Please consider supporting us by disabling your ad blocker. Thank you for your support.
Please consider supporting us by disabling your ad blocker.
Control a Smart Device using Tuya API and Python
In today's post, I will show you how to use Python and the internet of things to control a smart device. The internet of things is a system of interrelated sensors, software, and other technologies that can be connected to the internet to be controlled by software or communicate real-time data without involving a human being.
The device I'll be using in this tutorial is a smart light switch that can work with Alexa and Google Home:
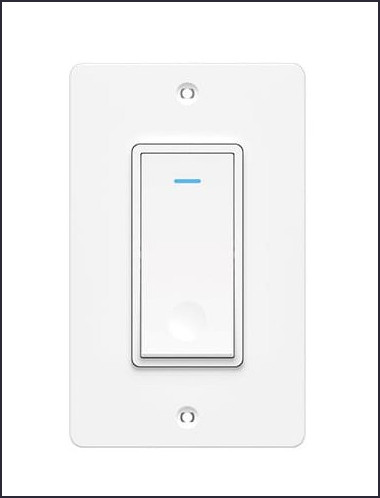
Actually, I will be using the virtual version of this device since I don't have the physical device. This will work exactly the same way if you had the physical device.
So in order to control this device, we need to connect it to the Tuya IoT platform. Then we can use Tuya's Open API to send post requests with Python.
To make the tutorial even more interesting, we will also see how to turn the device on/off depending on the temperature of the environment using Tuya's Weather Service API.
Sounds exciting, right? So let's not waste our time and get started.
This is a sponsored post on behalf of Tuya IoT Platform. All opinions are my own.
What is Tuya
Tuya is an Internet of Things (IoT) cloud platform that delivers a full suite of offerings to developers. Tuya connects different smart devices by providing hardware development tools, integrating public cloud services, and offering an intelligent business development platform.
So you can use the platform to connect hardware to the cloud and then use their API to control and monitor these objects.
Tuya has a SaaS Development Framework based on Tuya OpenAPI. The framework provides a full set of frontend and backend solution code to let you quickly build SaaS applications. You can use the SaaS Framework Demo to preview the functionalities and devices management interface.
At the time of writing, the framework integrates basic features such as user login, role permissions, device control ...
There is also a list of tutorials that allow you to master Tuya IoT Platform.
Create an Account on the Tuya IoT Platform
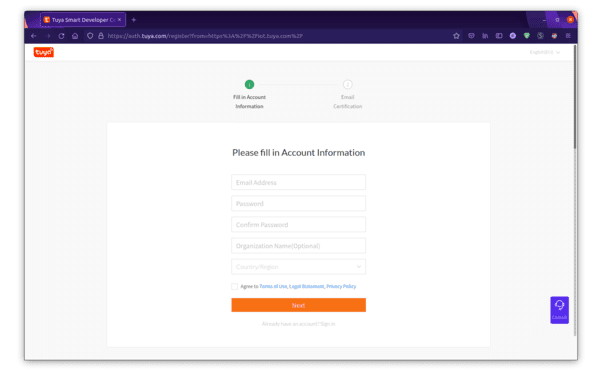
So we will start with all the required setup and authorization and the first thing we need to do is create an account with Toya.
Go to the sign up page and create an account
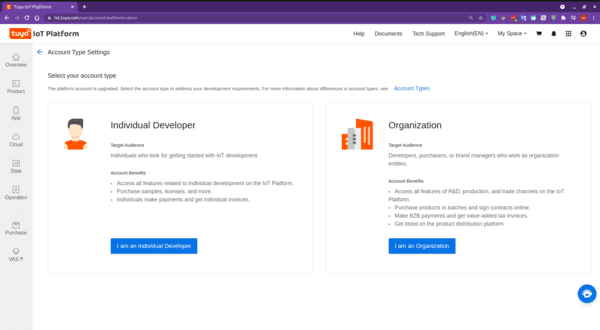
After that, you will be asked to choose if you are an individual developer or an organization; click on Set Now:
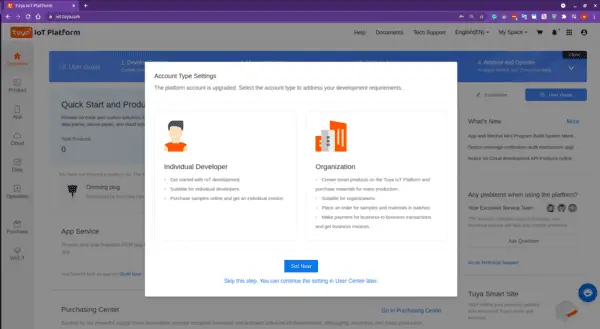
and choose I am an Individual Developer:
Next click Cloud > Development from the left navigation bar and then select the TRIAL EDITION option:
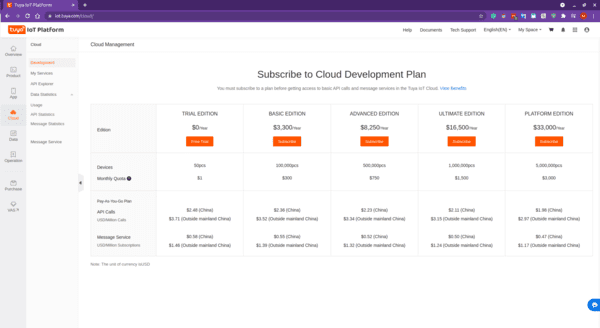
On the next page select TRIAL EDITION and click Buy Now. Don't worry, you don't have to add a credit card, the process is completely free.
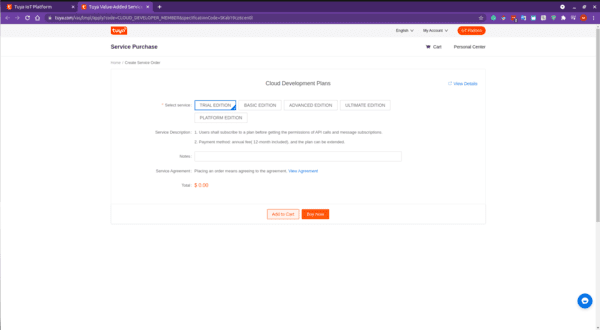
and select Submit Order on the next page. Again, don't worry this is completely free.

After that, you can see that your trial edition plan is running.
Now go back to the IoT platform by clicking on the IoT Platform button at the top right of the page and then click Cloud > Development
Create a Cloud Development Project
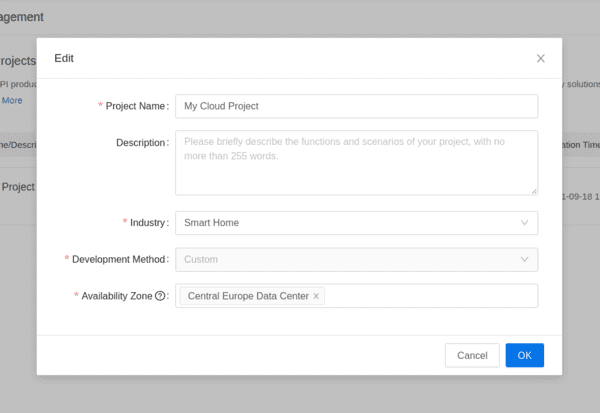
Now we need to create a cloud project. Click Create Cloud Project on the right side of the page. On the dialog box, fill in the form and click Create.
For Industry select Smart Home, for Development Method select Custom, and for Availability Zone select the server address corresponding to your area. For me it's Central Europe Data Center:
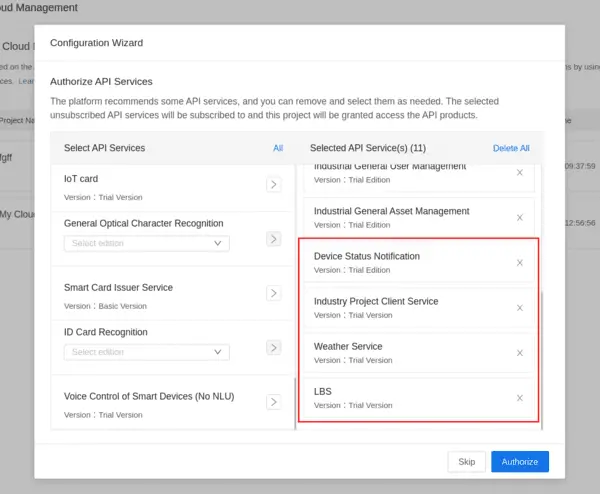
On the Authorize API Services page, you can see that there are some APIs services selected by default (on the right) but we also need to add other APIs. The ones that we are looking for are: Device Status Notification, Industry Project Client Service, Weather Service, and LBS API. Select them and click Authorize.
After that, you will see the Project Configuration page to create an asset and a user:
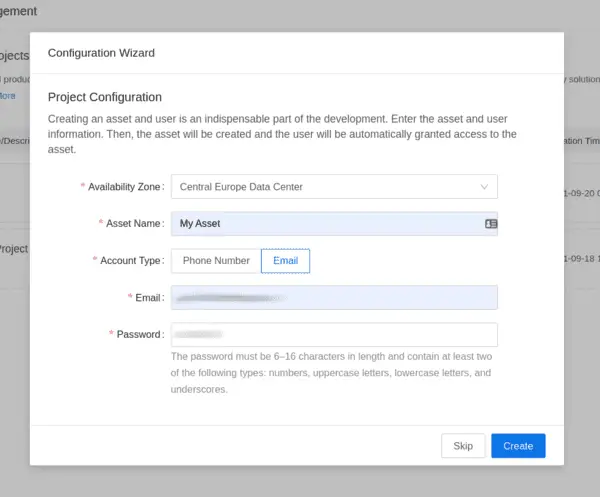
Fill in the form and make sure to keep in mind the account and password you configured. We will need that later.
Add Devices Using Virtual Device
In this step, we are going to add a virtual smart device to the asset we just created.
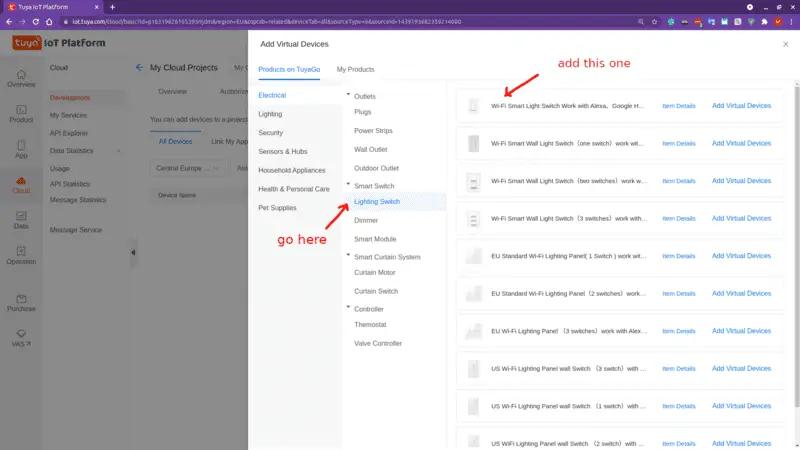
Under the Devices section, hover the mouse on Add Device, and click Add Virtual Device.
The device that we are looking for is called Wi-Fi Smart Light Switch... which you can find by clicking Electrical > Smart Switch > Lighting Switch.
To add it, simply click Add Virtual Devices:
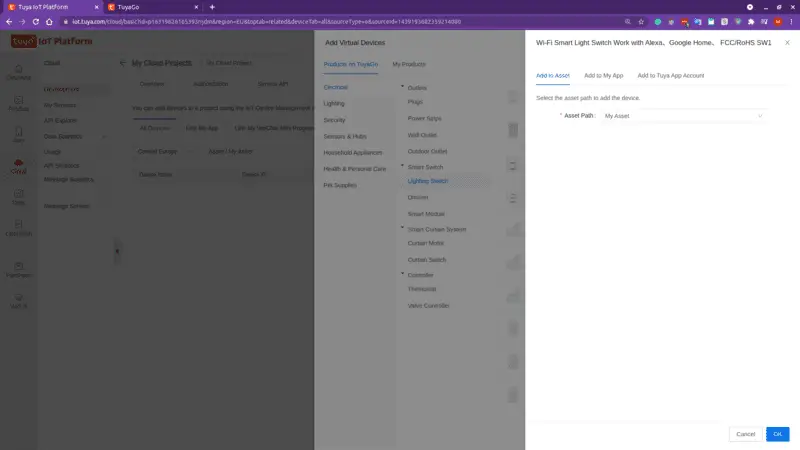
and then for the Asset Path just select the asset that you created before and click OK, for me I named it My Asset. So this will connect this device with that asset:
Download the IoT Device Management App
Now what we need to do is to download the IoT Device Management App on mobile.
Android version
Go to this link and scan the QR code to download the app.
iOS version
- Download TestFlight from Apple’s App Store.
-
Visit this link to get the IoT Device Management app.
Once you have installed the app, log in using the QR code of the project, the username, and the password you used when you created the asset and the user.
You can find the QR code of the project by going to Cloud > Development > My Cloud Project > Devices > Add Device > Add Device with IoT Device Management App
The image below shows the log in page on mobile:
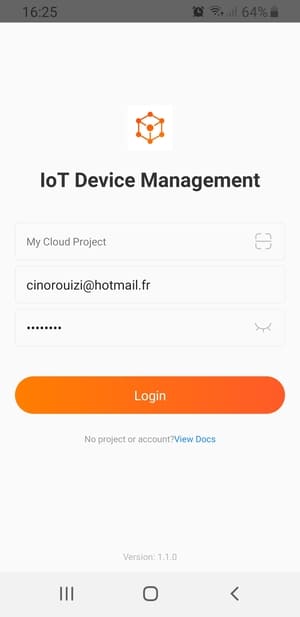
Note that this way you will be connected to your asset, not your Tuya account.
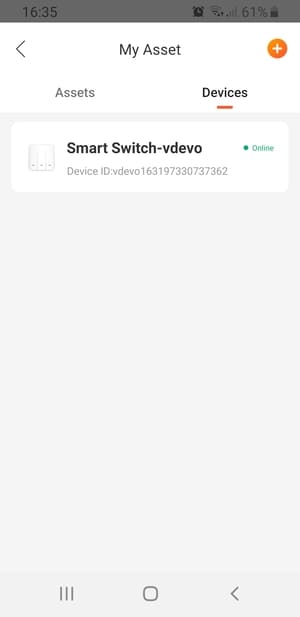
After that, you will be redirected to a page where you can see all your assets. Click on the asset we created before, then navigate to the Devices section, you should see the virtual device we added before.
Control the Device with Python
We are finally going to start writing some Python code to connect to the project and control the smart device.
First, we need to install the Tuya-iot-python-sdk package. Open a new terminal window and run this command:
pip3 install tuya-iot-py-sdkNow open a new file, name it tuya.py and let's see how to call the Tuya API:
from tuya_iot import TuyaOpenAPI

# Cloud project authorization info
ACCESS_ID = 'your-access-id'
ACCESS_KEY = 'your-access-key'

# Select an endpoint base on your project availability zone
# For more info, refer to: https://developer.tuya.com/en/docs/iot/api-request?id=Ka4a8uuo1j4t4
ENDPOINT = "https://openapi.tuyaeu.com"

# Project configuration
USERNAME = 'your-username'
PASSWORD = 'your-password'

DEVICE_ID = 'your-device-id'

# Initialization of tuya openapi
openapi = TuyaOpenAPI(ENDPOINT, ACCESS_ID, ACCESS_KEY)
openapi.connect(USERNAME, PASSWORD)
So we start by importing the TuyaOpenAPI class from the tuya_iot module
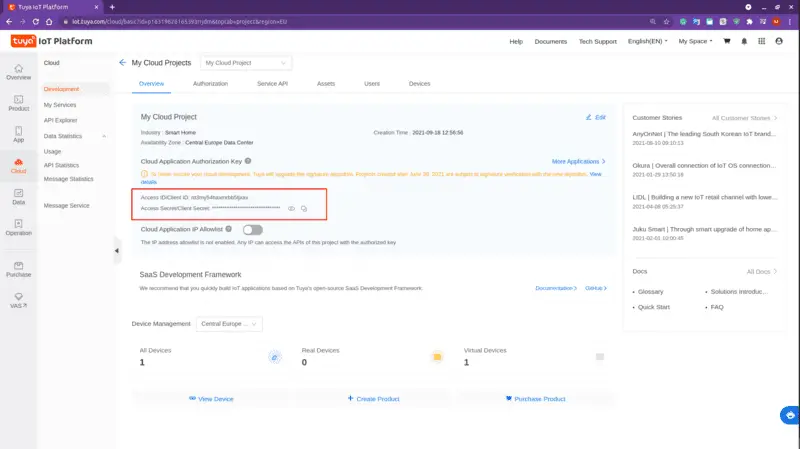
Then we set the configuration info to connect to our Tuya IoT account. You can find the ACCESS_ID and ACCESS_KEY keys by navigating to Cloud > Development > My Cloud Project:
The platform provides a separate endpoint in a different region. Go to this page and select an endpoint of the region where your device is deployed. This will reduce the response time of API requests.
The USERNAME and PASSWORD are the same ones you used to log into the app from your phone.
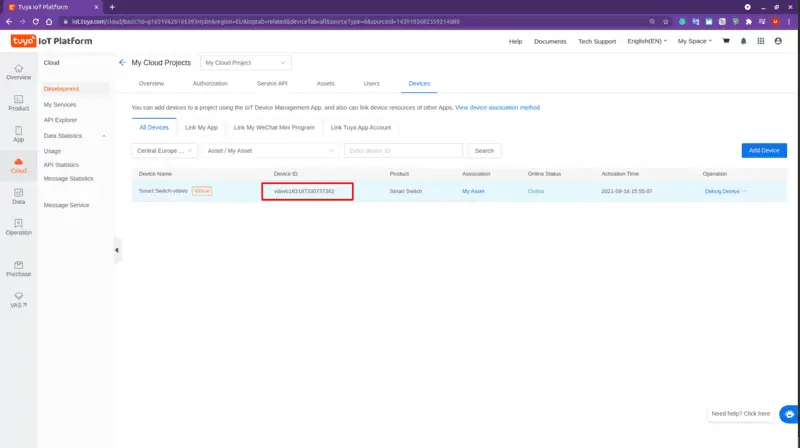
And you can get the DEVICE_ID by navigating to Cloud > Development > My Cloud Project > Devices:
Finally, we log in using the connect() function.
Now to control the device, we need to send a post request to a specific API address. You can go to the Device Control API page and navigate to Send instructions to the device from the right section to find more information about the API:
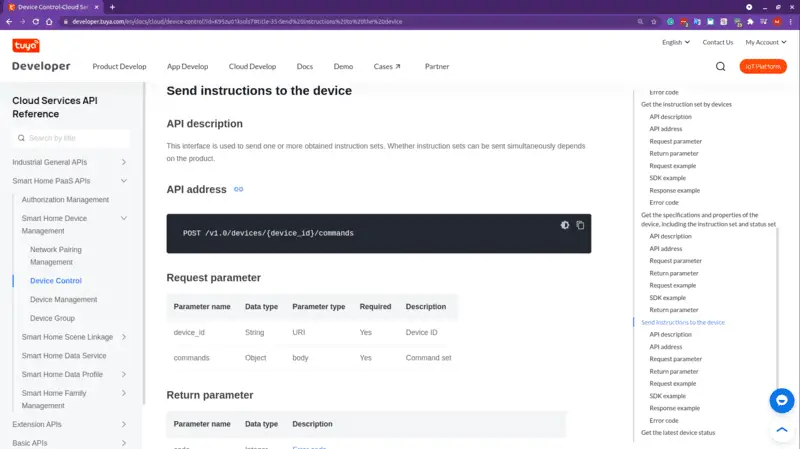
From that page, you can see that the API address is equal to /v1.0/devices/{device_id}/commands, and the request parameters are device_id and commands. Each device has a set of commands specific to it.
To find the list of commands for your device you can use the API Explorer (which you can find under Cloud > API Explorer).
Make sure to select Industrial General Device Control and then Get the instruction set of the device at the top left corner of the page. Then past the device ID on the field and hit Submit Request.
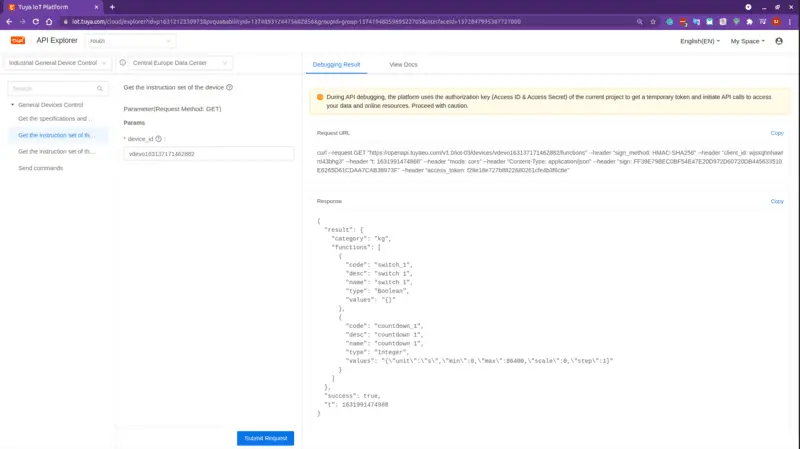
You can see that we can send switch_1 and countdown_1 commands to this device. The value that needs to be sent with the switch_1 command is a boolean type: True or False.
To test these commands on the API Explorer, you can navigate to the Send commands section at the left and past the device id, the command that you want to send, and the value for that command.
Great! So we have all the information we need to send a post request with Python to control the device.
Go back to the tuya.py file and write the following code:
commands = {'commands': [{'code':'switch_1','value': True}]}
request = openapi.post(f'/v1.0/iot-03/devices/{DEVICE_ID}/commands', commands)
print(request)
You should see something like this:
{'result': True, 'success': True, 't': 1632046886245}If you had opened your app on your mobile before sending this request, you will be able to see the device turn on automatically.
Turn the Device on/off Depending on the Temperature
Before finishing this tutorial, let's see how to turn the device on/off depending on the temperature outside.
It doesn't seem very logical to turn this device on/off depending on the temperature, but there is, for example, the valve controller device for which this will make sense. For example, we could use this product to open faucets to water trees when the temperature outside is high.
Now the way this valve controller device works is exactly the same as the smart light switch we used before, so we don't actually need to add it to test it with the weather API.
In order to get the weather, we must first know the longitude and latitude of our location. We can get the longitude and latitude of our location using the Location-Based Service API providing it our IP address.
And you can get your IP address from whatismyipaddress.com.
So to sum up, we need to get our IP address, send a get request to the Location-Based Service API to get the longitude and latitude of our position, and finally send a get request to the Weather Service API providing it our latitude and longitude.
Here is how to do it with Python:
# send a get request to get the longitude and latitude
location = openapi.get('/v1.0/iot-03/locations/ip?ip=your-ip-address')
print(location)
location = location['result']
latitude, longitude = location['latitude'], location['longitude']

# send a get request to get the temperature
weather_url = f'/v2.0/iot-03/weather/current?lat={latitude}&lon={longitude}'
weather = openapi.get(weather_url)
print(weather)
temperature = weather['result']['current_weather']['temp']

# if the temperature is above 30 °C we turn the device on
if float(temperature) >= 30:
    commands = {'commands': [{'code':'switch_1','value': True}]}
    request = openapi.post(f'/v1.0/iot-03/devices/{DEVICE_ID}/commands', commands)
The location variable contains a dictionary that looks like this:
{
  "result": {
    "continent_code": "AS",
    "country_code": "KR",
    "latitude": "37.5112",
    "longitude": "126.9741",
    "national_number": "82"
  },
  "success": true,
  "t": 1632070066216
}
So we grab the latitude and longitude and send a get request to the weather API.
The weather variable contains something like this:
{
  "result": {
    "air_quality": {
      "aqi": "54",
      // ...
    },
    "coordinate": {
      "lat": "37.51120",
      "lon": "126.97410"
    },
    "current_weather": {
      // ...
      "temp": "18",
      "uvi": "0",
      "wind_speed": "3.1"
    }
  },
  "success": true,
  "t": 1632070343417
}
We grab the temperature and send a post request to the device to turn it on if the temperature is above 30 °C.
Summary
The tutorial was a bit long because it was necessary to detail the configuration steps. I wanted to include a lot of images with each step to make sure you don't get lost.
Hopefully, this gave you a general idea of what is the internet of things and how to work with the Tuya IoT Platform.
I would like to thank Tuya for sponsoring this post and making the internet of things quite accessible. And as you saw, their documentation and API are super easy and intuitive to use and integrate with Python.
With just a few lines of code, we were able to control a smart device and turn it on/off depending on the temperature.
The final code is available on GitHub on my repository.
I hope you enjoyed this tutorial and if you have any questions just ask me in the comment section below. Thank you for reading this post and see you in the next one.
Previous Article

Image Classification with Python, TensorFlow and Deep Learning
Next Article
How to Read, Write, and Save Images with OpenCV and Python
Hi JP, thanks for the feedback! to be honest, I don't know what caused this error. But if you have followed the steps described in the tutorial and the error message appears I guess there may a problem with Tuya's servers or API. I think it would be better to contact the tuya support. If you ever manage to solve your problem, can you please share it here on the blog so that others can benefit? Thank you.
Jan. 12, 2022, 7:41 p.m.
Hi, great work. I did the "pip3 install tuya-iot-py-sdk" which worked, but then when I run your code (on an RPi 3B), I get an error internal to the typing library, cannot import 'Literal' from 'typing'. I can't seem to find any module called "typing.py".
April 11, 2022, 9:18 p.m.
Additional: found typing.py in /usr/lib/python3.7. I am very much a python intermediate but in typing under _all_ there does not seem to be 'Literal'. Maybe I'm not using the correct version of Python for this? Thanks.
April 11, 2022, 9:28 p.m.
So some more sleuthing: do I have to be running python 3.8? Seems per https://docs.python.org/3/library/typing.html, Literal is new in 3.8.
April 11, 2022, 9:34 p.m.
Update: So upgrading the RPi to Py3.8 seems to have worked - at least the error message is gone. I followed the procedure at https://itheo.tech/install-python-38-on-a-raspberry-pi and set Thonny to use the Py3.8 and set Python3.8 as default. But I am getting {'code': 1010, 'msg': 'token invalid', 'success': False, 't': 1649711661980, 'tid': '5b71f158b9dc11ecb417ae5e97192ed8'} which probably means I haven't found the correct codes. So still working on this.
April 11, 2022, 11:21 p.m.
Hi Berne,
I see you are making good progress with debugging x) great work.
I am not quite sure why you are getting the error message "{'code': 1010, 'msg': 'token invalid', ..." but I think there is something wrong with the data you are sending to the server.
Make sure you are using the correct device ID and API address. Also please do check the "ENDPOINT" variable and make sure it is pointing to the region where your device is deployed.
Hope this will help.
April 12, 2022, 11:58 a.m.
Thanks for the feedback and suggestion! Right now I am going to try Tinytua because I was able to locate how to find local keys, which are needed to run a device locally. But if that doesn't work, I'll come back to your methods here and see if I can fix the issue. If so and success will repost here for others. Thanks again! PS I am a hobbyist and just running python on a spare RPi to monitor my weather station, also RPi based, and if it freezes, to do a power cycle on it using a smart switch socket. Right now this is open loop control with SMS messaging, trying to close the loop. If I can't get Tuya to work I'll have to build a ESP32 controlled relay.
April 12, 2022, 5:07 p.m.
Thank you for letting me know Berne. Make sure to post the solution for others ;) Happy learning :)
April 12, 2022, 7:33 p.m.
Can access the URL for the open IoT?
{'code': 1114, 'msg': "your ip(XXX.XXX.XXX.XXX) don't have access to this API", 'success': False, 't': 1655783600023, 'tid': 'b08bc4acf11511ec88579287a6a8350d'}
June 21, 2022, 5:56 a.m.
Sorry @Jibun no Kage, I didn't understand what you are asking! Can you give more details about your issue?
June 21, 2022, 12:03 p.m.
Hi! Thanks for the great tutorial! Unfortunately, I'm currently stuck on the "add devices using virtual device" step. When I attempt it, a tiny popup appears at the top of the screen that says "server error". It's been doing this for two days now, though yesterday the message was different ("tuya System error. Please try again later(UNKNOWN)"). I'm wondering whether I messed something up while I was following the tutorial or if they're just generally having a problem on their end.

Any thoughts?
Thanks!
Jan. 12, 2022, 4:29 p.m.