Please consider supporting us by disabling your ad blocker. Thank you for your support.
Please consider supporting us by disabling your ad blocker.
Django Celery Result Backend

Celery uses a result backend to keep track of the tasks’ states. In the previous tutorial, we saw how Celery works and how to integrate it into a Django application.
In this tutorial, we are going to use the RPC (RabbitMQ/AMQP) result backend to store and retrieve the states of tasks.
Using RabbitMQ as a Result Backend
If you want to follow along, grab a copy of the project by running these commands:
$ git clone https://github.com/python-dontrepeatyourself/django-celery-result-backend
$ cd django-celery-result-backend
$ git checkout 5ef8acd985bd7808b8af3a52479d810bdd031b03

$ python3 -m venv venv
$ source venv/bin/activate
(venv) $ pip install -r requirements.txt
(venv) $ python manage.py runserver
I will assume that RabbitMQ is already installed on your machine; if not, please refer to the Install RabbitMQ as a Message Broker section of the previous tutorial to see how to install and run it.
First, add this configuration at the end of your settings module to enable the result backend:
CELERY_RESULT_BACKEND = 'rpc://localhost'Here is the task that we are going to use:
# core/tasks.py
@shared_task
def loop(l):
    "simulate a long-running task like export of data or generating a report"
    for i in range(int(l)):
        print(i)
        time.sleep(1)
    print('Task completed')
This task loops over the number that we pass it as an argument, printing a counter each second.
Start the worker:
(venv) $ celery -A mysite worker -l info

 -------------- celery@rouizi v5.1.2 (sun-harmonics)
--- ***** -----
-- ******* ---- Linux-5.8.0-63-generic-x86_64-with-glibc2.32 2021-08-10 12:48:25
- *** --- * ---
- ** ---------- [config]
- ** ---------- .> app:         mysite:0x7f5d18c2ccd0
- ** ---------- .> transport:   amqp://guest:**@localhost:5672//
- ** ---------- .> results:     rpc://
- *** --- * --- .> concurrency: 12 (prefork)
-- ******* ---- .> task events: OFF (enable -E to monitor tasks in this worker)
--- ***** -----
 -------------- [queues]
                .> celery           exchange=celery(direct) key=celery


[tasks]
  . core.tasks.add
  . core.tasks.loop
  . core.tasks.send_email_task

[2021-08-10 12:48:25,301: INFO/MainProcess] Connected to amqp://guest:**@127.0.0.1:5672//
[2021-08-10 12:48:25,308: INFO/MainProcess] mingle: searching for neighbors
[2021-08-10 12:48:26,334: INFO/MainProcess] mingle: all alone
Now, open a new terminal window, navigate to the project directory, activate the virtual environment, and run the shell:
(venv) $ python manage.py shell
Python 3.8.10 (default, Jun  2 2021, 10:49:15)
[GCC 10.3.0] on linux
Type "help", "copyright", "credits" or "license" for more information.
(InteractiveConsole)
>>> from core.tasks import loop
>>> task = loop.delay(30)
Each task has a unique identifier associated with it, and you can get it using the id attribute:
>>> task.id
'a247b12c-2904-4dbc-b867-7524e694381b'
We can also check whether the task has finished or not using the ready() method:
>>> task.ready()
False
In this example, the task will run for about 30 seconds. After that time, the task.ready() will return True.
Another interesting expression you can try with the task object is to look at the task state:
>>> task.state
'PENDING'
# after the worker finishes processing the task
>>> task.state
'SUCCESS'
Now we are going to create a custom state that will allow us to keep track of the status of the task.
Edit the task function as follows:
from mysite.celery import app


@app.task(bind=True)
def loop(self, l):
    for i in range(int(l)):
        print(i)
        time.sleep(1)
        self.update_state(state='PROGRESS',
                          meta={'current': i, 'total': l})
    print('Task completed')
    return {'current': 100, 'total': 100, }
Here we bounded the task using bind=True. This will give us access to the self argument, which we then use to update the task state.
Celery has some built-in states like PENDING, STARTED, SUCCESS,... But we can easily create a custom state.
Here I created a custom state called PROGRESS, which allows us to know that the task is currently in progress. We also included the current and total number of iterations in the metadata to keep track of the progression of the task.
We can use these pieces of information on the client-side to display a progress bar or a percentage of the completion of the task (You'll need to stop and rerun the worker for the changes to take effect).
>>> task = loop.delay(30)
>>> task.state
'PROGRESS'
>>> task.info
{'current': 4, 'total': 30}

# in case the user sends invalid data
>>> task = loop.delay('abc')
>>> task.state
'FAILURE'
>>> task.info
ValueError("invalid literal for int() with base 10: 'abc'")
Integrating with the Django Application
Now we need to create a view function that starts the loop() task.
from django.http import JsonResponse
from .tasks import loop


def run_long_task(request):
    if request.method == 'POST':
        l = request.POST.get('l')
        task = loop.delay(l)
        return JsonResponse({"task_id": task.id}, status=202)
So the client will send a POST request to this view with the l parameter to indicates for how long the user wants to run the task. The view starts the task asynchronously and returns the task ID to the client. We also used the status code 202, which indicates that the request has been accepted for processing.
We also need to define another view that will be responsible for getting the task status:
from celery.result import AsyncResult

# ...

def task_status(request, task_id):
    task = AsyncResult(task_id)

    if task.state == 'FAILURE' or task.state == 'PENDING':
        response = {
            'task_id': task_id,
            'state': task.state,
            'progression': "None",
            'info': str(task.info)
        }
        return JsonResponse(response, status=200)
    current = task.info.get('current', 0)
    total = task.info.get('total', 1)
    progression = (int(current) / int(total)) * 100 # to display a percentage of progress of the task
    response = {
        'task_id': task_id,
        'state': task.state,
        'progression': progression,
        'info': "None"
    }
    return JsonResponse(response, status=200)
To get access to the task, we used the AsyncResult class, passing it the task id.
In the if block, we check if the task hasn't yet started (PENDING state) or has failed (FAILED state). If the task hasn't yet started, task.info will return None, and if it failed task.info will return the exception that was raised.
In either case, we can't get the current and total number of iterations to calculate the percentage of the progression, so we set it to "None".
The code below the if block is used to calculate the progression of the task and set the value of the "info" key to "None".
Don't forget to add routes for those two views:
# mysite/views.py
# ...
from core.views import index, home, run_long_task, task_status

urlpatterns = [
    # ...
    path('run-long-task/', run_long_task, name='run_long_task'),
    path('task-status/<str:task_id>/', task_status, name='task_status'),
]
That's all we need to do on the server-side.
Client-Side Javascript
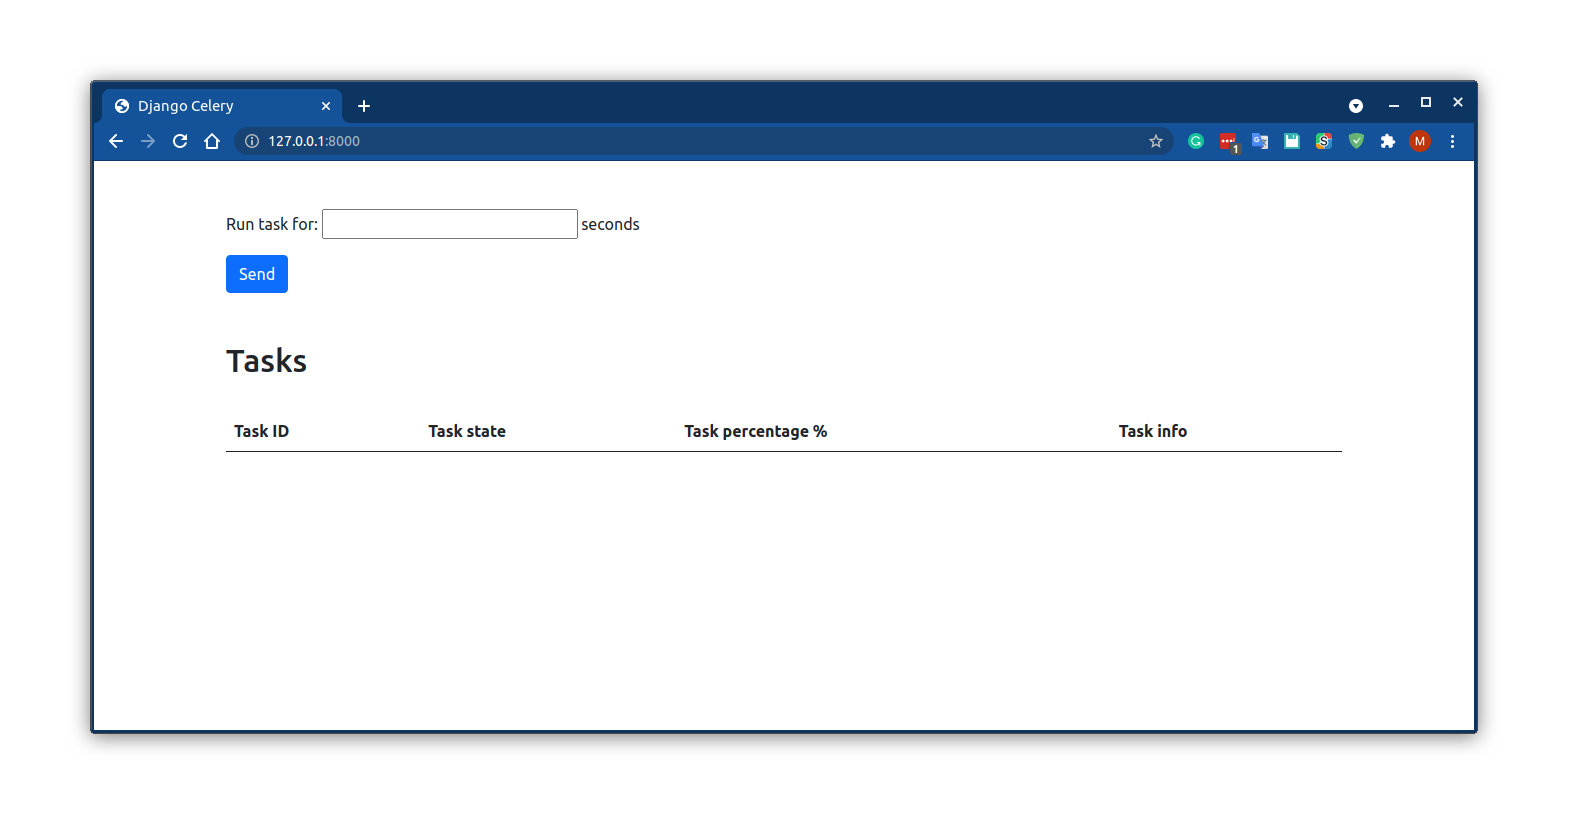
On the client-side, we have a simple form that asks the user for the number of seconds that will be used as a parameter to run the task.
Once the user submits the form, we send the following ajax POST request to the run_long_task view to start the Celery background job:
<!-- core/templates/home.html -->
<script>
  $(document).ready(function() {
    $('form').submit(function(e) {
      e.preventDefault()

      $.ajax({
        url: '/run-long-task/',
        type: 'POST',
        data: {
          l: $('#id_number').val(),
          csrfmiddlewaretoken: $('[name=csrfmiddlewaretoken]').val()
        }
      })
      .done((response) => {
        updateState(response.task_id)
      })
      .fail((error) => console.log(error))
    })

  })
</script>
When the ajax POST request gets a response from the server, the callback function obtains the task id and calls another function (updateState()) to updates the UI elements.
So let's create the updateState() function:
<script>
  $(document).ready(function() {
    /* ... */

    function updateState(taskID) {
      $.ajax({
        url: `task-status/${taskID}/`,
        type: 'GET'
      })
      .done(response => {
        const data = `
          <th>${response.task_id}</th>
          <td>${response.state}</td>
          <td>${response.progression}</td>
          <td>${response.info}</td>
          `
        const tr = $('#' + response.task_id)
        // if the element exists, update it
        if (tr.length) {
          tr.html(data)
        }
        // otherwise, create a new row in the table
        else {
          const tableBody = `<tr id='${response.task_id}'>${data}</tr>`
          $('tbody').append(tableBody)
        }

        // task is finished
        if (response.state == "FAILURE" || response.state == "SUCCESS") {return false}
        // rerun every 2 seconds
        setTimeout(function() {
          updateState(response.task_id)
        }, 2000)
      })
      .fail(error => console.log(error))
    }

  })
</script>
This function is called every two seconds to continue polling the task status and update the UI until the Celery task succeeded (response.state == "SUCCESS") or failed (response.state == "FAILURE").
When the function is called, a GET request is sent to the task_status view along with the task id. When a response is received, it creates some HTML elements and updates the previous row in the table if we are still dealing with the previous task or creates a new row in the table if this is a new task.
Here is the final result:
Summary
With this tutorial and the previous one, we saw how to use celery and keep track of tasks using a result backend.
Hopefully, this has given you a more complete idea of how celery works.
Feel free to write a comment in the section below.
The code examples used in this tutorial is available on GitHub: https://github.com/python-dontrepeatyourself/django-celery-result-backend
Previous Article
Asynchronous Tasks in Django with Celery and RabbitMQ
Next Article
How to Crop Images with OpenCV and Python
Hi Steve, Thank you for the feedback. unfortunately, I can't help you since I don't have the code. but I think that you might have a problem with your AJAX request.
Sorry if I can't help you further.
Jan. 25, 2022, 12:25 p.m.
Appreciating the dedication you put into your site and in depth information you offer.
It's nice to come across a blog every once in a while that isn't the same old rehashed information.
Fantastic read! I've saved yyour site and I'm adding your RSS feeds tto my Google account.
June 15, 2022, 7:10 p.m.
Greta thanks for the positive feedback, I really appreciate it!
June 15, 2022, 10:28 p.m.
Jan. 20, 2022, 5:32 p.m.