Please consider supporting us by disabling your ad blocker. Thank you for your support.
Please consider supporting us by disabling your ad blocker.
Django Todo App with AJAX and jQuery
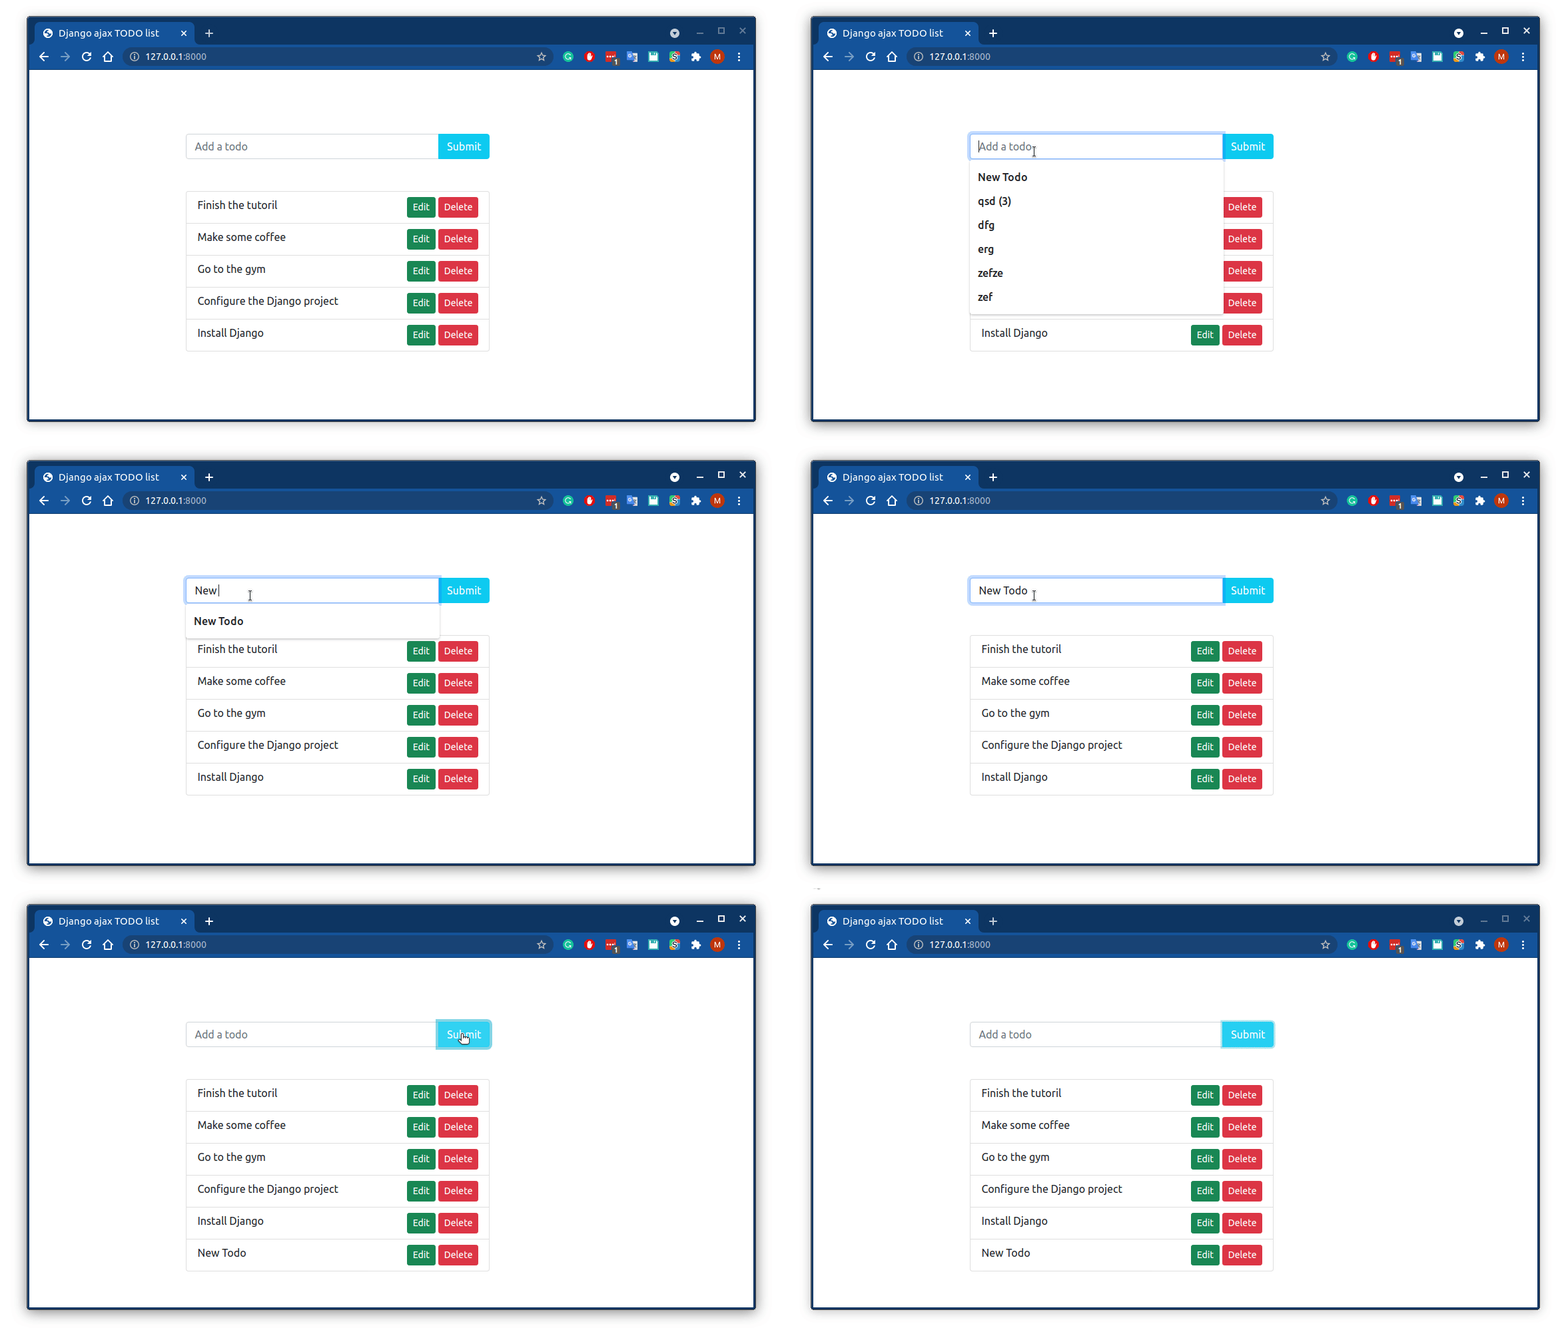
In this tutorial, we are going to use jQuery and AJAX to send requests to a Django backend to add the CRUD (Create, Read, Update, Delete) operations asynchronously. For this, we are going to build a simple todo application.
Using AJAX allows us to update parts of the page on the fly without reloading the complete web page. This is very useful to have an optimal user experience.
Project Setup
Let's start by creating a new directory with a new Django project called django-ajax-todo:
mkdir django-ajax-todo && cd $_
python3 -m venv venv
source venv/bin/activate
pip install django
django-admin startproject app .
django-admin startapp core
Next, add the core app to the INSTALLED_APPS variable in settings.py:
# app/settings.py
INSTALLED_APPS = [
    'django.contrib.admin',
    'django.contrib.auth',
    'django.contrib.contenttypes',
    'django.contrib.sessions',
    'django.contrib.messages',
    'django.contrib.staticfiles',

    'core' # add this
]
Now update the urls.py file to include the URLs of the core app:
# app/urls.py
from django.contrib import admin
from django.urls import path, include # add this


urlpatterns = [
    path('admin/', admin.site.urls),
    path('', include('core.urls')), # add this
]
Create the urls.py file within the core app, and add a URL to the home page:
touch core/urls.py# core/urls.py
from django.urls import path
from . import views
urlpatterns = [
path('', views.home, name='home'),
]
The home view does not exist yet, so let's add it:
# core/views.py
from django.shortcuts import render


def home(request):
    return render(request, 'todo.html')
Now we need to create the templates folder and the todo.html file:
mkdir core/templates
touch core/templates/todo.html
<!-- core/templates/todo.html -->
<!doctype html>
<html lang="en">
<head>
<!-- Required meta tags -->
<meta charset="utf-8">
<meta name="viewport" content="width=device-width, initial-scale=1">
<!-- Bootstrap CSS -->
<link href="https://cdn.jsdelivr.net/npm/bootstrap@5.0.2/dist/css/bootstrap.min.css" rel="stylesheet" integrity="sha384-EVSTQN3/azprG1Anm3QDgpJLIm9Nao0Yz1ztcQTwFspd3yD65VohhpuuCOmLASjC" crossorigin="anonymous">
<title>Django ajax TODO list</title>
</head>
<body>
<div class="container mt-5">
<form class="row mt-5 pt-5" id="form">
<div class="col-12 col-lg-6 offset-lg-2">
<div class="input-group">
<input type="text" class="form-control" id="todo_name" placeholder="Add a todo" required>
<button type="submit" class="text-white btn btn-info">Submit</button>
</div>
</div>
</form>
<div class="row my-5">
<div class="col-12 col-lg-6 offset-lg-2">
<ul class="list-group">
<!-- List of todos goes here -->
</ul>
</div>
</div>
</div>
<script src="https://code.jquery.com/jquery-3.6.0.min.js" integrity="sha256-/xUj+3OJU5yExlq6GSYGSHk7tPXikynS7ogEvDej/m4=" crossorigin="anonymous"></script>
<script src="https://cdn.jsdelivr.net/npm/bootstrap@5.0.2/dist/js/bootstrap.bundle.min.js" integrity="sha384-MrcW6ZMFYlzcLA8Nl+NtUVF0sA7MsXsP1UyJoMp4YLEuNSfAP+JcXn/tWtIaxVXM" crossorigin="anonymous"></script>
<script></script>
</body>
</html>
We also need to update the settings.py file to include the templates folder:
# app/settings.py
TEMPLATES = [
    {
        'BACKEND': 'django.template.backends.django.DjangoTemplates',
        'DIRS': [BASE_DIR / 'templates'],
        # ...
Our model will be as simple as the one below:
# core/models.py
from django.db import models


class TODO(models.Model):
    name = models.CharField(max_length=100, unique=True)
    completed = models.BooleanField(default=False)

    def __str__(self):
        return self.name
I made the assumption that the todo's name must be unique (unique=True).
Let's add this model to the admin:
# core/admin.py
from django.contrib import admin
from .models import TODO

admin.site.register(TODO)
Finally, let's run the migration and fire the server:
python manage.py makemigrations
python manage.py migrate
python manage.py runserver
We are all set! Here is our home page:

Listing Todos
So our todo app will have the CRUD operations (Create, Read, Update, Delete) and in this section, we will start with the Read operation.
We just need to send a GET request:
<!-- core/template/todo.html -->
<!-- ... -->
<script>
  $(document).ready(function() {
    // send a GET request to build the list of todos
    $.ajax({
      url: '/todo-list/',
      type: 'GET',
      dataType: 'json',
    }).done(function(response) {
        console.log(response) // let's just print the data in the console for now
      })
  })
</script>
When a user navigates to the home page, an AJAX GET request is sent to the server to grab the list of todos.
This is what each parameter represents:
- url: We provide a URL to which we want to send the request. We can also use Django's {% url %} tag to specify a dynamic URL.
- type: We specify the type of the request. In this case, we are using a simple GET request.
- dataType: The type of data that we are expecting back from the server. In this case, we are expecting the data to be in JSON format.
- done: This is a function that is called if the request succeeds. For now, we just show the data that we get from the server in the console.
Note that the .success callback is deprecated since jQuery 1.8+. Instead, we are using the .done callback to a successful AJAX request.
We need a simple view to list the todos:
# core/views.py
from django.shortcuts import render
from django.http import JsonResponse
from .models import TODO

# ...

def todo_list(request):
    todos = TODO.objects.all()
    return JsonResponse({'todos': list(todos.values())})
Note that we are using the JsonResponse class to return a JSON-encoded response to the AJAX request.
Also, we are using the values() method of the model to return a dictionary rather than model instances. That's because the Queryset object is not JSON serializable.
Let's add a route for this view in the urls.py file:
# core/urls.py
# ...

urlpatterns = [
    path('', views.home, name='home'),
    path('todo-list/', views.todo_list, name='todo-list'), # add this
]
Now let's go back to the template to add the list of todos after we get a response from the server:
<!-- core/templates/todo.html -->
<!-- ... -->
<script>
  $(document).ready(function() {
    // send a GET request to build the list of todos
    $.ajax({
      url: '/todo-list/',
      type: 'GET',
      dataType: 'json',
    }).done(function(response) {
        for (var i in response.todos) {
          var todo = `<span>${response.todos[i].name}</span>`

          var item = `
          <li class="list-group-item d-flex justify-content-between">
            ${todo}
            <div>
              <button id="edit" class="btn btn-success btn-sm" type="submit">Edit</button>
              <button id="delete" class="btn btn-danger btn-sm" type="submit">Delete</button>
            </div>
          </li>
          `
          $('.list-group').append(item) // append the new item to the <ul> tag
        }
      })
  })
</script>
Once we get the data from the server, we loop over it and add the todo's name along with an edit and delete button in an <li> tag.
We make sure to append each <li> tag to the <ul> tag.
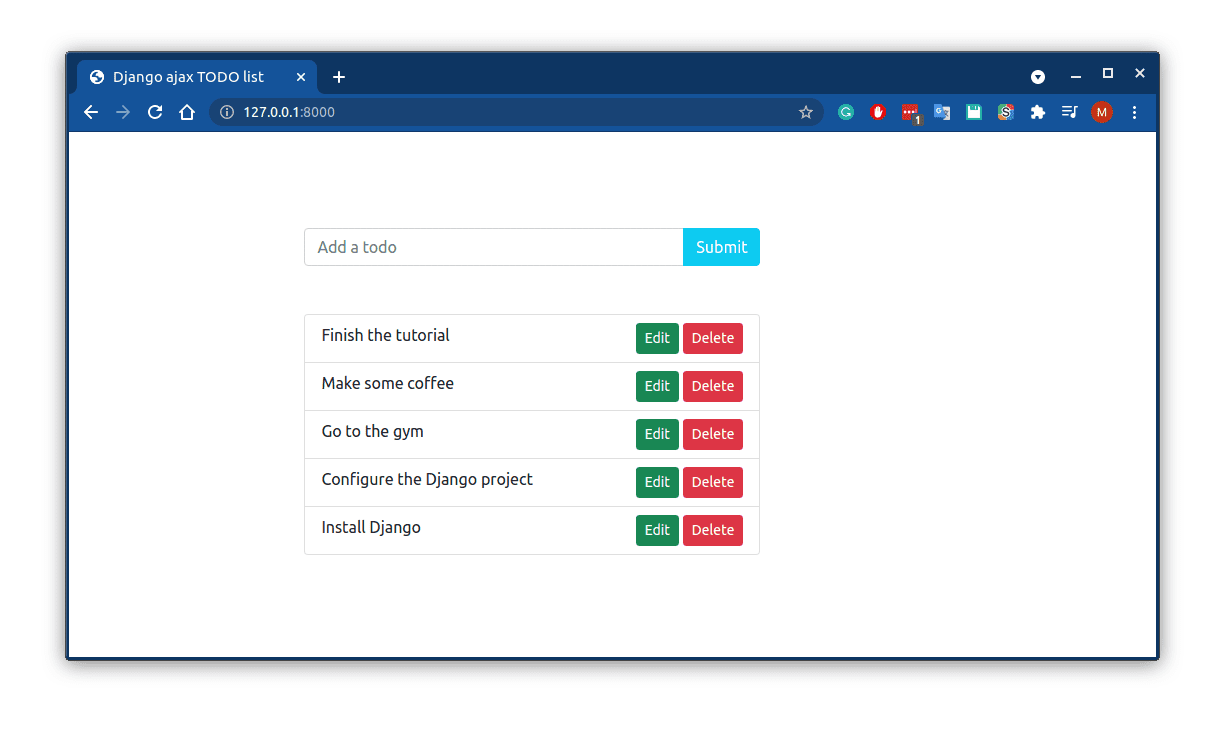
Here is what the home page will look like after adding some todos via the admin:
Create a Todo
Now we want to handle the form submission to add an entry to the database and dynamically add the new todo.
<!-- core/template/todo.html -->
<!-- ... -->
<script>
  $(document).ready(function() {
    /* ... */
    /* send a POST request to create a todo */
    $('#form').submit(function(e) {
      e.preventDefault(); // prevent the page from reload
      var url = "/todo-create/"
      var data = {
        todo_name: $('#todo_name').val(),
        csrfmiddlewaretoken: csrftoken,
      }

      $.ajax({
        url: url,
        type: 'POST',
        data: data,
      }).done(function(response) {
          console.log(response) // let's just print the data in the console for now
        })
      $(this).trigger('reset') // reset the form
    })
  })
</script>
We are listening to the form submission using the .submit() method. e.preventDefault() prevents the form from reloading the page on submission.
We are using the data variable to store the data that will be sent to the server. Since this is a POST request, we need to send the CSRF token with our request.
You can see that we are using the csrftoken variable which does not exist yet, so we have to define it somewhere.
The Django documentation provides us a function that will get the CSRF token for us. So let's use it just before the POST request:
<!-- ... -->
<script>
  $(document).ready(function() {
    // get the CSRF token
    function getCookie(name) {
      let cookieValue = null;
      if (document.cookie && document.cookie !== '') {
          const cookies = document.cookie.split(';');
          for (let i = 0; i < cookies.length; i++) {
              const cookie = cookies[i].trim();
              // Does this cookie string begin with the name we want?
              if (cookie.substring(0, name.length + 1) === (name + '=')) {
                  cookieValue = decodeURIComponent(cookie.substring(name.length + 1));
                  break;
              }
          }
      }
      return cookieValue;
    }
    const csrftoken = getCookie('csrftoken');

    /* ... */

    $('#form').submit(function(e) {
      /* ... */
    })
  })
</script>
Just like that, we have the CSRF token to use in our POST request.
Now the view function:
# core/views.py
# ...

def todo_create(request):
    if request.method == 'POST':
        todo_name = request.POST.get('todo_name')
        todo = TODO.objects.filter(name=todo_name)

        # we need to make sure that this todo does not exist in the database
        if todo.exists():
            return JsonResponse({'status': 'error'})

        todo = TODO.objects.create(name=todo_name)
        return JsonResponse({'todo_name': todo.name, 'status': 'created'})
In our view, we get the todo's name from the POST request and we need to make sure that there is no todo with the same name in the database.
Let's not forget to add a route in the urls.py file:
# core/urls.py
# ...
urlpatterns = [
    # ...
    path('todo-create/', views.todo_create, name='todo-create'),
]
And finally the template:
<script>
  $(document).ready(function() {

    /* ... */

    $('#form').submit(function(e) {

      /* ... */

      $.ajax({
        url: url,
        type: 'POST',
        data: data,
      }).done(function(response) {
          if (response.status === 'error') {
            alert("todos must have unique name.")
          } else if (response.status === 'created') {
            var temp = `
            <li class="list-group-item d-flex justify-content-between">
              <span>${response.todo_name}</span>
              <div>
                <button id="edit" class="btn btn-success btn-sm" type="submit">Edit</button>
                <button id="delete" class="btn btn-danger btn-sm" type="submit">Delete</button>
              </div>
            </li>
            `
            $('.list-group').append(temp)
          }
        })
      $(this).trigger('reset')
    })
  })
</script>
If we get the 'error' message from the server we let the user know that a todo with the same name already exists. Otherwise, we just append the new todo at the end of the <ul> tag.
We used the .trigger() method to reset the form after it was submitted. In this context, this refers to the form.

Update a Todo
With jQuery we can use the .click() method to bind the click event to an element in the HTML:
$("#edit").click( function() {
    // do something
});
But since the list of todos (<li> tags) is added dynamically to the template, the .click() method will not work.
Instead, we can use the .on() click method:
$('ul').on('click', 'li', function() {
    // we do nothing here for now
    // we will use this click event on the li tag, later on, to
    // mark a todo as complete/incomplete
}).on('click', '#edit', function(event) {
    // do something when the user clicks on the edit button
})
This is called event delegation: The event ('click') is attached to the static parent (<ul>) of the element that should be handled (<li>).
As per the documentation:
Delegated event handlers have the advantage that they can process events from descendant elements that are added to the document at a later time. By picking an element that is guaranteed to be present at the time the delegated event handler is attached, you can use delegated event handlers to avoid the need to frequently attach and remove event handlers.
We need to chain the .on() method because the <li> tag is added dynamically to the HTML page. We can't just do $('li').on('click', '#edit', function() {...}).
Now when the user clicks the edit button, we need to update the form field to include the todo's name to let the user change the name:
<script>
  $(document).ready(function() {
    var editedItem = null;

    /* ... */

    /* attach the click event to the dynamic li tag */
    $('ul').on('click', 'li', function() {
      // We do nothing here for now
    }).on('click', '#edit', function(event) {
      // we need to atach the click event to the button after
      // the li tag is created, otherwise this will not work
      event.stopPropagation(); // prevent the parent handler from being notified of the event
      var li_tag = $(this).parent().parent() // `this` refer to the edit button

      editedItem = li_tag
      $('#todo_name').val(editedItem.children().first().text())
    })
  })
</script>
We used the stopPropagation() method to prevent the <li> tag from being notified of the click event on the edit button. If we don't do that, every time we click the edit button, the click event on the <li> tag will also be fired.
To get the name of the edited item, we used .children().first().text(). Then we put it in the form's field (which has the todo_name ID).
Now we need to make some changes to the form submission process:
<script>
  $(document).ready(function() {
    /*  ... */

    $('#form').submit(function(e) {

      /* ... */

      if (editedItem != null) {
        var url = "/todo-edit/"
        var data = {
          todo_name: editedItem.children().first().text(), // the todo's name that we want to change
          new_todo_name: $('#todo_name').val(), // the new todo's name
          csrfmiddlewaretoken: csrftoken
        }
      }

      $.ajax({
        /* ... */
      }).done(function(response) {
          if (response.status === 'error') {
            /* ... */
          } else if (response.status === 'created') {
            /* ... */
          } else if (response.status === 'updated') {
            editedItem.children().first().text(response.new_todo_name)
            editedItem = null;
          }
        })
      $(this).trigger('reset')
    })

    /* ... */
  })
</script>
We check whether the editedItem variable is null or not. If not this means the user submitted the form after clicking on the edit button, so we need to change the data that will be sent to the server.
We need to send the previous todo's name as well as the new todo's name to the server.
We can get the new todo's name from the form field which has the ID todo_name.
The todo's name we want to change is in the <li> tag which is stored in the editedItem variable, by doing editedItem.children().first().text() we get the todo's name.
Here I anticipated the response we will get from the server when the todo's name is changed. We simply change the todo's name using the editedItem variable and set it back to null.
If you are stuck, you can refer to the source code of the project to compare it with your code.
On the server-side, the todo_edit view will be almost similar to the todo_create view:
urls.py
# core/views.py
# ...
urlpatterns = [
    # ...
    path('todo-edit/', views.todo_edit, name='todo-edit'),
]
views.py
# core/views.py

# ...

def todo_edit(request):
    if request.method == "POST":
        todo_name = request.POST.get('todo_name')
        new_todo_name = request.POST.get('new_todo_name')
        edited_todo = TODO.objects.get(name=todo_name)

        # if a todo with a name equal to `new_todo_name`
        # we return an error message
        if TODO.objects.filter(name=new_todo_name).exists():
            return JsonResponse({'status': 'error'})

        edited_todo.name = new_todo_name
        edited_todo.save()

        context = {
            'new_todo_name': new_todo_name,
            'status': 'updated'
        }
        return JsonResponse(context)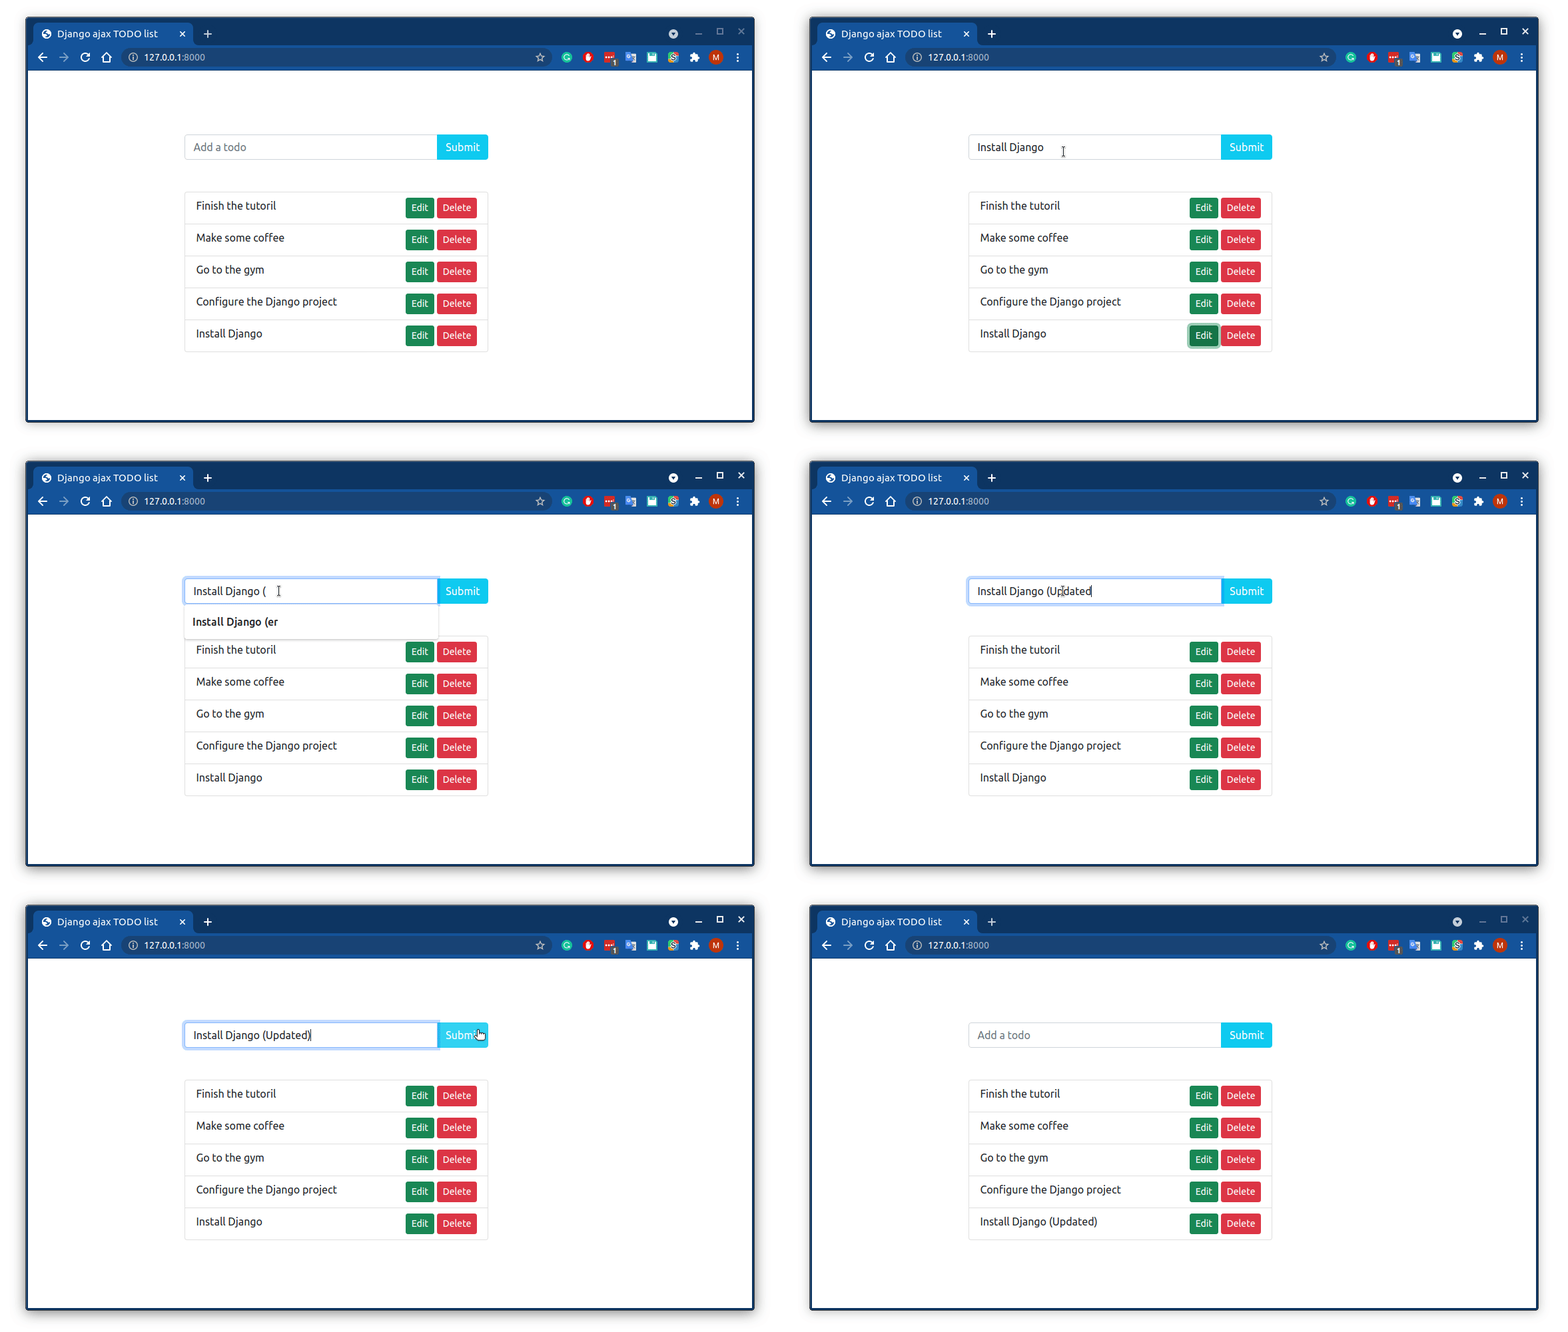
Delete a Todo
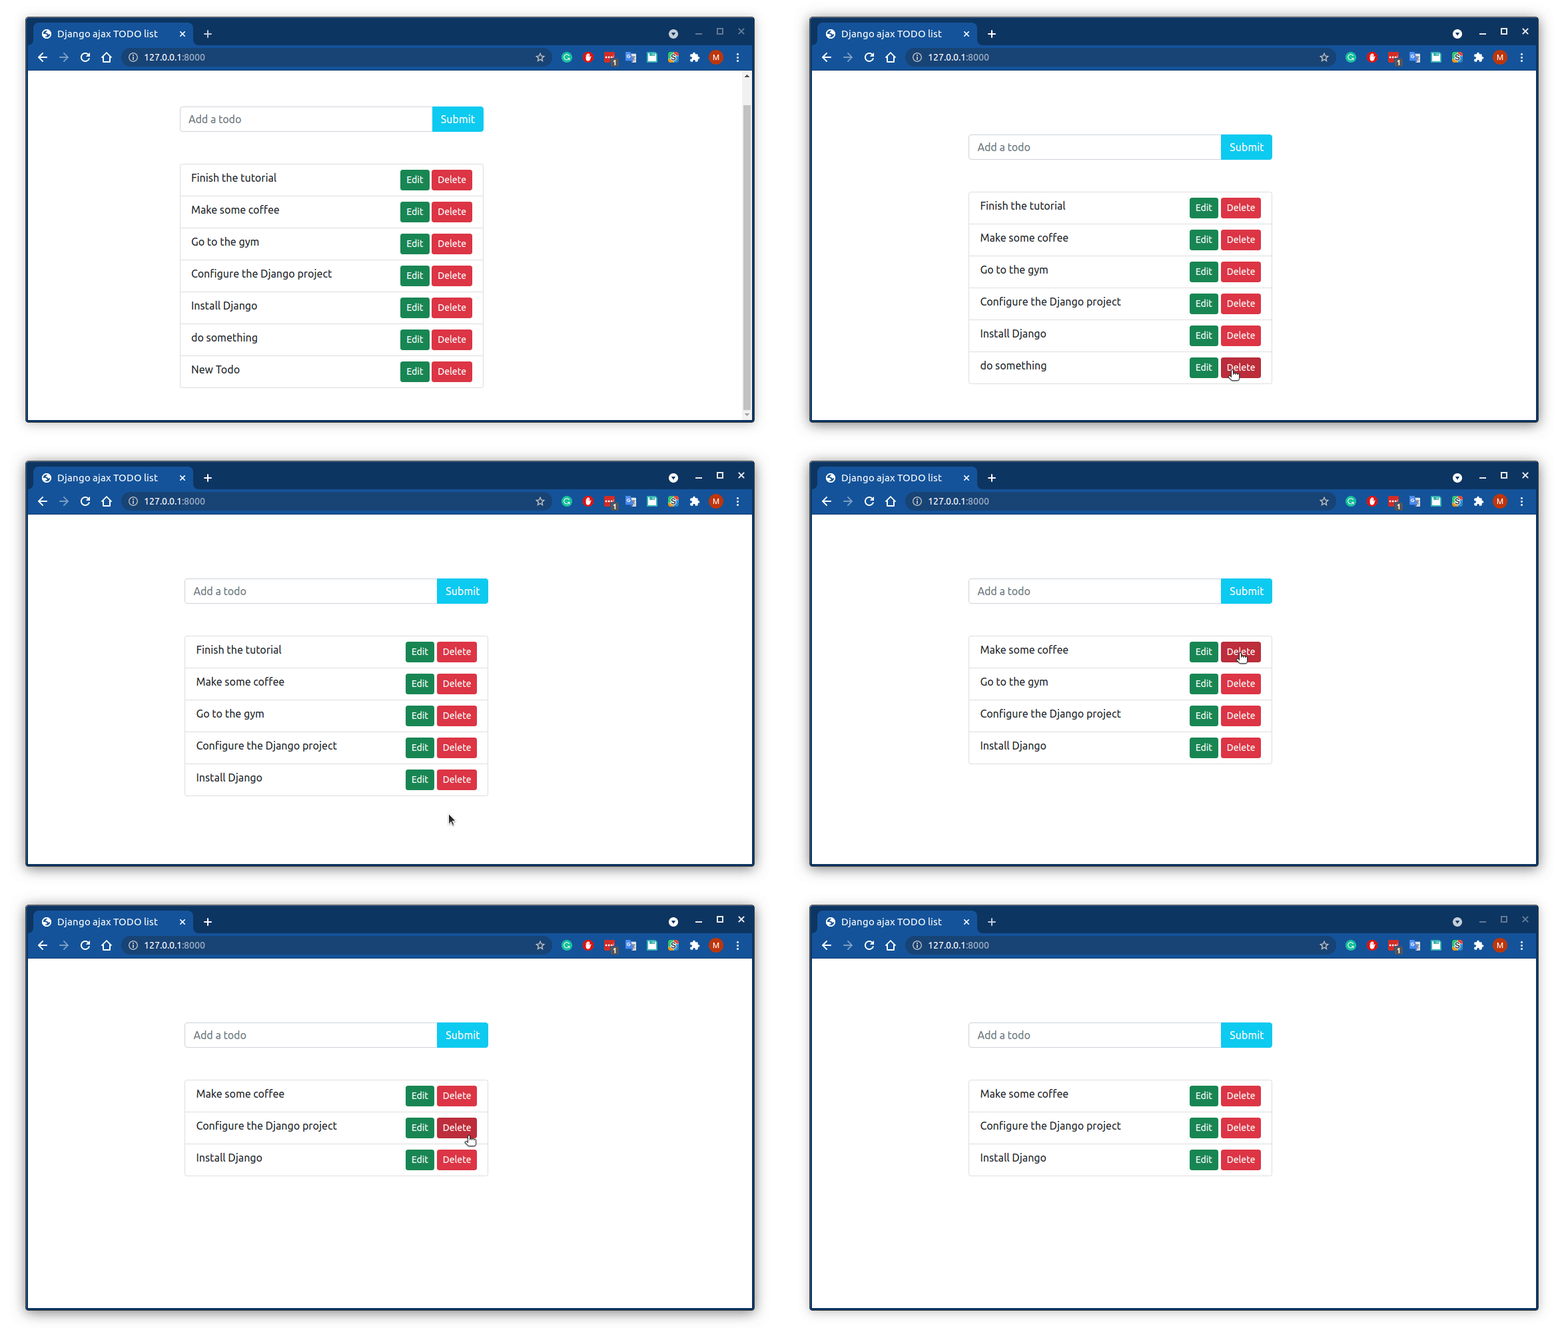
The delete feature is the simplest.
urls.py
from django.urls import path

from . import views

urlpatterns = [
    path('', views.home, name='home'),
    path('todo-list/', views.todo_list, name='todo-list'),
    path('todo-create/', views.todo_create, name='todo-create'),
    path('todo-edit/', views.todo_edit, name='todo-edit'),
    path('todo-delete/', views.todo_delete, name='todo-delete'), # add this
]
views.py
# ...

def todo_delete(request):
    if request.method == 'POST':
        todo_name = request.POST.get('todo_name')
        TODO.objects.filter(name=todo_name).delete()
        return JsonResponse({'status': "deleted"})
todo.html
<script>
  $(document).ready(function() {

    /*  ... */

    $('ul').on('click', 'li', function() {
      /* ... */
    }).on('click', '#edit', function(event) {
      /* ... */
    }).on('click', '#delete', function(event) {
      event.stopPropagation()
      var url = "/todo-delete/"
      var li_tag = $(this).parent().parent()

      $.ajax({
        url: url,
        type: 'POST',
        data: {
          todo_name: li_tag.children().first().text(),
          csrfmiddlewaretoken: csrftoken
        },
      }).done(function(response) {
          if (response.status === 'deleted') {
            li_tag.remove()
          }
        })
    })
  })
</script>
And here is the result:
Mark a Todo as Complete/Incomplete
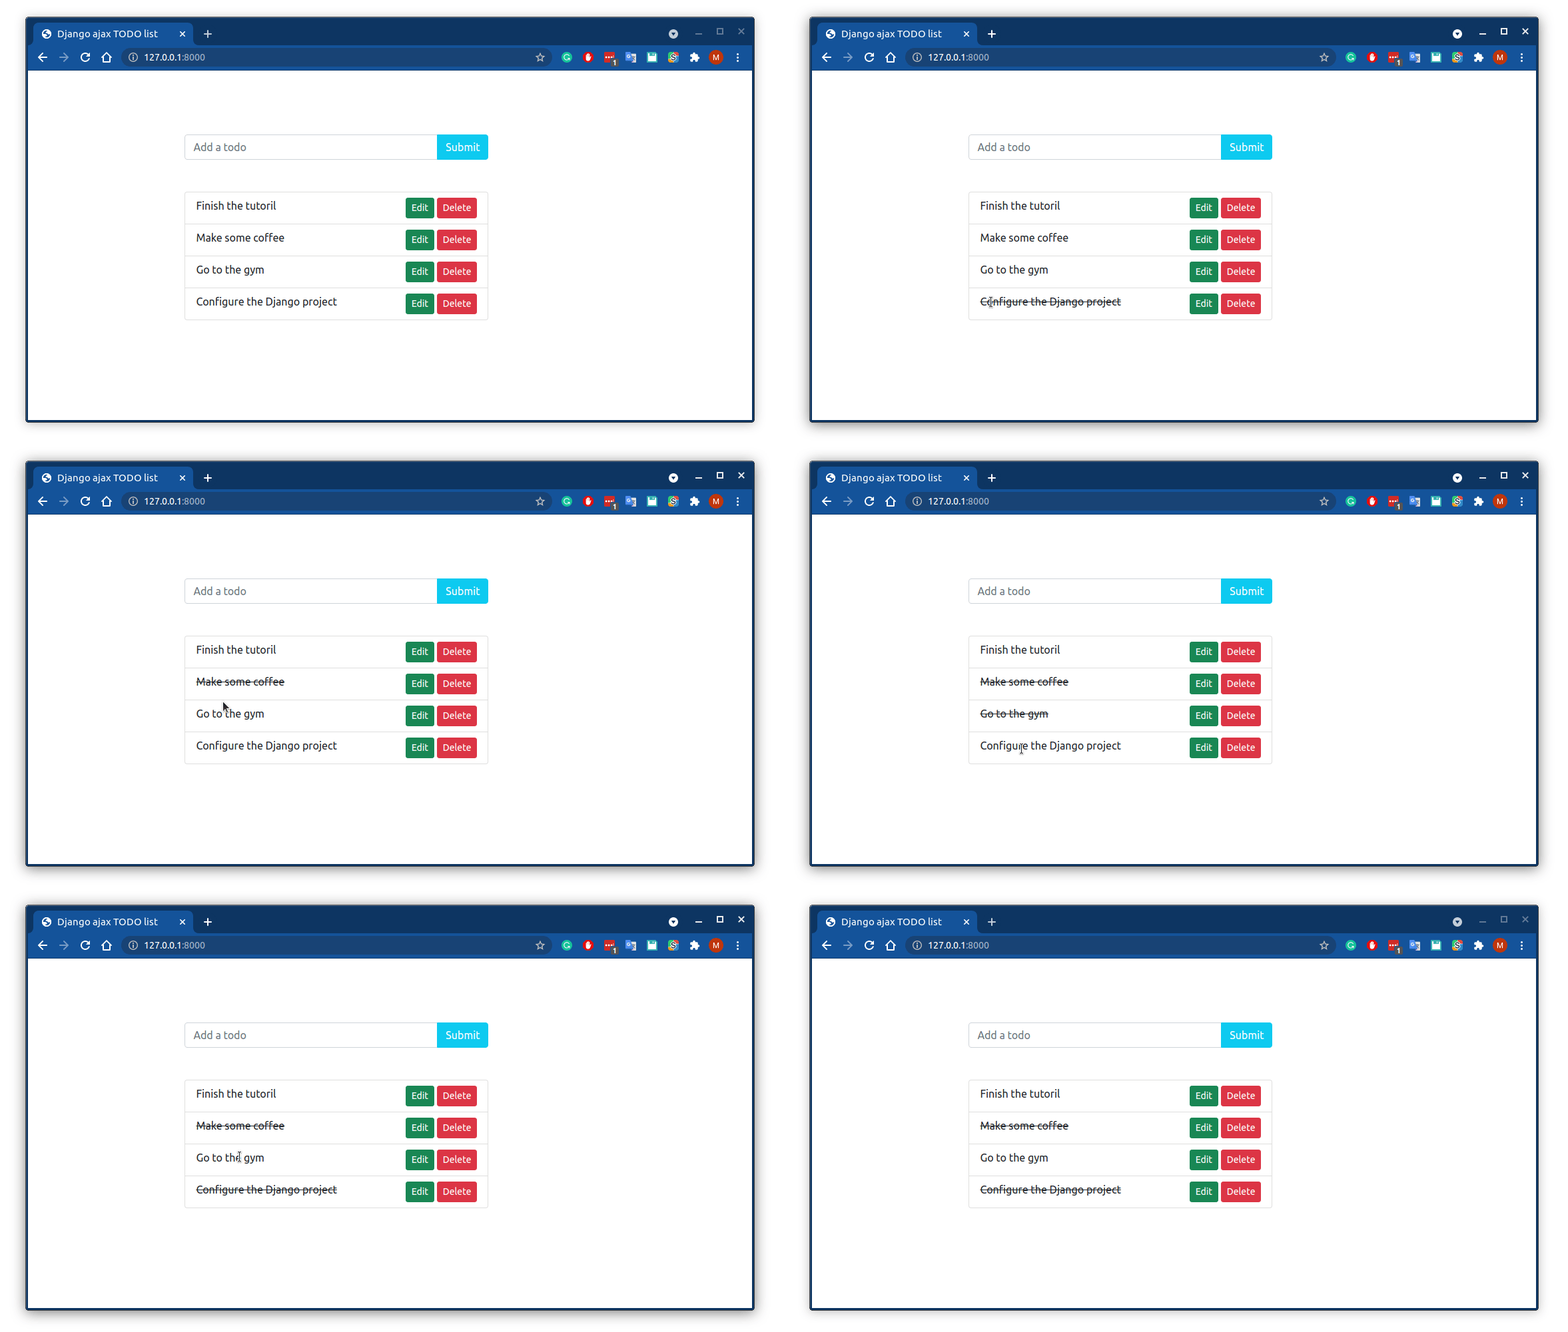
The last thing to do is to add the ability to click on the todos to mark them as complete or incomplete. We will do this in the click event which was bind to the <li> tag.
todo.html
<script>
  $(document).ready(function() {

    /*  ... */

    $('ul').on('click', 'li', function() {
      var url = "/todo-edit/"
      // `this` refer to the li tag
      var todo_name = $(this).children().first().text()
      var span_tag = $(this).children().first()
      //  check whether the span tag has a children element or not (we will add it later)
      // return 1 if the span tag has a chlidren and 0 otherwise
      var completed = span_tag.children().length

      if (!completed) {
        // mark the todo as completed since the user just clicked on it
        completed = 1
      } else {
        // mark the todo as incompleted since the user just clicked on it
        completed = 0
      }

      $.ajax({
        url: url,
        type: 'POST',
        data:{
          todo_name: todo_name,
          completed: completed,
          csrfmiddlewaretoken: csrftoken
        },
      }).done(function(response) {
          console.log(response) // just print the response for now
        })
    }).on('click', '#edit', function(event) {
      /* ... */
    }).on('click', '#delete', function(event) {
      /* ... */
    })
  })
</script>
To mark a todo as complete, we will later add (after we get a response from the server) a <del> tag around the todo's name so that it appears to be deleted.
So to check whether a todo is marked as completed or not, we just search for the <del> tag which will be the children element of the <span> tag (in the code above this is equivalent to span_tag.children().length).
Now, we need to make some changes to the todo_edit view:
# ccore/views.py
# ...

def todo_edit(request):
    if request.method == "POST":
        todo_name = request.POST.get('todo_name')
        # the `new_todo_name` variable will be None in this case
        # because we didn't send it in the AJAX request
        # we still need it in case the user wants to edit the todo's name
        new_todo_name = request.POST.get('new_todo_name')
        completed = request.POST.get('completed')
        edited_todo = TODO.objects.get(name=todo_name)

        # if the completed variable is not None this means that the user
        # wants to mark the todo as complete/incomplete, otherwise the
        # user wants to edit the todo's name
        if completed:
            if completed == '0':
                edited_todo.completed = False
                edited_todo.save()
                return JsonResponse({'status': 'updated'})
            elif completed == '1':
                edited_todo.completed = True
                edited_todo.save()
                return JsonResponse({'status': 'updated'})

        if TODO.objects.filter(name=new_todo_name).exists():
            return JsonResponse({'status': 'error'})

        edited_todo.name = new_todo_name
        edited_todo.save()

        context = {
            'new_todo_name': new_todo_name,
            'status': 'updated'
        }
        return JsonResponse(context)
Now that we have the response from the server, we can edit the HTML:
<script>
  $(document).ready(function() {

    /*  ... */

    $('ul').on('click', 'li', function() {
      /* ... */

      $.ajax({
        /* ... */
      }).done(function(response) {
          if (response.status == 'updated' & completed) {
            span_tag.empty() // remove the text from the span tag (remove the todo's name)
            span_tag.append(`<del>${todo_name}</del>`)
          } else if (response.status === 'updated' & !completed) {
            span_tag.remove($('del'))
            span_tag.text(todo_name)
          }
        })
    }).on('click', '#edit', function(event) {
      /* ... */
    }).on('click', '#delete', function(event) {
      /* ... */
    })
  })
</script>
Also, there is a small change that needs to be done in the GET request that is sent to the server to build the list of todos.
Before building the list of todos, we have to check whether the todo is marked as completed or not so that we know whether we add the <del> tag around the todo's name or not:
<script>
  $(document).ready(function() {
    /* CSRF stuff here */
    /*  ... */

    // send a GET request to build the list of todos
    $.ajax({
      url: '/todo-list/',
      type: 'GET',
      dataType: 'json',
    }).done(function(response) {
        for (var i in response.todos) {
          var todo = `<span>${response.todos[i].name}</span>`
          // Now we need to check if the todo is marked as completed or not
          // if so, we add the del tag around the todo's name
          if (response.todos[i].completed) {
            var todo = `<span><del>${response.todos[i].name}</del></span>`
          }
          var item = `
          <li class="list-group-item d-flex justify-content-between">
            ${todo}
            <div>
              <button id="edit" class="btn btn-success btn-sm" type="submit">Edit</button>
              <button id="delete" class="btn btn-danger btn-sm" type="submit">Delete</button>
            </div>
          </li>
          `
          $('.list-group').append(item)
        }
      })

    /* ... */
  })
</script>
Here is the final result:
Summary
In this tutorial, we saw how to use jQuery to send asynchronous requests to a server to create a todo application.
AJAX is the best choice when you want to send some asynchronous requests to your application. If you want to build a single page application you should consider using a javascript framework like vue.js or react.js.
You can grab the code from the django-ajax-todo-jquery repository on GitHub.
Previous Article

How to Customize the Validation of Forms in Django
Next Article
