Please consider supporting us by disabling your ad blocker. Thank you for your support.
Please consider supporting us by disabling your ad blocker.
How to Remove Background with OpenCV
In this tutorial, we will learn how to use OpenCV to remove background from videos using a technique named background subtraction.
Background subtraction is a common technique used in computer vision to detect moving objects in a video. It is a very useful technique for security, surveillance, traffic monitoring, etc.
The basic idea of background subtraction is to detect moving objects in a video by subtracting the background from the foreground. The background is a static image which is assumed to be the same throughout the video. The foreground is the moving object in the video. The background is subtracted from each frame of the video to get the foreground.
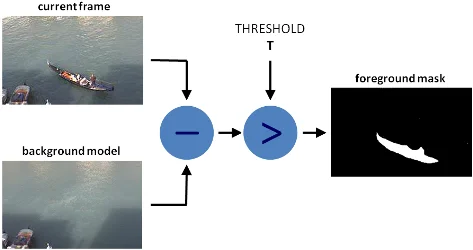
Background Subtraction Scheme (image source)
In general, we don't have a static background image. So we need to find a way to estimate the background. There are many ways to do this. We will be using a Gaussian Mixture-based Background/Foreground Segmentation Algorithm. It is a very simple and efficient algorithm. The algorithm uses a Gaussian Mixture Model (GMM) to model each pixel.
It is based on the fact that every pixel in a video has a distribution of colors. The distribution is different for the background and the foreground.
Since the background is assumed to be the same throughout the video, the pixels are background most of the time.
So the shape of the distribution for the background pixels will be taller and narrower than the foreground pixels. So we can use this fact to separate the background from the foreground.
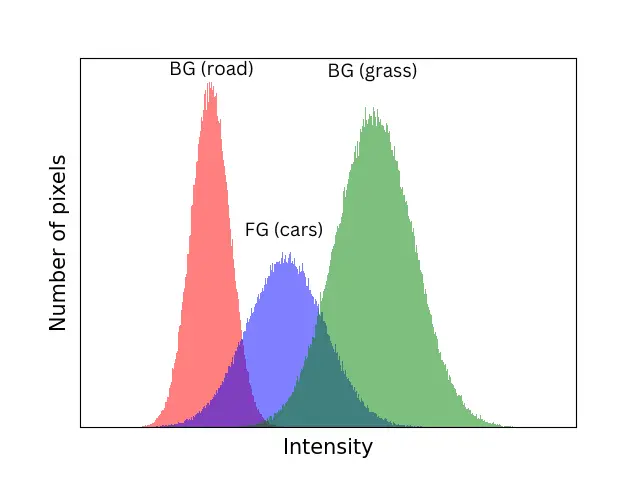
As you can see in the image above, the background pixel intensity forms a narrow distribution (since the background is assumed to be the same throughout the video) while the foreground pixel intensity forms a wide distribution.
Background Subtraction with OpenCV
OpenCV provides a class called BackgroundSubtractorMOG2 which implements the Gaussian Mixture-based Background/Foreground Segmentation Algorithm. It is a very efficient algorithm and is capable of detecting shadows.
This class takes three optional parameters:
- history: Length of the history. The default value is 500
- varThreshold: This is a threshold value for the pixel-model match that determines whether a pixel is well described by the background model or not. The default value is 16.
- detectShadows: A boolean value that determines whether the algorithm detects shadows or not. The default value is True.
Let's see how to apply the background subtraction algorithm to a video.
import cv2
import numpy as np

# Create a VideoCapture object
video_cap = cv2.VideoCapture("cars.mp4")
# initialize the background subtractor object
background_sub = cv2.createBackgroundSubtractorMOG2()
We have created a VideoCapture object to read the video. We have also created a BackgroundSubtractorMOG2 object to apply the background subtraction algorithm.
Now we will read each frame of the video and apply the background subtraction algorithm to it.
# loop through the video frames
while True:
    # read the video frame
    success, frame = video_cap.read()

    # if there are no more frames to show, break the loop
    if not success:
        break

    # apply the background subtractor to the frame
    mask = background_sub.apply(frame)
    # convert the mask to 3 channels
    mask = cv2.cvtColor(mask, cv2.COLOR_GRAY2BGR)
    # stack the frame horizontally
    hstacked_frames = np.hstack((frame, mask))
    cv2.imshow("Frame and Mask", hstacked_frames)

    # if the 'q' key is pressed, stop the loop
    if cv2.waitKey(30) == ord("q"):
        break

# release the video capture object
video_cap.release()
cv2.destroyAllWindows()
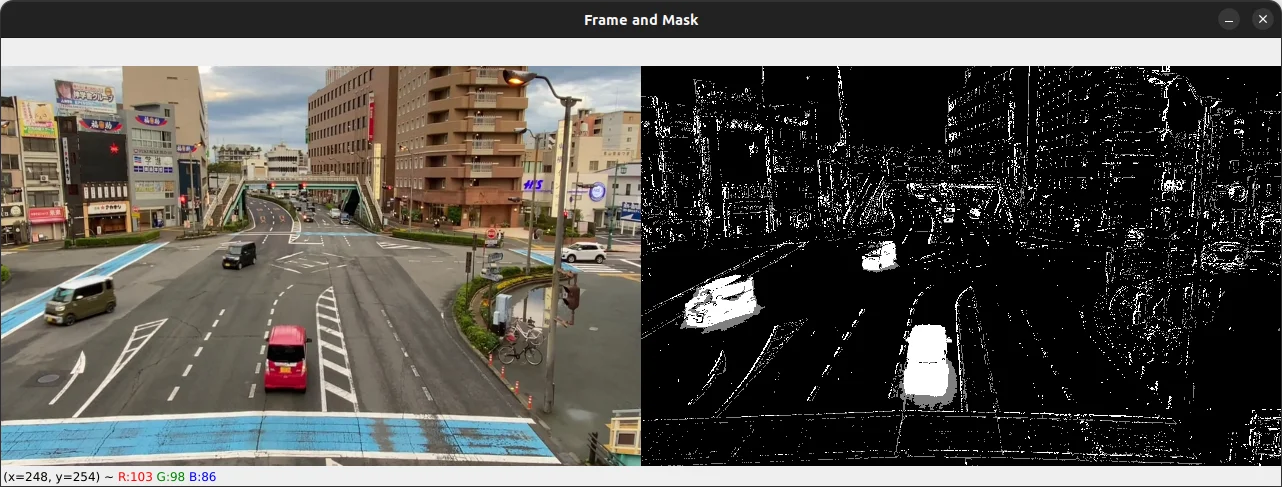
So here we have created a while loop to read each frame of the video, applied our background subtractor algorithm to each frame, and displayed the frame and the mask side by side.
The mask is a binary image where the background pixels are black (0) and the foreground pixels are white (255).
The image below shows a screenshot of the output of the above code.
Object Detection with Background Subtraction
Now that we have removed the background from the video, we can use the mask to detect the moving objects in the video.
We will first apply the opening morphological operation to the mask to remove some noise. Then we will find the contours of the moving objects in the mask using the findContours function
import cv2
import numpy as np

# Create a VideoCapture object
video_cap = cv2.VideoCapture("cars.mp4")
# initialize the background subtractor object
background_sub = cv2.createBackgroundSubtractorMOG2()

while True:
    # read the video frame
    success, frame = video_cap.read()

    # if there are no more frames to show, break the loop
    if not success:
        break

    # apply the background subtractor to the frame
    mask = background_sub.apply(frame)
    # apply the opening morphological operation to the mask to remove the noise
    kernel = np.ones((5, 5), np.uint8)
    opening = cv2.morphologyEx(mask, cv2.MORPH_OPEN, kernel, iterations=1)

    # get the contours of the moving objects
    contours, _ = cv2.findContours(opening, cv2.RETR_EXTERNAL, cv2.CHAIN_APPROX_SIMPLE)

    # mask = cv2.cvtColor(mask, cv2.COLOR_GRAY2BGR)
    # stack the frame horizontally
    hstacked_frames = np.hstack((mask, opening))
    cv2.imshow("Frame and the opening operation", hstacked_frames)

    # if the 'q' key is pressed, stop the loop
    if cv2.waitKey(30) == ord("q"):
        break

# release the video capture object
video_cap.release()
cv2.destroyAllWindows()
Here is the result:
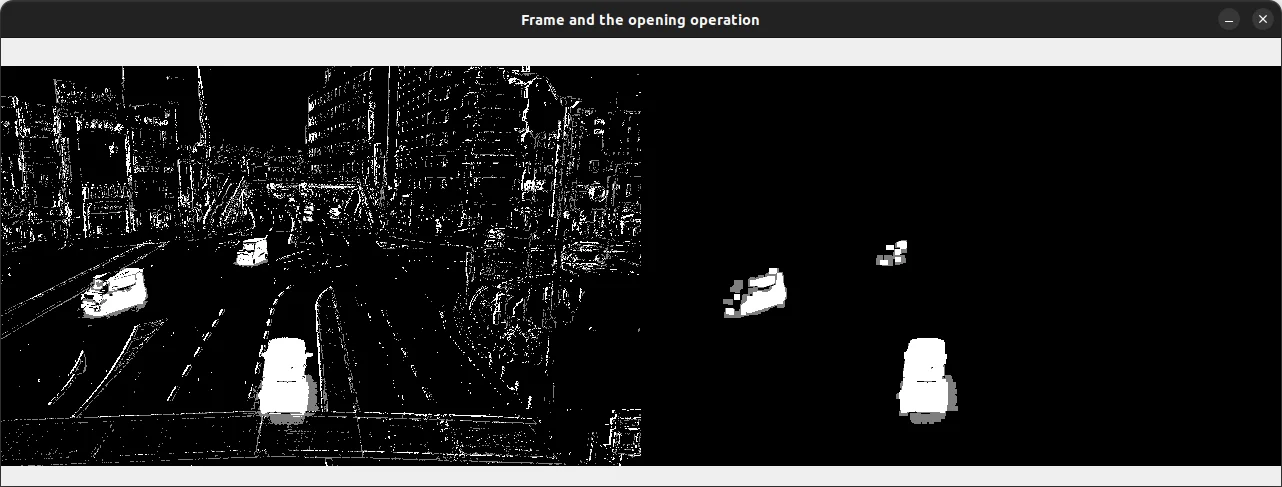
As you can see, lots of noise has been removed from the mask. We can now use the contours to detect the moving objects in the video and draw a bounding box around them.
    # ...
    opening = cv2.morphologyEx(mask, cv2.MORPH_OPEN, kernel, iterations=1)

    # get the foreground frame using the mask and the original frame
    new_frame = cv2.bitwise_and(frame, frame, mask=mask)

    # get the contours of the moving objects
    contours, _ = cv2.findContours(opening, cv2.RETR_EXTERNAL, cv2.CHAIN_APPROX_SIMPLE)

    # loop over the contours
    for contour in contours:
        # if the contour is too small, ignore its
        if cv2.contourArea(contour) > 1000:
            # get the bounding rectangle of the contour
            (x, y, w, h) = cv2.boundingRect(contour)
            # draw the bounding rectangle on the frame
            cv2.rectangle(frame, (x, y), (x + w, y + h), (0, 255, 0), 2)

    # convert the mask and the opening binary frames to 3 channels
    mask = cv2.cvtColor(mask, cv2.COLOR_GRAY2BGR)
    opening = cv2.cvtColor(opening, cv2.COLOR_GRAY2BGR)
    # stack the frame horizontally
    hstacked_frames = np.hstack((frame, new_frame))
    hstacked_frames1 = np.hstack((mask, opening))
    # stack the frame vertically
    vstacked_frames = np.vstack((hstacked_frames, hstacked_frames1))
    cv2.imshow("Frame + New frame + Mask + Opening operation", vstacked_frames)

    # ...
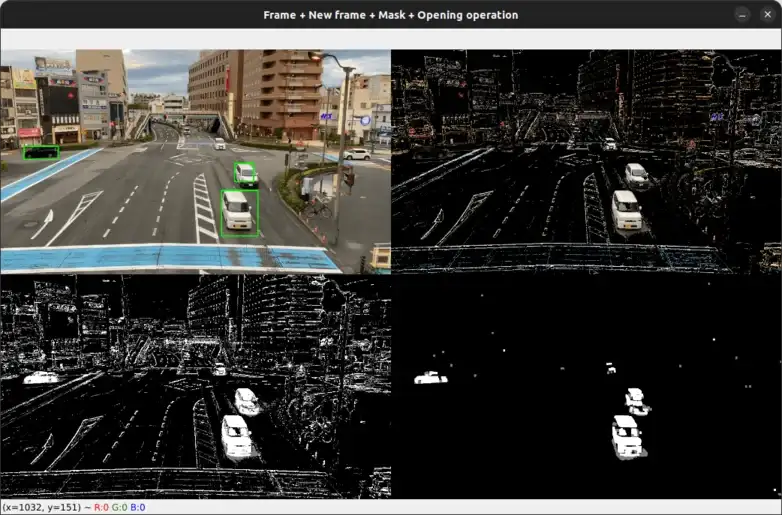
After getting the contours of the moving objects, we loop over each contour and filter out the small contours. Then we get the bounding rectangles of the contours and draw a rectangle around them on the original frame.
After that, we stack the original frame, the foreground frame, the mask, and the opening operation side by side and display them.
Here is the final result:
As you can see, the moving cars that are far from the camera are quite difficult to detect. This is because the background subtraction algorithm is not very accurate when the moving objects are far from the camera. But it works well when the moving objects are close to the camera.
The downside of this method is that we need to manually tune the parameters of the background subtraction algorithm to get the best results. Try to play with the parameters of the createBackgroundSubtractorMOG2 class to see how it affects the final output.

Summary
In this tutorial, you learned how to use OpenCV and Python to remove the background from a video. You learned about the Gaussian Mixture-based Background/Foreground Segmentation Algorithm and how it works.
We have also learned how to use the mask generated by the background subtraction algorithm to detect the moving objects in the video.
In this tutorial, we saw a rudimentary technique for object detection with background subtraction. If you're looking to take your object detection skills to the next level, be sure to check out my new ebook Mastering YOLO: Build an Automatic Number Plate Recognition System.
This comprehensive guide will teach you everything you need to know to build your own end-to-end object detection and recognition systems using YOLO.
The code for this tutorial is available through this link.
Please feel free to leave a comment below if you have any questions or suggestions.
Previous Article
Image Thresholding with OpenCV and Python
Next Article
Bitwise Operations and Image Masking with OpenCV
Thank you for your positive feedback on the article, Doug. I'm glad it was helpful for your project.
Let me know if you have any questions or need further information.

Happy coding :)
Feb. 6, 2023, 10:38 a.m.
Feb. 5, 2023, 9:37 p.m.