Please consider supporting us by disabling your ad blocker. Thank you for your support.
Please consider supporting us by disabling your ad blocker.
Object Detection with YOLO using PyTorch
Get the Source code for this article
In this tutorial, we will use the YOLO object detection algorithm to detect objects in images and videos.
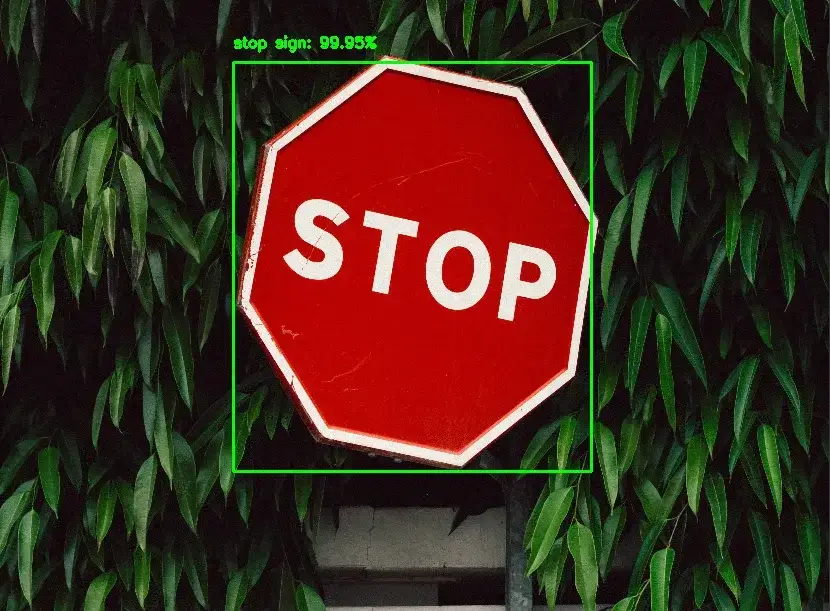
Object detection is a computer vision task that involves identifying and localizing objects in an image or video. It is a challenging task that requires both localizing objects in the image and classifying what type of object has been detected.
There are primarily two types of deep learning-based object detection algorithms: one-stage and two-stage detectors.
One-stage detectors, such as YOLO, SSD, and RetinaNet, directly predict bounding boxes and class probabilities in a single pass. These algorithms are much faster than two-stage detectors, but they are less accurate.
Two-stage detectors, such as RCNN, Faster R-CNN, and Mask R-CNN, use two networks: The first network, called a region proposal network (RPN), proposes regions where objects are likely to be present. The second network (a classifier) classifies the proposed regions into different classes of objects.
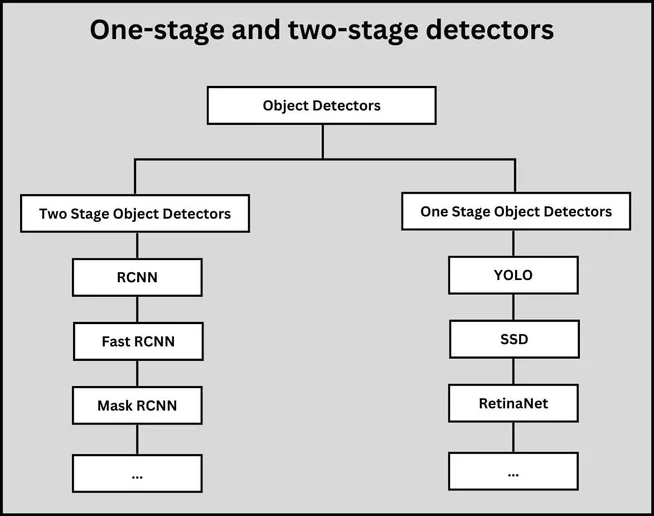
One-stage and two-stage object detectors
If you want to see how to use YOLO in a real-world application, check out my new book, Mastering YOLO: Build an Automatic Number Plate Recognition System, where we build an Automatic Number Plate Recognition (ANPR) system using YOLO.
YOLO overview
What is YOLO
YOLO (which stands for “You Only Look Once”) was first introduced by Joseph Redmon et al. in the 2016 paper You Only Look Once: Unified, Real-Time Object Detection. It is a single-stage object detector that does not have a region proposal network and instead treats detection as a regression problem.
In a single forward pass through the network, the YOLO model predicts the location of objects, as well as their class labels. This makes the model extremely fast, predicting images at 45 FPS on a GPU.
How YOLO works
YOLO works by dividing an image into an SxS grid (e.g. 7x7). Each grid cell predicts B (e.g. 2) bounding boxes, class probabilities, and confidence scores. The confidence score represents the probability that there is an object in the bounding box. The class probabilities represent the probability that the object in the bounding box is of a given class.
The final output of the YOLO model is an array of shape (S, S, Bx5 + C), where S is the number of grid cells, B is the number of bounding boxes per grid cell, and C is the number of classes. The last dimension contains the bounding box coordinates, confidence scores, and class probabilities.
So, for example, if S=7, B=2, and C=20, the output array will have a shape of (7, 7, 2x5 + 20). The 2x5 comes from the 2 bounding boxes per grid cell, each of which has 5 elements: x, y, w, h, and confidence score, and 20 is the number of classes.
Since the model predicts bounding boxes for each grid cell, there will be multiple bounding boxes for the same object. To remove duplicate/overlapping bounding boxes, the model uses non-max suppression (NMS).
NMS selects the bounding box with the highest confidence score and removes any bounding boxes that overlap it by more than a certain threshold (e.g. 0.5) using the intersection over union (IoU) metric.
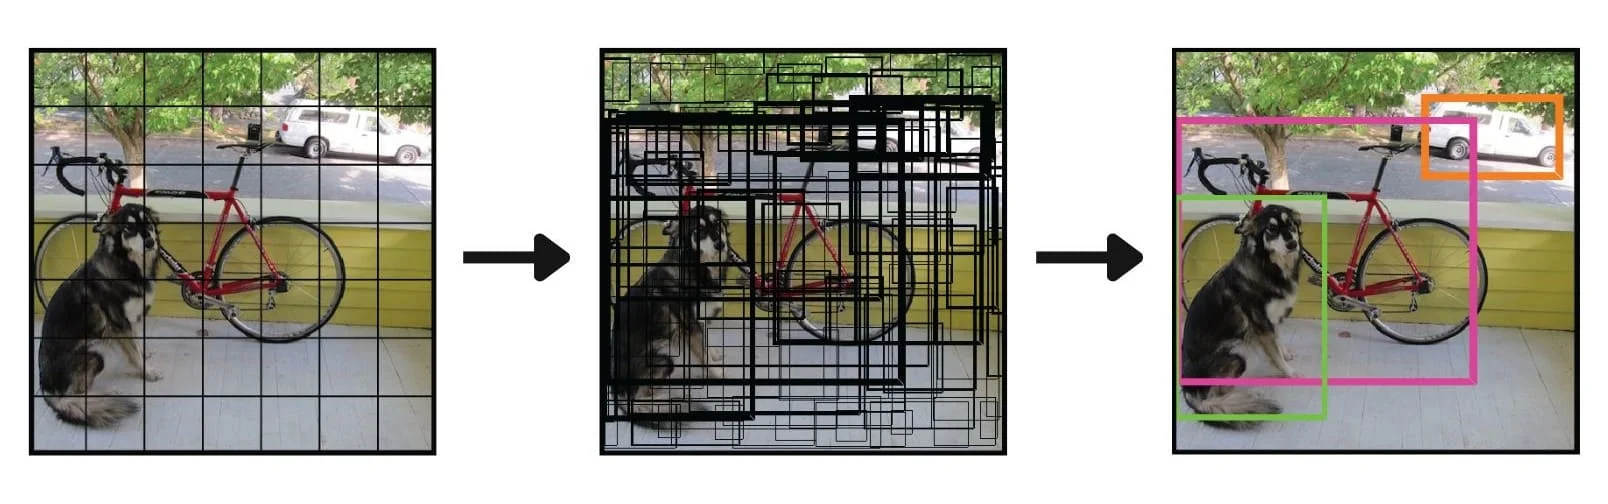 YOLO before and after non-max suppression (image source modified)
YOLO Architecture
The YOLO architecture is a convolutional neural network inspired by the GoogLeNet model. It is composed of 24 convolutional layers followed by 2 fully connected layers. The model takes in an input image of shape (448, 448, 3) and outputs a tensor of shape (7, 7, 30).
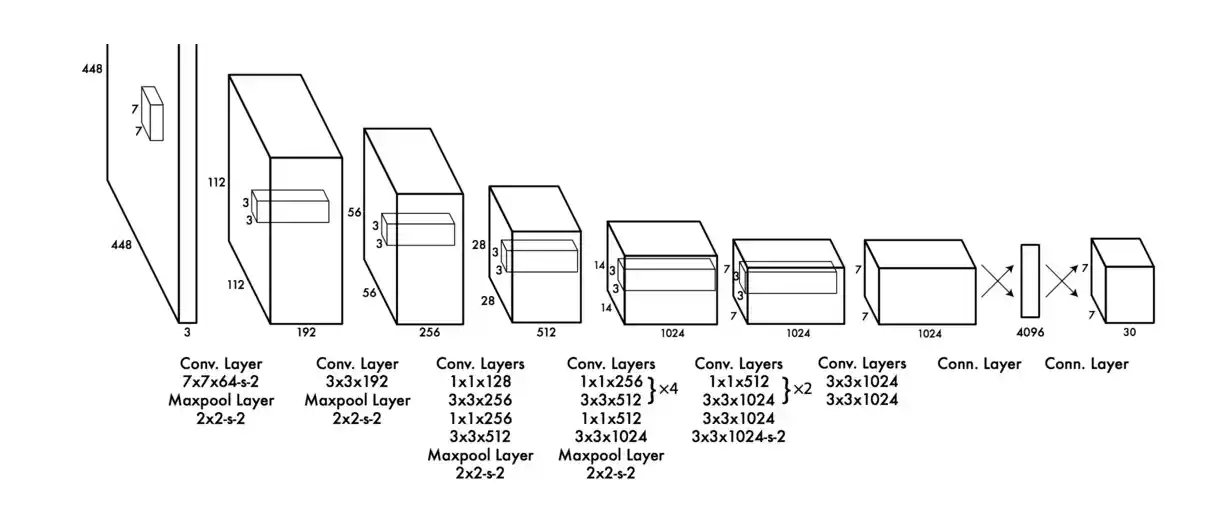 YOLO architecture (image source)
YOLO Versions
YOLO has gone through several iterations, with each iteration improving the speed and accuracy of the model. At the time of writing, YOLOv7 is the latest iteration of the YOLO object detection algorithm.
I included in the table below the links to the papers for each version of YOLO. You can read the papers to learn more about the architecture and the improvements made in each version.
| Version | Year | Paper |
|---|---|---|
| YOLOv1 | 2016 | You Only Look Once: Unified, Real-Time Object Detection |
| YOLOv2 | 2017 | YOLO9000: Better, Faster, Stronger |
| YOLOv3 | 2018 | YOLOv3: An Incremental Improvement |
| YOLOv4 | 2020 | YOLOv4: Optimal Speed and Accuracy of Object Detection |
| YOLOv5 | 2020 | no papper |
| YOLOv6 | 2022 | YOLOv6: A Single-Stage Object Detection Framework for Industrial Applications |
| YOLOv7 | 2022 | YOLOv7: Trainable bag-of-freebies sets new state-of-the-art for real-time object detectors |
Please note that after the release of YOLOv3, Joseph Redmon the author of YOLO stopped publishing papers for the YOLO object detection algorithm. So YOLOv4 and later versions were created by other researchers.
Now that you have a general idea of what YOLO is and how it works, let's see how to use it to detect objects in images and videos.
Clone the Repository and Install the Requirements
To make things easier, we will use Google Colab to run the code in this tutorial. But inside my book, Mastering YOLO: Build an Automatic Number Plate Recognition System, I will show you how to run the code on your local machine.
You will also learn how to train your own YOLO model on a custom dataset and how to install CUDA and cuDNN to benefit from GPU acceleration. If that sounds interesting to you, you can check it out here.
That being said, let's come back to Colab. Google Colaboratory is a free online Jupyter notebook environment that allows you to write and execute code in the cloud.
It provides free access to GPUs and TPUs, which makes it a great tool for machine learning and deep learning projects.
Since Colab provides a free version, the notebook can run for a maximum of 12 hours.
So first, let’s create a new notebook and clone the repository. Navigate to colab.research.google.com and create a new notebook.
And then run the following commands to clone the repository:
!git clone https://github.com/ultralytics/yolov5.git
%cd yolov5/
!pip install -r requirements.txt
The ! symbol is used to run shell commands in a Jupyter notebook.
The repository should now be cloned in the current directory (content). You can find the yolov5 folder in the left sidebar by clicking on the file's icon.
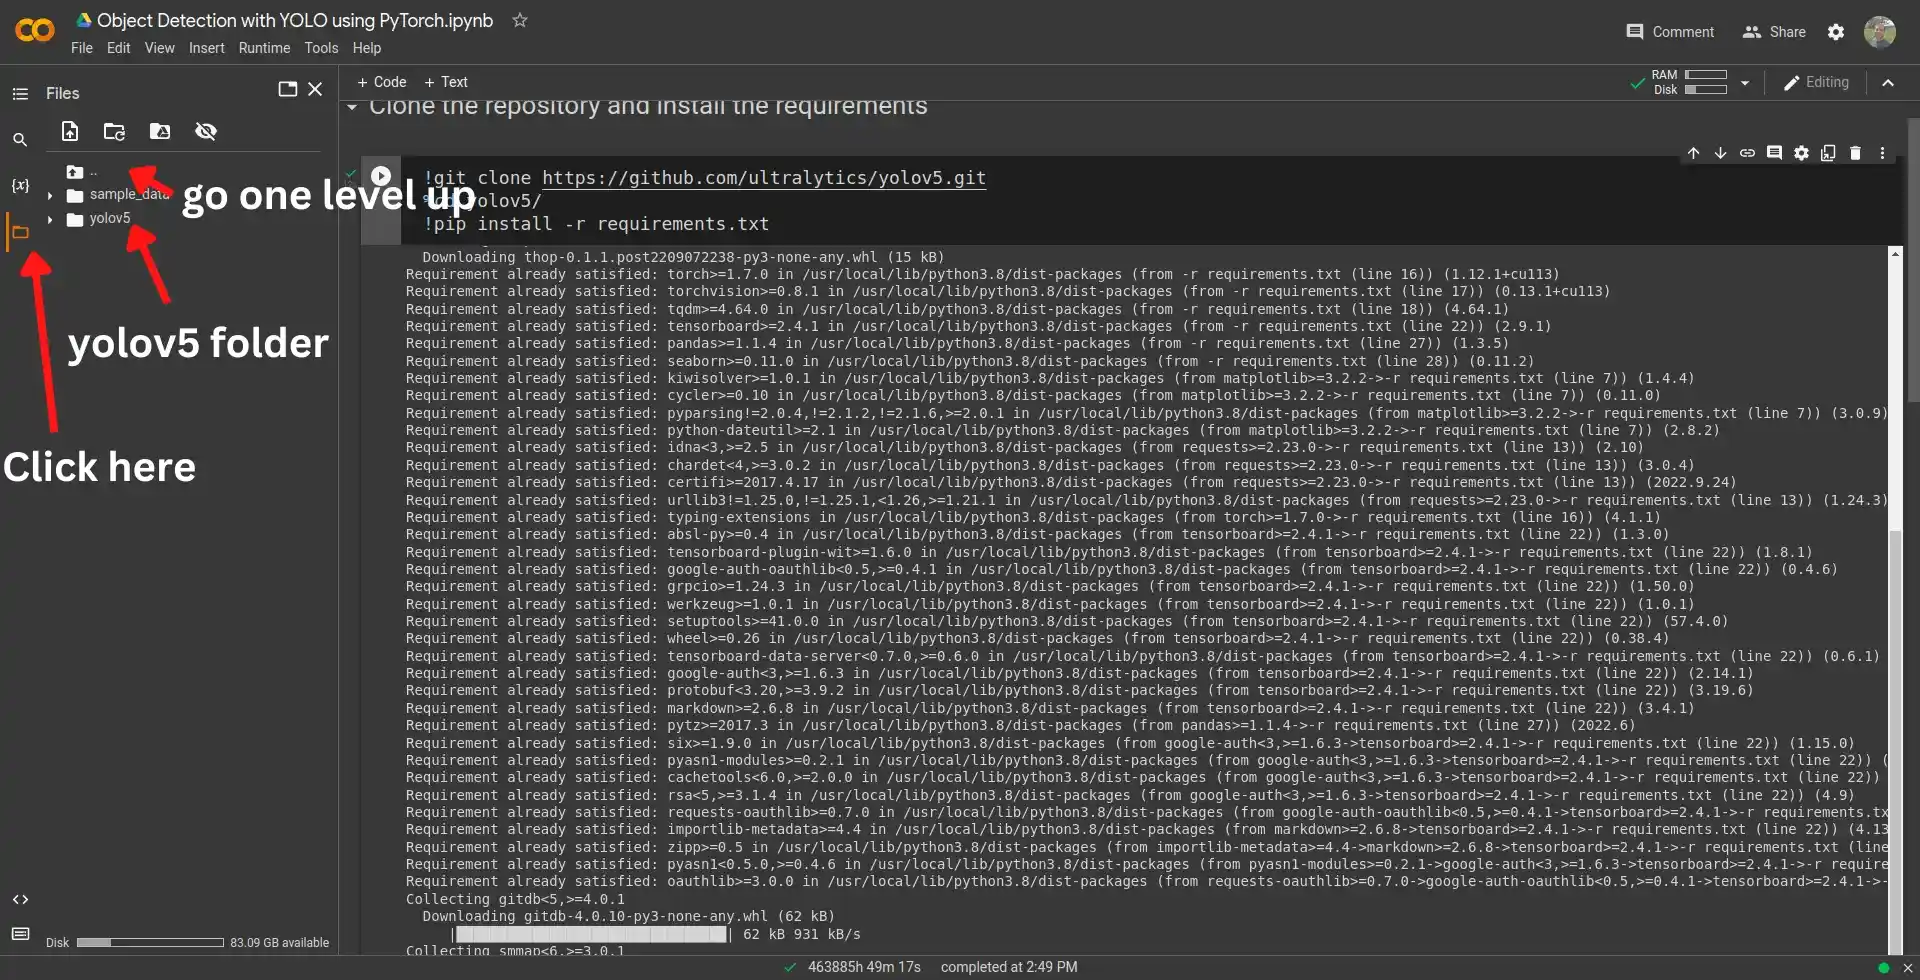
You can go one level up by clicking on the icon shown in the image above.
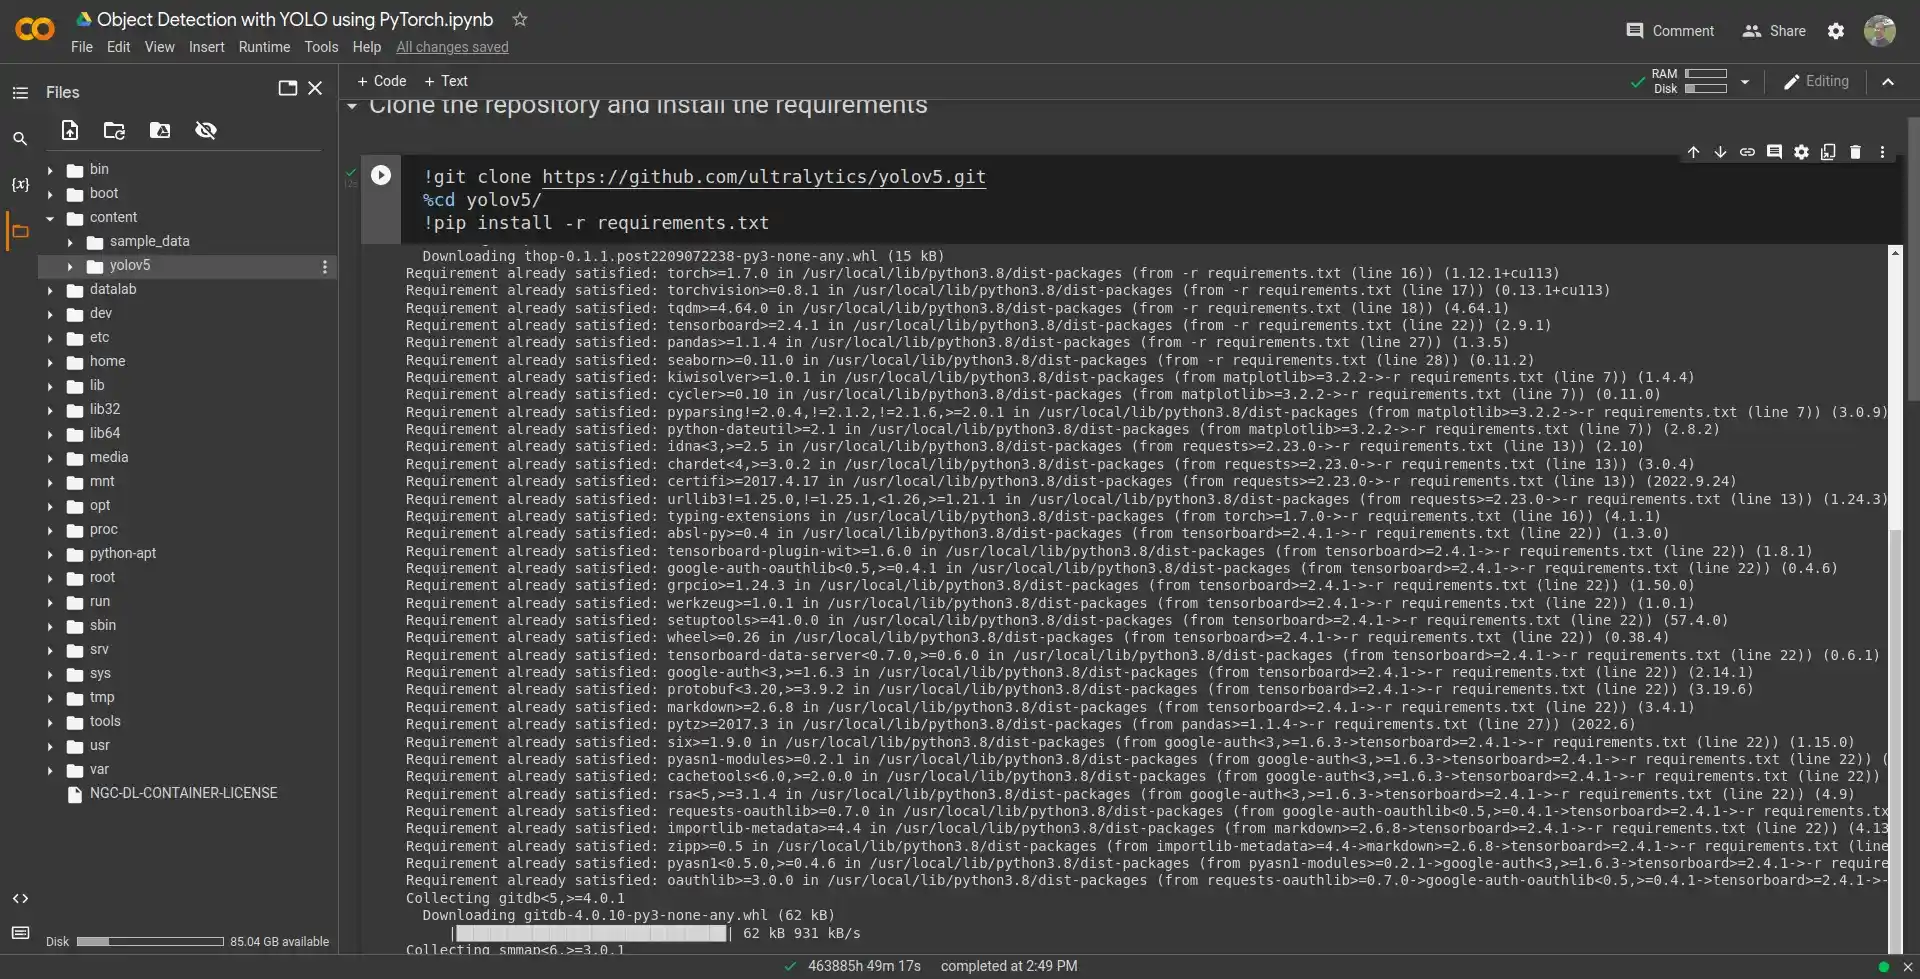
So here you can see the yolov5 folder under the content directory.
!pwd

/content/yolov5

Manually Download Pre-trained Weights for YOLOv5 (optional)
Now that we have cloned the repository, we can download the pre-trained weights for YOLOv5. You can choose a pre-trained model from here.
There are 5 pre-trained models available: yolov5n, yolov5s, yolov5m, yolov5l, and yolov5x. The n model is the smallest model and the x model is the largest model.
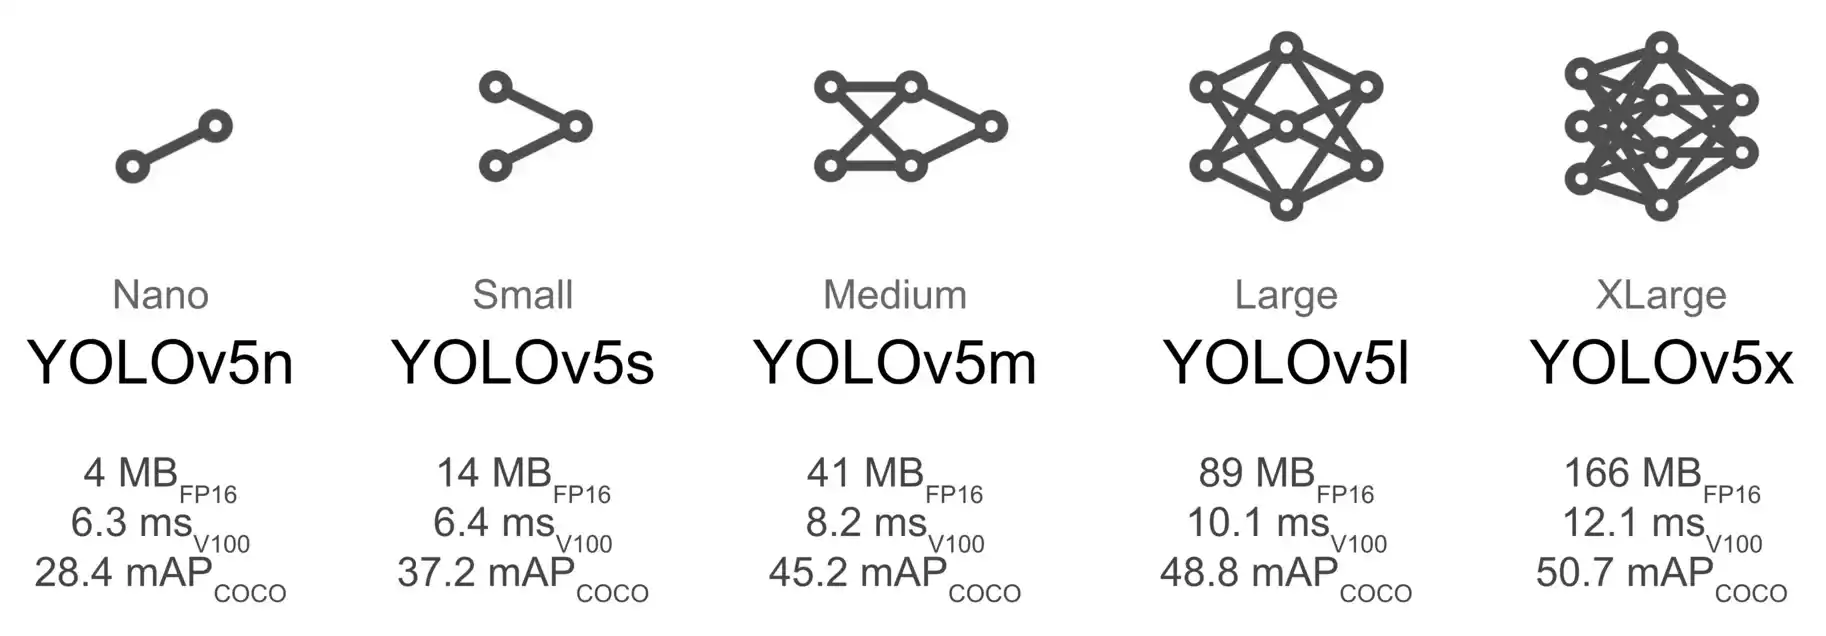
YOLOv5 pre-trained models (image source)
To download the pre-trained weights for the yolov5m model, for example, run the following command in the notebook:
!wget https://github.com/ultralytics/yolov5/releases/download/v6.2/yolov5m.pt
When you run the script from the YOLOv5 repo for training or detection you can specify the model size using the --weights argument and the weights file will be downloaded automatically; so you don't need to download the weights manually.
Running YOLOv5 on Images
Now that we have cloned the repository and downloaded the pre-trained weights, we can run YOLOv5 on images.
To run YOLOv5 on images, we will use the detect.py script from the repository.
!python detect.py --weights yolov5m.pt --img 640 --source data/images/bus.jpg
Let's review the arguments:
- --weights: the model we want to use. Here we are using the yolov5m model.
- --img: resize the image to this value before feeding it to the model. Here we are resizing the image to 640x640.
- --source: the path to the image or video file. Here we are using the bus.jpg image from the data/images folder in the repository. You can use any image or video file you want.
There are many other arguments you can use with the detect.py script. You can find the full list of arguments in the detect.py script
After running the script, the output will be saved in the runs/detect folder.
Each time you run the script, a new folder will be created in the runs/detect folder, i.e. runs/detect/exp, runs/detect/exp2, runs/detect/exp3, and so on.
For convenience, I moved all the output images and videos to the runs folder.
Here is the output image for the bus.jpg image:
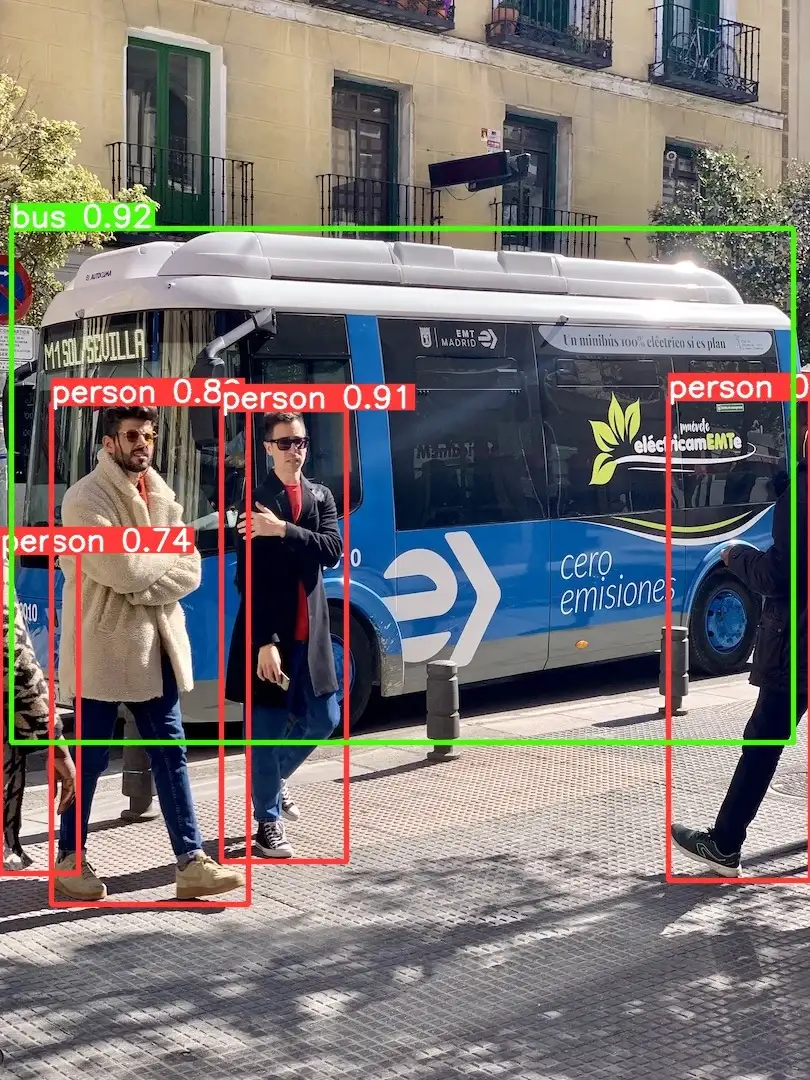
As you can see, the model has detected the bus and the persons with a high confidence score.
Let's try another image. I have included a few images and videos in the examples/images and examples/videos folders in the repository. Make sure to download them before running the script.
!python detect.py --weights yolov5m.pt --img 640 --source examples/images/1.jpg
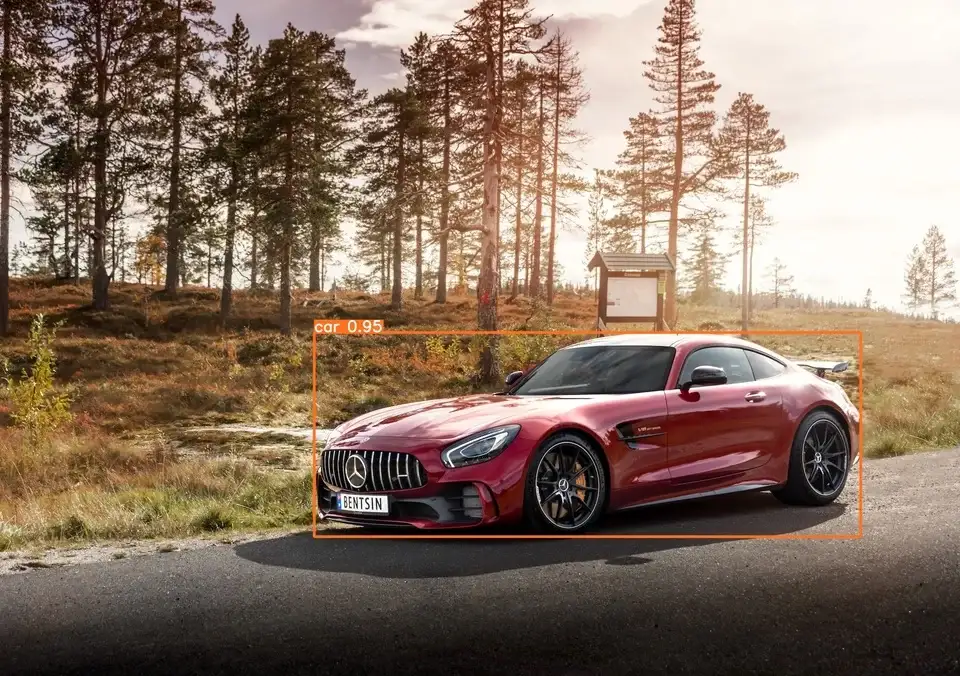
This time also the model successfully detected the car with 95% confidence.
But what if we pass to our model an object that it has never seen before? Let's try with a fox:
!python detect.py --weights yolov5m.pt --img 640 --source examples/images/5.jpg

Well, since the model has never seen a fox before (the model was trained on the COCO dataset which doesn't contain a fox class), the model classifies the fox as a dog with 43% confidence and a bear with 33% confidence.
It makes sense since a fox looks a lot like a dog or a bear.
Here we have two detection results for the same object. We can control the number of detection results by changing the --conf-thres argument.
The default value is 0.25. If we set it to 0.35, we will get only one detection result for the fox:
!python3 detect.py --weights yolov5m.pt --img 640 --source examples/images/5.jpg --conf-thres 0.35
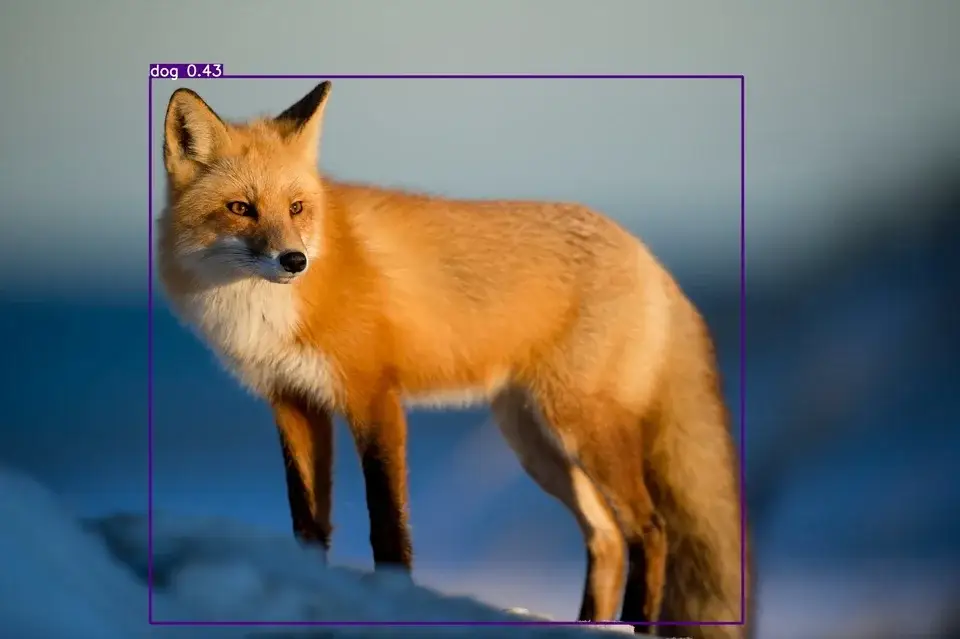
Now the model has only one detection result for the fox: 43% confidence for the dog class.
But what we can do to detect classes that the model has never seen before? Well, we need to train the model on our own dataset.
For example, if we want to detect the fox class, we need to train the model on a dataset that contains fox images.
That's exactly what we do in my book, Mastering YOLO: Build an Automatic Number Plate Recognition System. So check it out if you want to learn how to train YOLOv5 on your own dataset.
Running YOLOv5 on Videos
Now that we have seen how to run YOLOv5 on images, let's see how to run it on videos.
All you have to do is to change the path to the image in the --source argument with a path to a video file:
!python3 detect.py --weights yolov5m.pt --img 640 --source ../examples/videos/highway-1280*720.mp4 --conf-thres 0.6
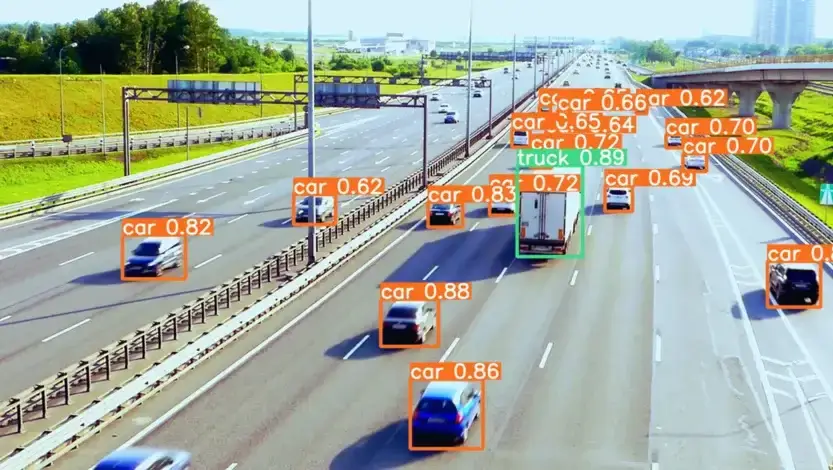
Here we are using a video with a resolution of 1280*720 and a frame rate of 30 fps.
The detection is pretty good. The model has detected the cars and the trucks with a high confidence score. Sometimes the model detects the cars as trucks but overall the result is good.
Conclusion
In this tutorial, you learned about the YOLO object detection algorithm and how to use the YOLOv5 implementation in PyTorch to detect objects in images and videos.
We have also seen how to change the confidence threshold to filter out the detection results with a low confidence score.
Try to run the script on other images and videos and try playing with the confidence threshold to see how it affects the detection results.
If you want to learn more about YOLO, especially how to train YOLOv5 on your own dataset, check out my book, Mastering YOLO: Build an Automatic Number Plate Recognition System.
You can find the full code for this tutorial here.
Related Articles
Previous Article
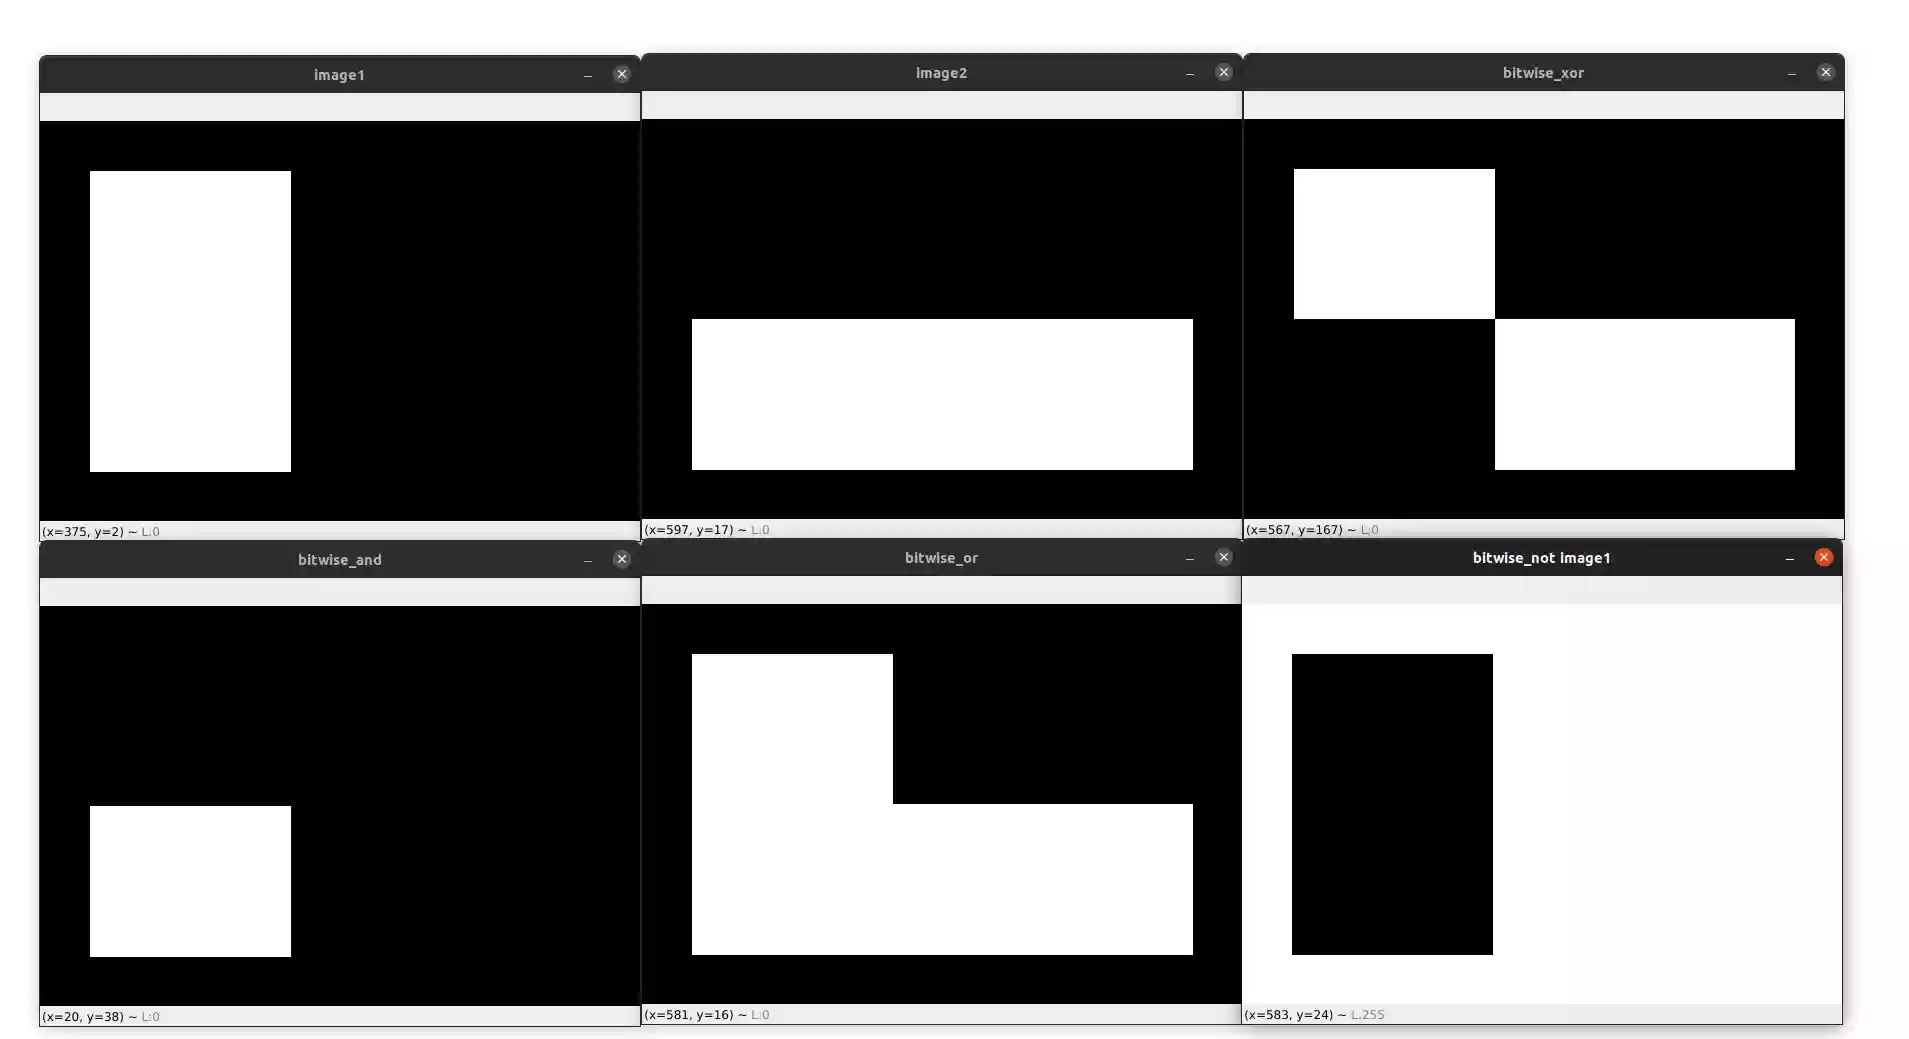
Bitwise Operations and Image Masking with OpenCV
Next Article