Please consider supporting us by disabling your ad blocker. Thank you for your support.
Please consider supporting us by disabling your ad blocker.
Image Thresholding with OpenCV and Python

Image thresholding is one of the most basic types of image segmentation. It consists of converting an image (a grayscale image) into a binary image (black and white image).
In simple thresholding, we manually set a threshold value T and compare each pixel intensity in the input image with T.
If a pixel in the input image is less than T, it will be set to 0 (black), and if a pixel in the input image is greater than T, it will be set to 255 (white).
In this tutorial, we are going to explore three methods of thresholding:
- Simple thresholding: With this method, we have to manually specify the threshold value.
- Otsu's thresholding: This method automatically determines the optimal threshold value.
- Adaptive thresholding: This technique divide the input image into multiple regions and determine the optimal threshold value for each region.
This article is part 9 of the tutorial series on computer vision and image processing with OpenCV:
- How to Read, Write, and Save Images with OpenCV and Python
- How to Read and Write Videos with OpenCV and Python
- How to Resize Images with OpenCV and Python
- How to Crop Images with OpenCV and Python
- How to Rotate Images with OpenCV and Python
- How to Annotate Images with OpenCV and Python (coming soon)
- Bitwise Operations and Image Masking with OpenCV and Python (coming soon)
- Image Filtering and Blurring with OpenCV and Python
- Image Thresholding with OpenCV and Python (this article)
- Morphological Operations with OpenCV and Python
- Edge and Contour Detection with OpenCV and Python

Simple Thresholding
To apply simple thresholding we can use the cv2.threshold(src, thresh, maxval, type) function. The function takes four parameters:
- src: The input image converted to grayscale.
- thresh: The threshold value.
- maxval: The maximum value to use if the pixel intensity in the input image is greater than the threshold value.
- type: The thresholding type to use (see ThresholdTypes).
Let's write some code to see how the cv2.threshold function works:
import cv2

image = cv2.imread("bitcoin.webp")
gray = cv2.cvtColor(image, cv2.COLOR_BGR2GRAY)
blurred = cv2.GaussianBlur(gray, (7, 7), 0)
We start by loading the image from disk and processing it by converting it to grayscale and blurring it to remove noise.
Next, let's apply the thresholding to the image:
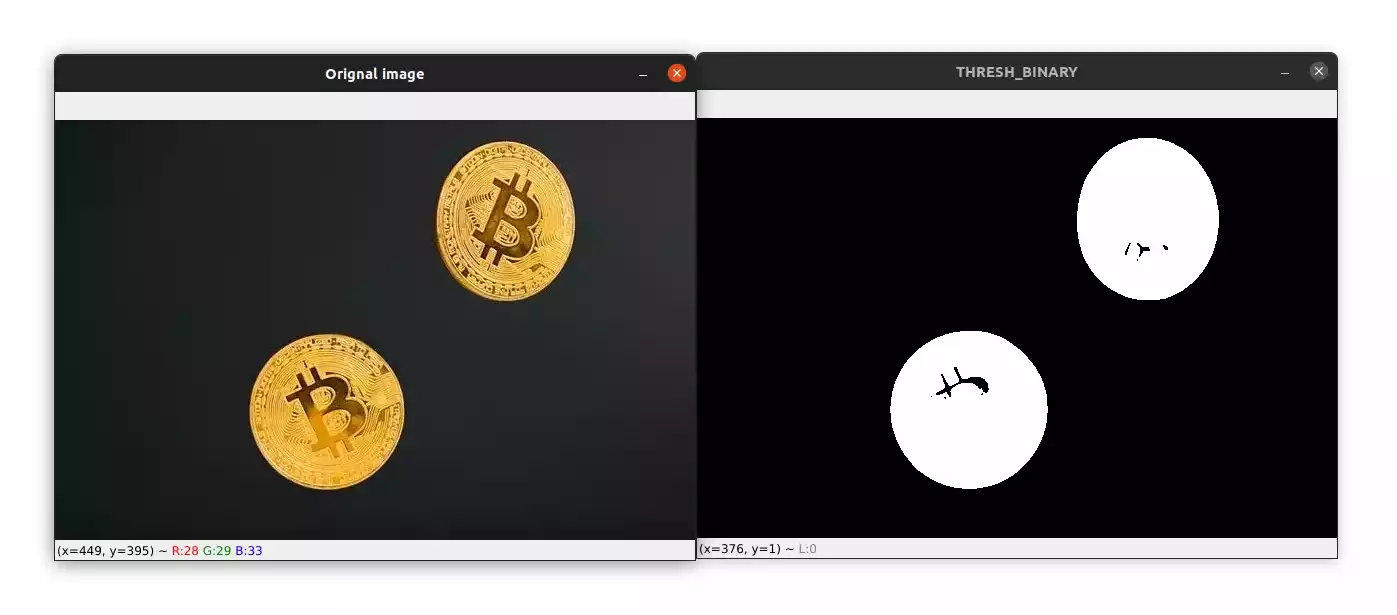
ret, thresh_binary = cv2.threshold(blurred, 60, 255, cv2.THRESH_BINARY)

cv2.imshow("Orignal image", image)
cv2.imshow("THRESH_BINARY", thresh_binary)
cv2.waitKey(0)
The thresholding is applied using the cv2.threshold function.
We pass in the grayscale blurred image as a first argument to the function. The second argument is the threshold value, which in this case, is equal to 60. I manually tested several values to find this value.
The third argument is the maximum value, which is the value to use if a pixel intensity in the input image is greater than the threshold value.
Finally, we used the threshold method cv2.THRESH_BINARY as the final parameter. With this method, all pixel intensities less than the threshold value will be set to 0 (black) and all pixel intensities greater than the threshold value will be set to 255 (white). If you want to have the opposite result just use the cv2.THRESH_BINARY_INV method instead.
The function then returns a tuple with two elements. The first element is the threshold value and the second element is the thresholded image.
Finally, we display the original image and the thresholded image:
Sponsored

Otsu's Thresholding
Manually setting the threshold value might be feasible if you have a few images to process, but what if you have hundreds or more images?
You can't use the same threshold value for all images because the lightning may be different for each image.
This is where Otsu's thresholding comes in handy. This algorithm automatically determines the optimal threshold value.
This technique produces the best result if the histogram of the image (grayscale image) has a bimodal distribution. Meaning that the histogram contains two peaks. For example, an image where most of its pixel intensities are concentrated around 130 and 220.
Let's now see how to perform Otsu's thresholding:
image = cv2.imread("bitcoin.webp")
gray = cv2.cvtColor(image, cv2.COLOR_BGR2GRAY)
blurred = cv2.GaussianBlur(gray, (7, 7), 0)
As before we need to convert the image into grayscale and blur it to remove noise.
Now, we can apply Otsu's thresholding:
ret, thresh_otsu = cv2.threshold(blurred, 0, 255, cv2.THRESH_BINARY + cv2.THRESH_OTSU)
print(ret)

cv2.imshow("Orignal image", image)
cv2.imshow("THRESH_OTSU", thresh_otsu)
cv2.waitKey(0)
Otsu's algorithm is applied using the cv2.threshold function. The first three arguments are similar as before.
The last parameter is a combination of cv2.THRESH_BINARY and cv2.THRESH_OTSU. This way the function determines the optimal threshold value using Otsu's method and uses it instead of the specified value that we passed to function (0).
Finally, we display the original image and the thresholded image with Otsu's method:
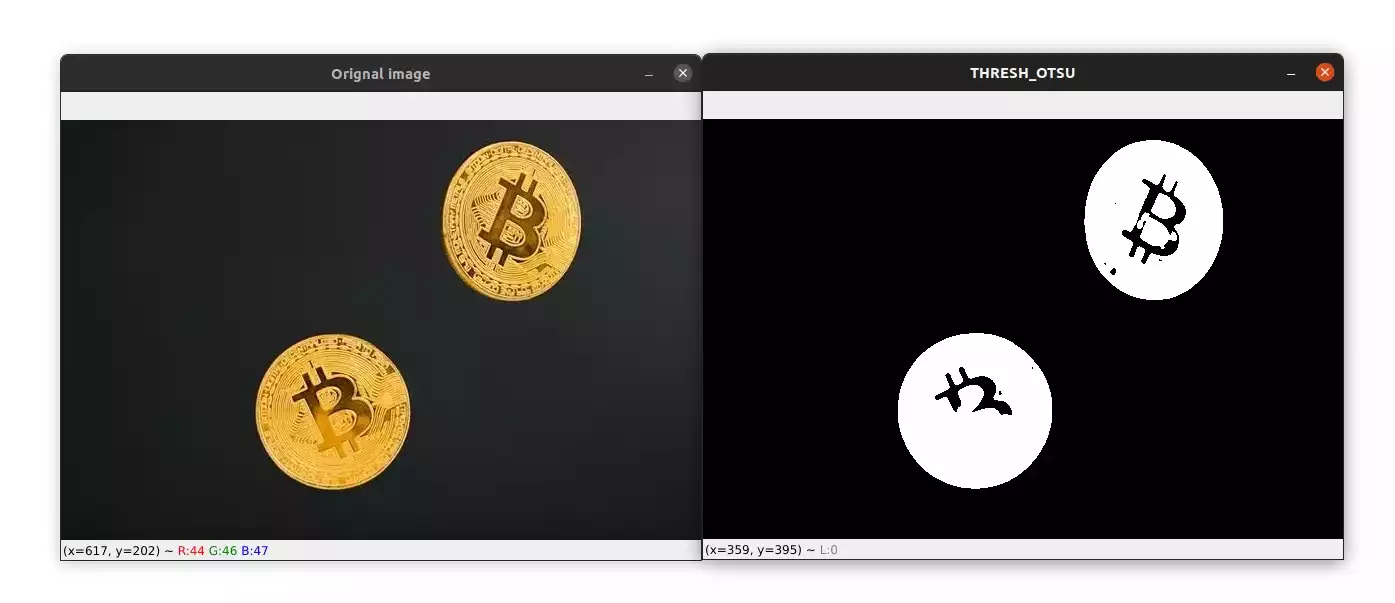
Take look at your terminal, you can see that the optimal threshold value is equal to 102.
Sponsored

Adaptive Thresholding
With simple and Otsu's thresholding, we used a single threshold value to threshold the entire image. This is ok if the lighting in the image is uniform, but if this is not the case?
Well take a look at the image below:
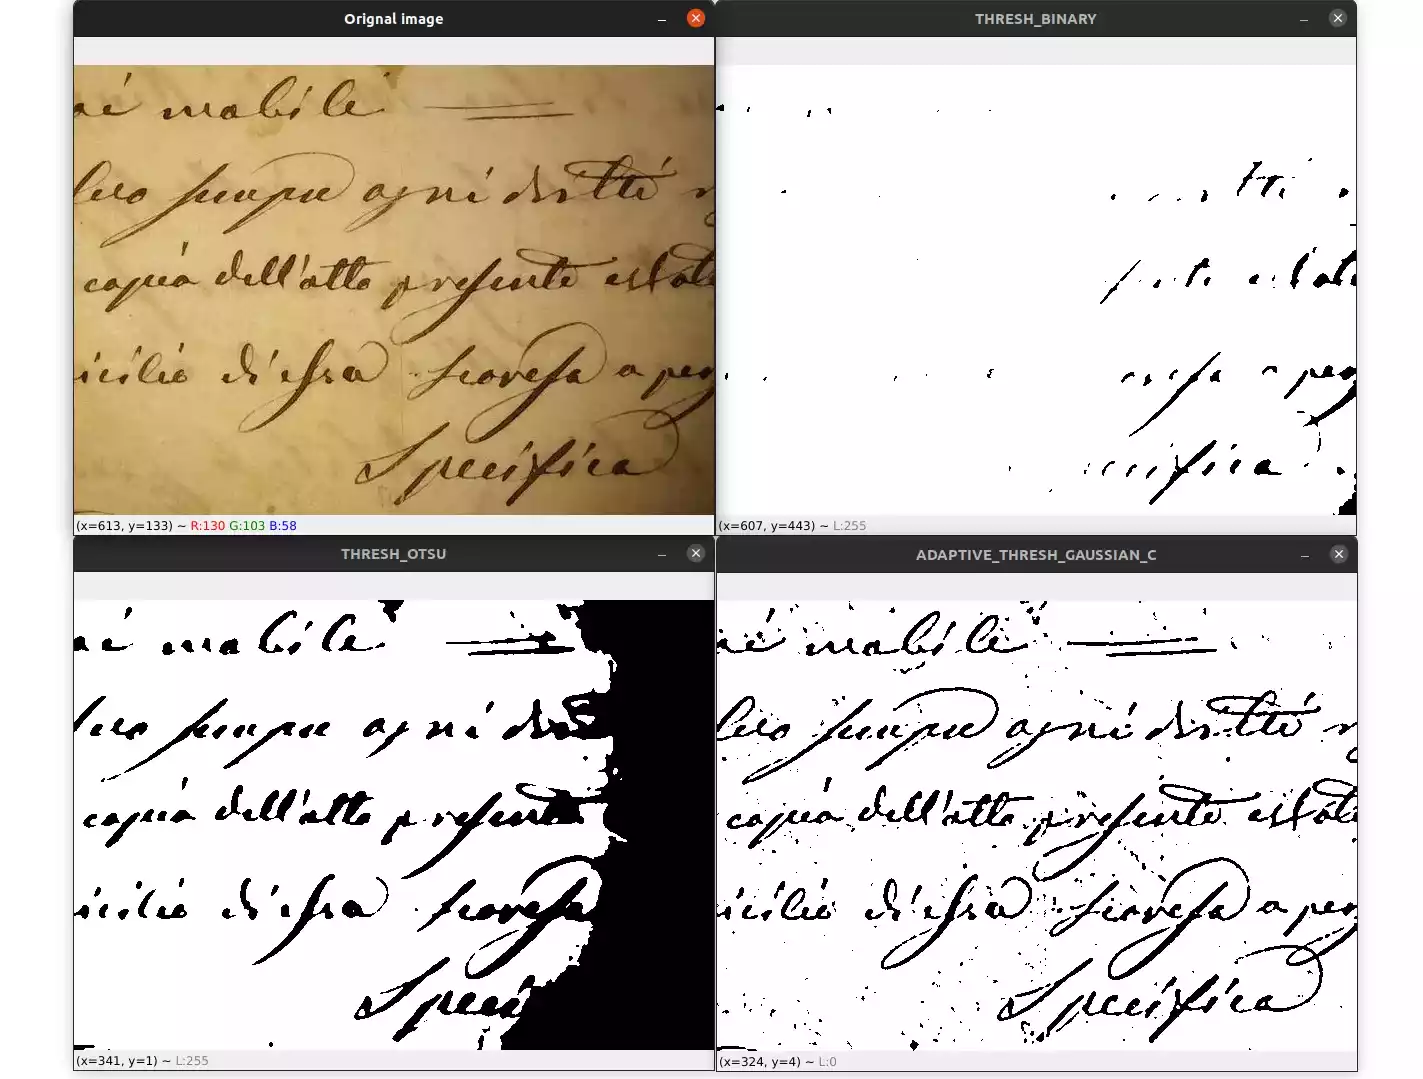
On the top-left, you can see the original image. Applying global thresholding (like simple thresholding or Otsu thresholding) gives us a very poor segmentation of the image, which you can see on the top-right and bottom-left.
Adaptive thresholding, which is shown at the bottom-right of the image above, gives us a much better result than that achieved with global thresholding.
So how does adaptive thresholding work?
Adaptive thresholding tries to find an optimal threshold value for each small region of pixels in the input image. This technique is therefore very effective when the image contains a strong illumination gradient.
Let's now write some code to see how to apply adaptive thresholding:
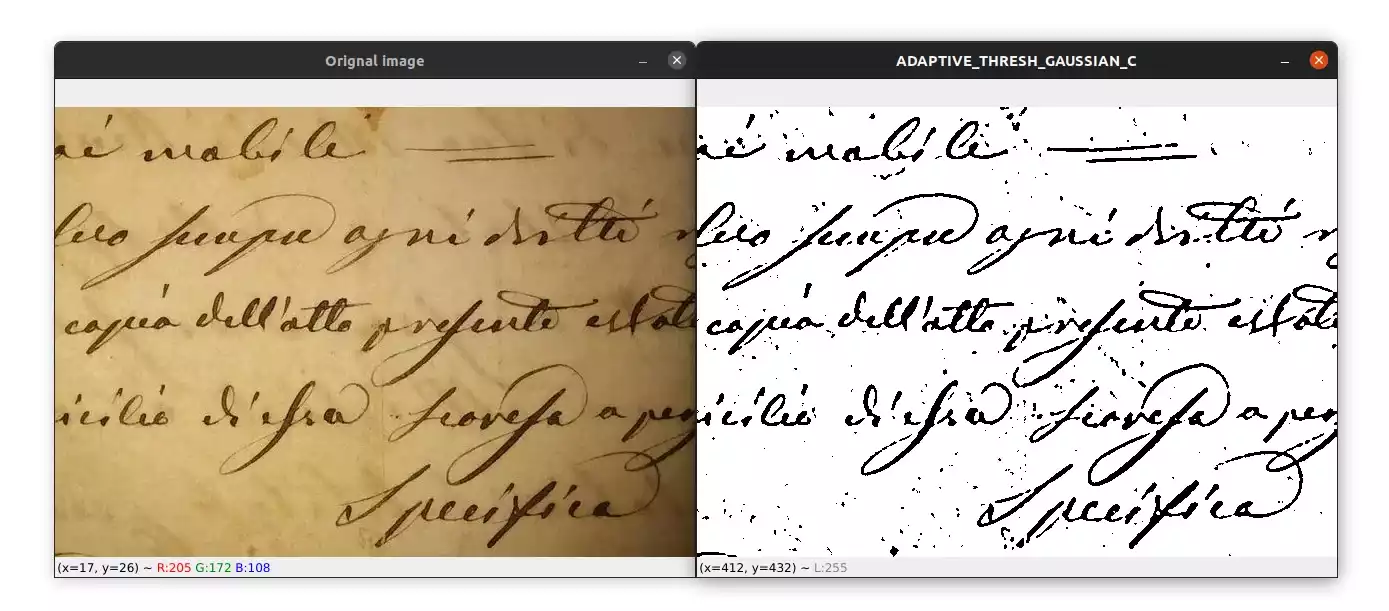
image = cv2.imread("letter.webp")
gray = cv2.cvtColor(image, cv2.COLOR_BGR2GRAY)
blurred = cv2.GaussianBlur(gray, (7, 7), 0)

adap_thresh = cv2.adaptiveThreshold(
    blurred, 255, cv2.ADAPTIVE_THRESH_GAUSSIAN_C, cv2.THRESH_BINARY, 11, 3)
cv2.imshow("Orignal image", image)
cv2.imshow("ADAPTIVE_THRESH_GAUSSIAN_C", adap_thresh)
cv2.waitKey(0)
We apply adaptive thresholding using the cv2.adaptiveThreshold function. As always, the first parameter to this function is the image we want to threshold.
The second argument is the maximum value to use when a pixel is greater than the threshold value.
The third argument is the adaptive threshold algorithm to use. Here we used cv2.ADAPTIVE_THRESH_GAUSSIAN_C which means that the threshold value is computed using a Gaussian weighted sum of the neighborhood pixel values. You can also use the cv2.ADAPTIVE_THRESH_MEAN_C option to compute the mean instead of the Gaussian weighted mean.
The fourth argument is the threshold method to use, just like with simple thresholding. As we discussed before, using cv2.THRESH_BINARY simply means that each pixel that is less than the threshold value will be set to 0 and each pixel that is greater than the threshold value will be set to 255.
The next argument is the size of the pixel neighborhood. In our case, we used a value of 11, which means that the threshold value will be computed for each 11x11 pixel region in the image.
The last parameter is a constant called C that is subtracted from the weighted mean in order to fine-tune the threshold value.
The result of applying adaptive thresholding is shown in the image below:
Summary
Simple thresholding and Otsu's method are fast but don't get the best results when the lighting is non-uniform in the input image. Adaptive thresholding, on the other hand, is slower but produces a good result in those cases.
You now have three tools in your toolbox to use depending on the type of problem you have.
The source code for this article is available through this link.
If you have any questions, feel free to leave a comment below.
Previous Article

Face Recognition with Python, Dlib, and Deep Learning
Next Article