Please consider supporting us by disabling your ad blocker. Thank you for your support.
Please consider supporting us by disabling your ad blocker.
Edge and Contour Detection with OpenCV and Python

In this tutorial, we are going to see another image processing technique: detect edges and contours in an image.
Edge detection is a fundamental task in computer vision. It can be defined as the task of finding boundaries between regions that have different properties, such as brightness or texture.
Simply put, edge detection is the process of locating edges in an image. An edge is typically an abrupt transition from a pixel value of one color to another, such as from black to white.
This article is part 11 of the tutorial series on computer vision and image processing with OpenCV:
- How to Read, Write, and Save Images with OpenCV and Python
- How to Read and Write Videos with OpenCV and Python
- How to Resize Images with OpenCV and Python
- How to Crop Images with OpenCV and Python
- How to Rotate Images with OpenCV and Python
- How to Annotate Images with OpenCV and Python (coming soon)
- Bitwise Operations and Image Masking with OpenCV and Python
- Image Filtering and Blurring with OpenCV and Python
- Image Thresholding with OpenCV and Python
- Morphological Operations with OpenCV and Python
- Edge and Contour Detection with OpenCV and Python (this article)
Canny Edge Detector
The canny edge detector is a multi-stage algorithm for detecting edges in an image. It was created by John F. Canny in 1986 and published in the paper "A computational approach to edge detection". It is one of the most popular techniques for edge detection, not just because of its simplicity, but also because it generates high-quality results.
The Canny edge detector algorithm has four steps:
- Noise reduction by blurring the image using a Gaussian blur.
- Computing the intensity gradients of the image.
- Suppression of Edges.
- Using hysteresis thresholding.
Read the paper above if you want to learn how the algorithm works. we will not go into the theory and the mathematics behind this algorithm, instead, we will write some code to see how to use it and how it works.
So let's get started.
import cv2

image = cv2.imread("objects.jpg")
gray = cv2.cvtColor(image, cv2.COLOR_BGR2GRAY)
blurred = cv2.GaussianBlur(gray, (3, 3), 0)

edged = cv2.Canny(blurred, 10, 100)

cv2.imshow("Original image", image)
cv2.imshow("Edged image", edged)
cv2.waitKey(0)
We start by loading our image, converting it to grayscale, and applying the cv2.GaussianBlur to blur the image and remove noise.
Next, we apply the Canny edge detector using the cv2.canny function. This function takes 3 required parameters and 3 optional parameters. In our case, we only used the required parameters.
The first argument is the image on which we want to detect the edges. The second and third arguments are the thresholds used for the hysteresis procedure.
The output image is shown below:

As you can see, the algorithm has found the most important edges on the image. Try using different values for the thresholds parameters to see how this will influence the edge detection.
Now let's move on to contour detection!

Contour Detection
Contours are the basic building blocks for computer vision. They are what allow computers to detect general shapes and sizes of objects that are in an image so that they can be classified, segmented, and identified.
Using OpenCV, we can find the contours by following these steps:
- Convert the image into a binary image. We can use thresholding or edge detection. We will be using the Canny edge detector.
- Find the contours using the cv2.findContours function.
- Draw the contours on the image using the cv2.drawContours function.
We already converted our image into a binary image in the previous section using the Canny edge detector, we just have to find the contours and draw them in the image.
Let's see how to do it:
# find the contours in the edged image
contours, _ = cv2.findContours(edged, cv2.RETR_EXTERNAL, cv2.CHAIN_APPROX_SIMPLE)
image_copy = image.copy()
# draw the contours on a copy of the original image
cv2.drawContours(image_copy, contours, -1, (0, 255, 0), 2)
print(len(contours), "objects were found in this image.")

cv2.imshow("Edged image", edged)
cv2.imshow("contours", image_copy)
cv2.waitKey(0)
We used the binary image we got from the Canny edge detector to find the contours of the objects. We find the contours by calling the cv2.findContours function. This function takes 3 required arguments and 3 optional arguments.
Here we only used the required parameters. The first argument is the binary image. Please note that since OpenCV 3.2 the source image is not modified by this function, so we don't need to pass a copy of the image to this function, we can simply pass the original image.
The second argument is the contour retrieval mode. By using cv2.RETR_EXTERNAL we only retrieve the outer contours of the objects on the image. See RetrievalModes for other possible options.
The third argument to this function is the contour approximation method. In our case we used cv2.CHAIN_APPROX_SIMPLE, which will compress horizontal, vertical, and diagonal segments to keep only their end points. See ContourApproximationModes for the possible options.
The function then returns a tuple with two elements (this is the case for OpenCV v4). The first element is the contours detected on the image and the second element is the hierarchy of the contours.
Next, we make a copy of the original image which we will use to draw the contours on it. Drawing the contours is performed using the cv2.drawContours function.
The first argument to this function is the image on which we want to draw the contours. Again, we have drawn the contours on a copy of the image because we don't want to alter the original image.
The second argument is the contours and the third argument is the index of the contour to draw, using a negative value will draw all the contours.
The fourth argument is the color of the contours (in our case it is a green color) and the last argument is the thickness of the lines of the contours.
You can see the result of this operation in the image below:

As you can see, the algorithm identified all the boundaries of the objects and also some contours inside the objects.
The contours variable is a list containing all the contours found by the algorithm, so we can use the built-in len() function to count the number of contours.
So if we want to count the number of objects in the image we need to detect only the contours of the boundaries of the objects.
In the previous example, if you print the number of contours you'll see that the algorithm detected 14 contours in the image.
In order for the contour detection algorithm to only detects the boundaries of the objects and therefore the len() function returns us the number of objects in the image, we have to apply the dilation operation to the binary image (see my course to learn more).
Let's see if morphological operations will help us to solve this issue:
image = cv2.imread("objects.jpg")
gray = cv2.cvtColor(image, cv2.COLOR_BGR2GRAY)
blurred = cv2.GaussianBlur(gray, (3, 3), 0)
edged = cv2.Canny(blurred, 10, 100)

# define a (3, 3) structuring element
kernel = cv2.getStructuringElement(cv2.MORPH_RECT, (3, 3))

# apply the dilation operation to the edged image
dilate = cv2.dilate(edged, kernel, iterations=1)

# find the contours in the dilated image
contours, _ = cv2.findContours(dilate, cv2.RETR_EXTERNAL, cv2.CHAIN_APPROX_SIMPLE)
image_copy = image.copy()
# draw the contours on a copy of the original image
cv2.drawContours(image_copy, contours, -1, (0, 255, 0), 2)
print(len(contours), "objects were found in this image.")

cv2.imshow("Dilated image", dilate)
cv2.imshow("contours", image_copy)
cv2.waitKey(0)
This time, after applying the Canny edge detector and before finding the contours on the image we apply the dilation operation to the binary image in order to add some pixels and increase the foreground objects. This will allow the contour detection algorithm to detect only the boundaries of the objects in the image.
Take a look at the image below to see the result after applying the dilation morphological operations:

This time the algorithm detected only the boundaries of the objects and if you check your terminal you'll see the output "5 objects were found in this image". Great!
And even if you change the image and without changing the code, the algorithm will detect the correct number of objects.
Take a look at the image below, make sure to download the example images of this part:

I can see the output on my terminal: "2 objects were found in this image".
Here is a final example of coins:
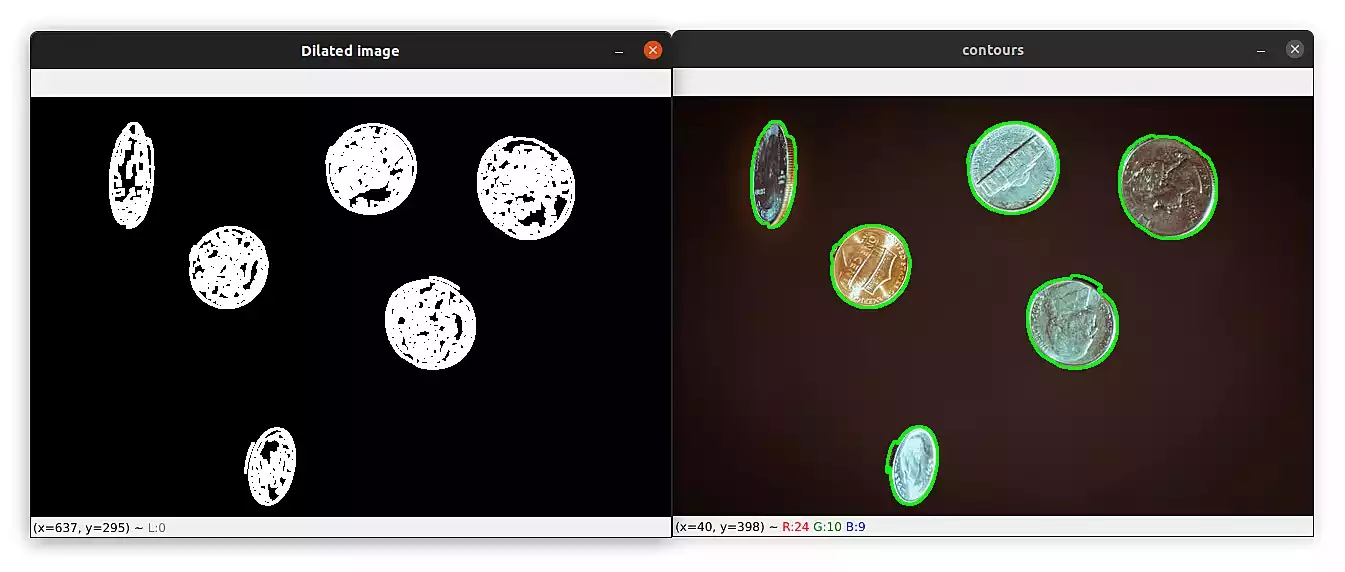
This time the output was "6 objects were found in this image".
Summary
The contour detection algorithm works well when there is a high contrast between the foreground objects and the background of the image. You can try experimenting with different images and different retrieval modes to see how this will affect the detection of the contours.
If you want to learn more about computer vision and image processing then check out my course Computer Vision and Image Processing with OpenCV and Python.
You can get the source code for this article by clicking this link.
Previous Article

How to Rotate Images with OpenCV and Python
Next Article

Save and Load Models with TensorFlow
Hi @linda, Thanks for the feedback.
Maybe I will try to extend the tutorial on the future to show how to remove contours from the image.

But in the meantime here are the steps that you can follow in order to do this:

1. Load the image using the `cv2.imread` function
2. Convert the image to grayscale using the `cv2.cvtColor` function
3. Use the `cv2.Canny` function to detect edges in the image
4. Use the `cv2.findContours` function to detect contours in the image
4. Iterate over the contours and draw them on a blank image using the `cv2.drawContours` function
5. To remove the contours from the original image, subtract the contours image from the original image using the `cv2.subtract` function
Dec. 17, 2022, 2:01 p.m.
Dec. 17, 2022, 12:55 a.m.