Please consider supporting us by disabling your ad blocker. Thank you for your support.
Please consider supporting us by disabling your ad blocker.
How to Rotate Images with OpenCV and Python
In this tutorial, we will see how to rotate images with OpenCV using some built-in functions.
The first one is cv2.getRotationMatrix2D which, as its name suggests, will give us the transformation matrix that we will use to rotate the image. The second function is cv2.warpAffine, this function applies the rotation by using the transformation matrix.
This article is part 5 of the tutorial series on computer vision and image processing with OpenCV:
- How to Read, Write, and Save Images with OpenCV and Python
- How to Read and Write Videos with OpenCV and Python
- How to Resize Images with OpenCV and Python
- How to Crop Images with OpenCV and Python
- How to Rotate Images with OpenCV and Python (this article)
- How to Annotate Images with OpenCV and Python (coming soon)
- Bitwise Operations and Image Masking with OpenCV and Python
- Image Filtering and Blurring with OpenCV and Python
- Image Thresholding with OpenCV and Python
- Morphological Operations with OpenCV and Python
- Edge and Contour Detection with OpenCV and Python
Rotate Images with OpenCV
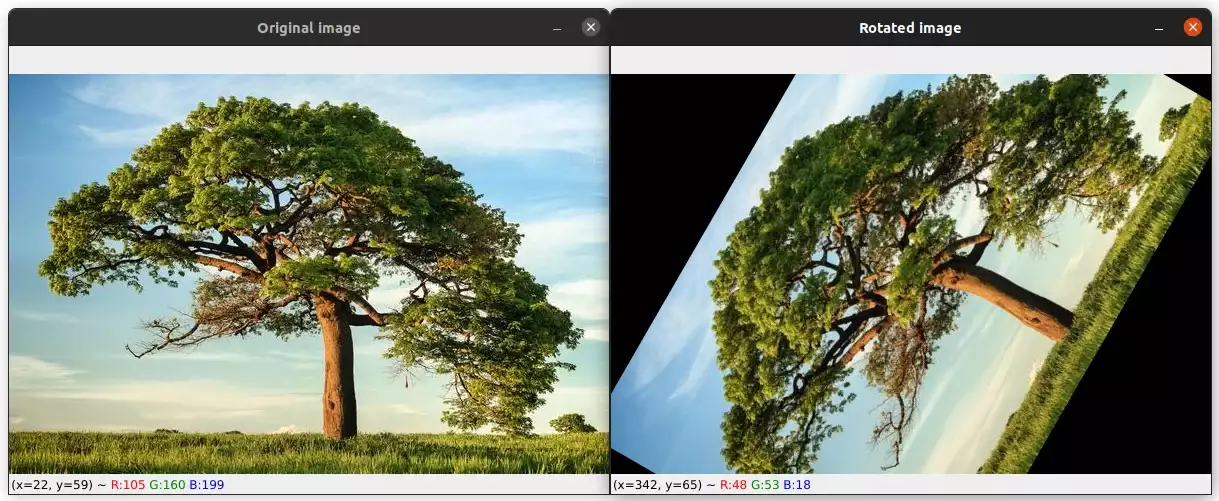
The image below will be used throughout this tutorial:

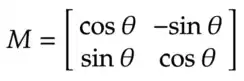
We can rotate an image by an angle θ by defining a transformation matrix M, which is defined as follows:
Using this matrix, we can rotate an image by an angle θ around the center of the image. However, OpenCV provides the ability to define any arbitrary rotation center and a scale factor to resize the image.
In this case, the transformation matrix become:
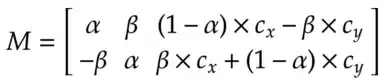
Where:


and Cx and Cy are the coordinates around which the image is rotated.
If you are wondering how we are going to create this matrix and calculate the rotation, don't worry, the cv2.getRotationMatrix2D function creates the above transformation matrix for us and the cv2.warpAffine function uses the transformation matrix to apply the rotation to the image.
The cv2.getRotationMatrix2D(center, angle, scale) function takes 3 arguments:
- center: the center of rotation of the source image.
- angle: the rotation angle in degrees. providing positive values will rotate the image counter-clockwise.
- scale: an isotropic scale factor to resize the image.
The cv2.warpAffine(src, M, dsize, dst, flags, borderMode, borderValue) function takes 3 required arguments and 4 optional arguments:
- src: (required) the input mage.
- M: (required) the transformation matrix.
- dsize: (required) size of the output image.
- dst: (optional) the output image with size dsize.
- flags: (optional) combination of interpolation methods.
- borderMode: (optional) the pixel extrapolation method.
- borderValue: (optional) the value used in case of a constant border.
Let's now write some code to see a concrete example of how to do image rotation with OpenCV:
import cv2

image = cv2.imread("image2.jpg")

height, width = image.shape[:2]
# get the center of the image
center_x, center_y = (width/2, height/2)
# rotate the image by 60 degrees counter-clockwise around the center of the image
M = cv2.getRotationMatrix2D((center_x, center_y), 60, 1.0)
rotated_image = cv2.warpAffine(image, M, (width, height))

cv2.imshow("Rotated image", rotated_image)
cv2.waitKey(0)
We start by reading the image and getting its width and height.
Next, we calculate the center of the image which will be used as the rotation point. Please note that we can use any other point for rotation as mentioned above.
Then we used the cv2.getRotationMatrix2D to define a rotation matrix M. We need to give it the center of rotation as the first argument. The second argument is the angle in degrees by which we want to rotate the image. In this case, the image will be rotated 60 degrees counter-clockwise.
The third argument is the scale factor. 1.0 means the output image will be the same size as the input image, 2.0 means the output image will be double the size of the input image.
Finally, we apply the rotation matrix M to our image using the cv2.warpAffine function. The function takes three arguments.
The first one is the input image. The second and third arguments are the rotation matrix M and the size of the output image respectively.
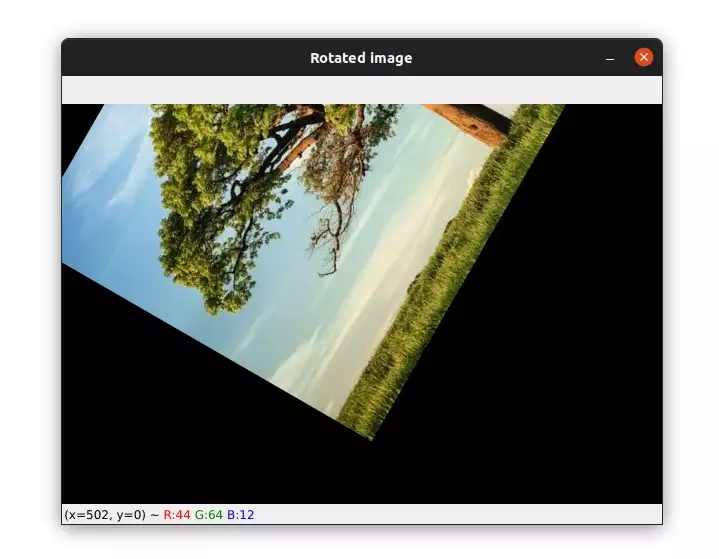
The image below shows the result of this rotation:
Let's see another example of rotation using a scale of 0.5:
# rotate the image by 100 degrees clockwise around the center
# of the image and divide the size of the image by half
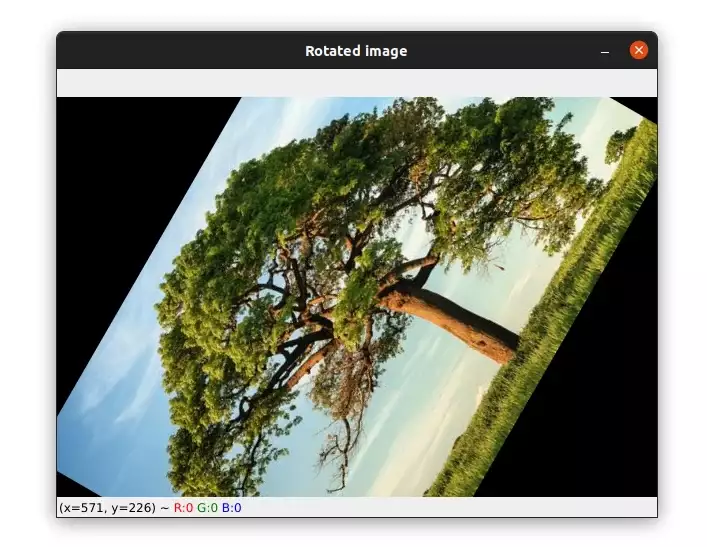
M = cv2.getRotationMatrix2D((center_x, center_y), -100, 0.5)
rotated_image = cv2.warpAffine(image, M, (width, height))The image will be rotated 100 degrees clockwise around the center of rotation and the size of the output image will be half of the input image.

let's see a final example in which we use a different center of rotation:
M = cv2.getRotationMatrix2D((100, 100), 60, 1.0)
rotated_image = cv2.warpAffine(image, M, (width, height))
In this example, the image will be rotated around x=100 and y=100. Please note that the coordinate origin is located at the top-left corner.
Here is what the output image looks like:
Related article: How to Resize Images with OpenCV and Python

Summary
To rotate an image with OpenCV, we first created a 2D rotation matrix using the cv2.getRotationMatrix2D function. We then applied an affine transformation using the cv2.warpAffine function to rotate the image.
If you want to learn more about computer vision and image processing then check out my course Computer Vision and Image Processing with OpenCV and Python.
If you need help, don't hesitate to ask in the comment section.
Previous Article

Number Plate Recognition with OpenCV and EasyOCR
Next Article
