Please consider supporting us by disabling your ad blocker. Thank you for your support.
Please consider supporting us by disabling your ad blocker.
Morphological Operations with OpenCV and Python
In this article we are going to see how to use the following morphological operations:
- Erosion
- Dilation
- Opening
- Closing
Morphological operations are some transformations applied to grayscale or binary images. Morphological operations apply a structuring element to add or remove some pixels from the boundaries of objects in an input image.
A structuring element is a matrix that defines the neighborhood used in the processing of each pixel.
The image below will be used to illustrate the erosion and dilation operations:

This article is part 9 of the tutorial series on computer vision and image processing with OpenCV:
- How to Read, Write, and Save Images with OpenCV and Python
- How to Read and Write Videos with OpenCV and Python
- How to Resize Images with OpenCV and Python
- How to Crop Images with OpenCV and Python
- How to Rotate Images with OpenCV and Python
- How to Annotate Images with OpenCV and Python (coming soon)
- Bitwise Operations and Image Masking with OpenCV and Python (coming soon)
- Image Filtering and Blurring with OpenCV and Python
- Image Thresholding with OpenCV and Python
- Bitwise Operations and Image Masking with OpenCV and Python
- Edge and Contour Detection with OpenCV and Python
Erosion
Erosion is one of the most basic morphological operations. Erosion removes pixels on the boundaries of objects in an image, which will make the objects smaller.
A pixel in the input image is set to 0 if any pixel inside the structuring element has a value of 0, otherwise, the pixel will be kept.
Let's see how to apply erosion to an image:
import cv2

image = cv2.imread("image.png")
gray = cv2.cvtColor(image, cv2.COLOR_BGR2GRAY)
kernel = cv2.getStructuringElement(cv2.MORPH_RECT, (3, 3))

eroded1 = cv2.erode(gray, kernel, iterations=1)
eroded2 = cv2.erode(gray, kernel, iterations=2)

cv2.imshow("original image", image)
cv2.imshow("Eroded 1 ieteration", eroded1)
cv2.imshow("Eroded 2 iterations", eroded2)
cv2.waitKey(0)
We start by loading our image from disk and converting it to grayscale.
Next, we create the structuring element using the cv2.getStructuringElement function. This function takes two required arguments and one optional argument; in our case, we only used the two required arguments: The first one is the type of the structuring element and the second argument is the size of the structuring element.
Using cv2.MORPH_RECT means we want a rectangular structuring element. Other options are available at MorphShapes.
From there, we apply the erosion using the cv2.erode function. This function takes 2 required arguments and 5 optional arguments but in our case, we only used 2 required arguments and 1 optional argument.
The first argument is the image we want to erode. The second argument is the structuring element used for erosion; here we passed a 3x3 structuring element that we created using the cv2.getStructuringElement.
The last argument to this function is the number of times the erosion is applied. In the first example, we applied the erosion once (using iterations=1) and in the second example, we applied the erosion twice (using iterations=2).
Finally, we display the original image and the eroded images, which you can see the result below:
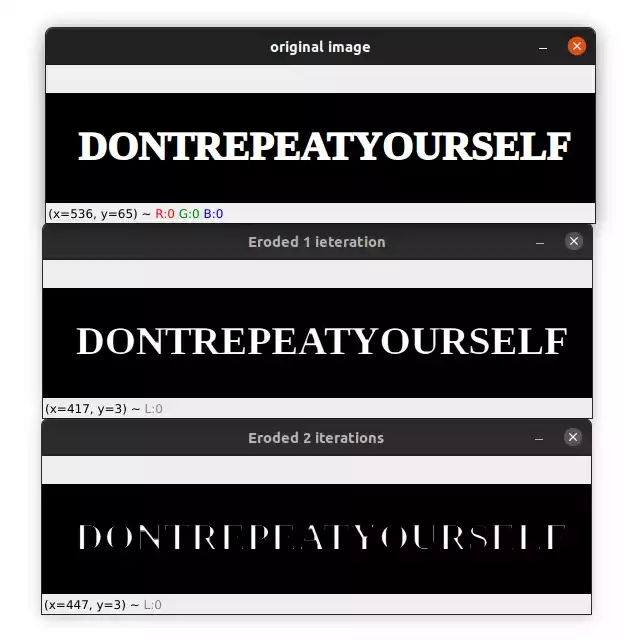
As you can see, after 2 iterations the text is smaller than with a single iteration; the cv2.erosion function removes pixels from the boundaries of an object after each iteration.
Dilation
Dilation is the second most basic morphological operation. Dilation adds pixels on the boundaries of objects in an image, which will increase the size of objects in the image.
A pixel in the input image is set to 1 if any pixel inside the structuring element is greater than 0.
Applying dilation is similar to applying erosion, we just need to use the cv2.dilate function instead of cv2.erode.
image = cv2.imread("image.png")
gray = cv2.cvtColor(image, cv2.COLOR_BGR2GRAY)
kernel = cv2.getStructuringElement(cv2.MORPH_RECT, (3, 3))

dilate1 = cv2.dilate(gray, kernel, iterations=1)
dilate2 = cv2.dilate(gray, kernel, iterations=2)

cv2.imshow("original image", image)
cv2.imshow("Dilated 1 iteration", dilate1)
cv2.imshow("Dilated 2 iterations", dilate2)
cv2.waitKey(0)
As before, we load our image from disk, convert it to grayscale, and define a structuring element using the cv2.getStructuringElement function.
Then we apply dilation using the cv2.dilate function. The first argument to this function is the image we want to dilate. The second argument is the structuring element used for dilation and the third argument is the number of times (iterations) the dilation is applied to the input image.
Please note that the function takes other arguments which you can find in the documentation.
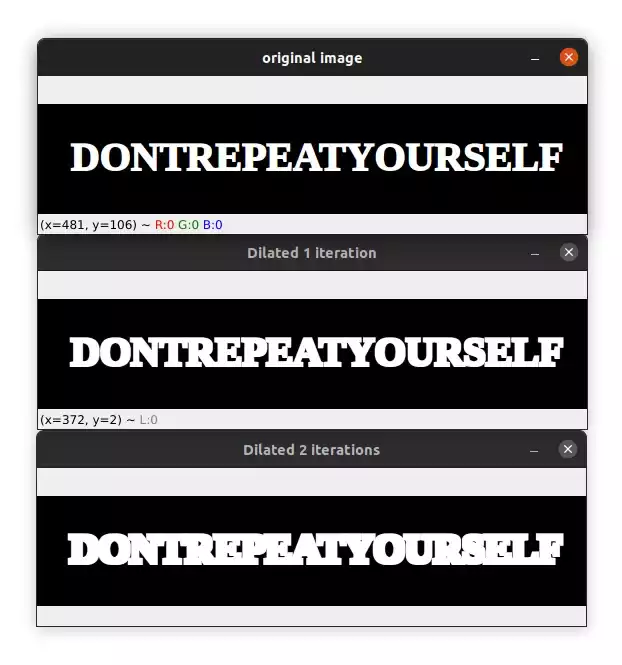
We finally display the resulting images:

Opening
A morphological opening is an erosion followed by a dilation. This operation is used to remove small objects and noise from an image.
Here is how to apply opening to an image:
opening1 = cv2.morphologyEx(gray, cv2.MORPH_OPEN, kernel, iterations=1)
opening2 = cv2.morphologyEx(gray, cv2.MORPH_OPEN, kernel, iterations=2)

cv2.imshow("original image", image)
cv2.imshow("Opening 1 iteration", opening1)
cv2.imshow("Opening 2 iterations", opening2)
cv2.waitKey(0)
The opening operation is applied using the cv2.morphologyEx function. This function takes 3 required parameters and 5 optional parameters. But here we only used the 3 required parameters and 1 optional parameter.
As before, the first argument of this function is the image to which we want to apply the morphological opening. The second argument is the type of morphological operation we want to apply (see MorphTypes).
The third argument is the structuring element used for opening and the last argument is the number of times the opening is applied.
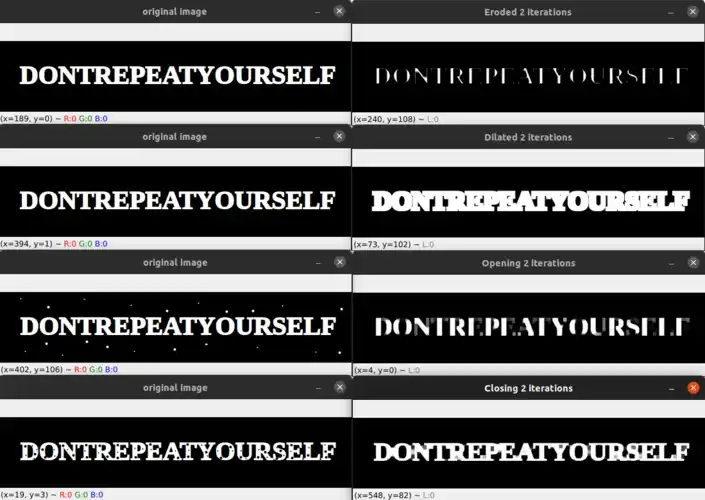
I applied morphological opening to the following image. As you can see the image contains some noise:

After applying morphological opening you'll get the following output:
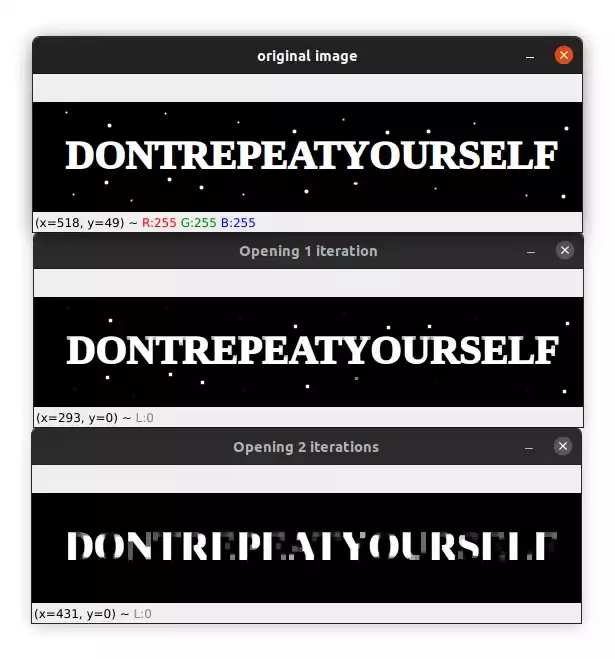
Notice how the small objects (blobs) were removed from the image.
Closing
A morphological closing is a dilation followed by an erosion. This operation is used to close small holes inside the objects.
Applying closing is similar to applying opening, we just need to use cv2.MORPH_CLOSE option instead of cv2.MORPH_OPEN:
closing1 = cv2.morphologyEx(gray, cv2.MORPH_CLOSE, kernel, iterations=1)
closing2 = cv2.morphologyEx(gray, cv2.MORPH_CLOSE, kernel, iterations=2)

cv2.imshow("original image", image)
cv2.imshow("Closing 1 iteration", closing1)
cv2.imshow("Closing 2 iterations", closing2)
cv2.waitKey(0)
Just like with opening, the closing operation is applied using the cv2.morphologyEx function but this time we are using the cv2.MORPH_CLOSE option to indicate that we are using a closing operation.
I used the following image to apply closing. As you can see I added some holes inside the text:

After applying morphological opening you'll get the following output:
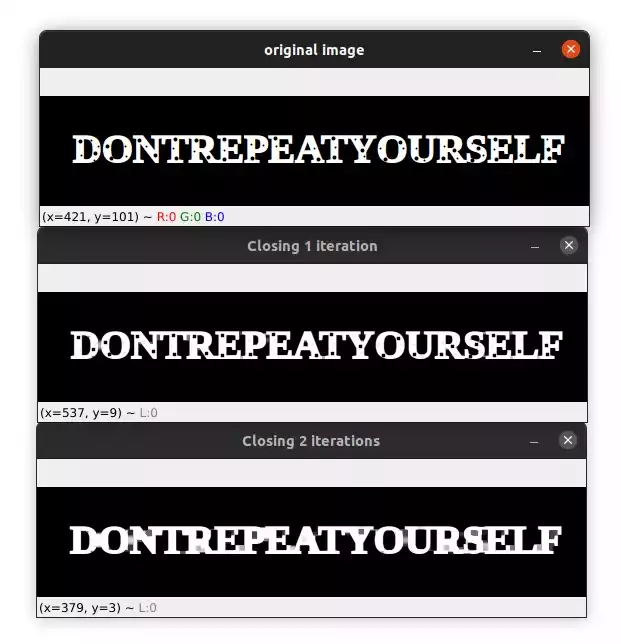
Notice how the holes inside the text were removed.
If you want to learn more about computer vision and image processing then check out my course Computer Vision and Image Processing with OpenCV and Python.
You can get the source code for this article by clicking this link.
Previous Article

Eye Blink Counter with Dlib, Python, and OpenCV
Next Article