Please consider supporting us by disabling your ad blocker. Thank you for your support.
Please consider supporting us by disabling your ad blocker.
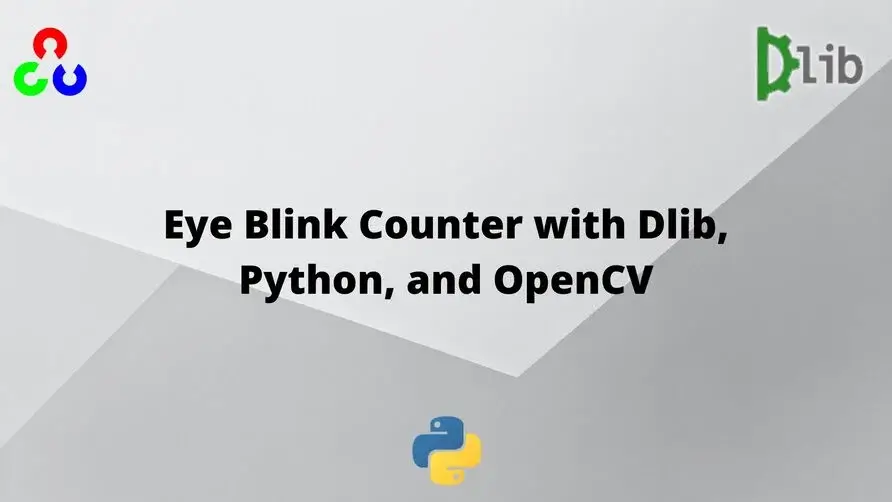
Eye Blink Counter with Dlib, Python, and OpenCV
In this tutorial, we will see how to create a blink detector/counter using Dlib, Python, and OpenCV.
We will first use the face detector from Dlib to detect faces in a video. Then we will use the shape predictor from Dlib to determine the location of the eyes in the face.
Finally, we will use the landmarks of the eyes to compute the eye aspect ratio and use it to determine if the person is blinking.
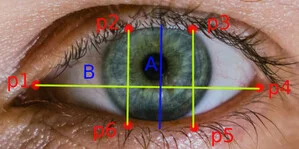
The aspect ratio is equal to A / B from the image above. The aspect ratio is close to zero when the eye is closed and remains approximately constant when the eye is open. So we can compare our eye aspect ratio to a pre-defined threshold to detect blinking.
Blinking Detection
Before detecting blinks we need to detect the eyes. We will use the pre-trained facial landmark detector from Dlib to detect the 68 landmark points on the face. Then we will use the indexes of the eyes to extract the two eyes.
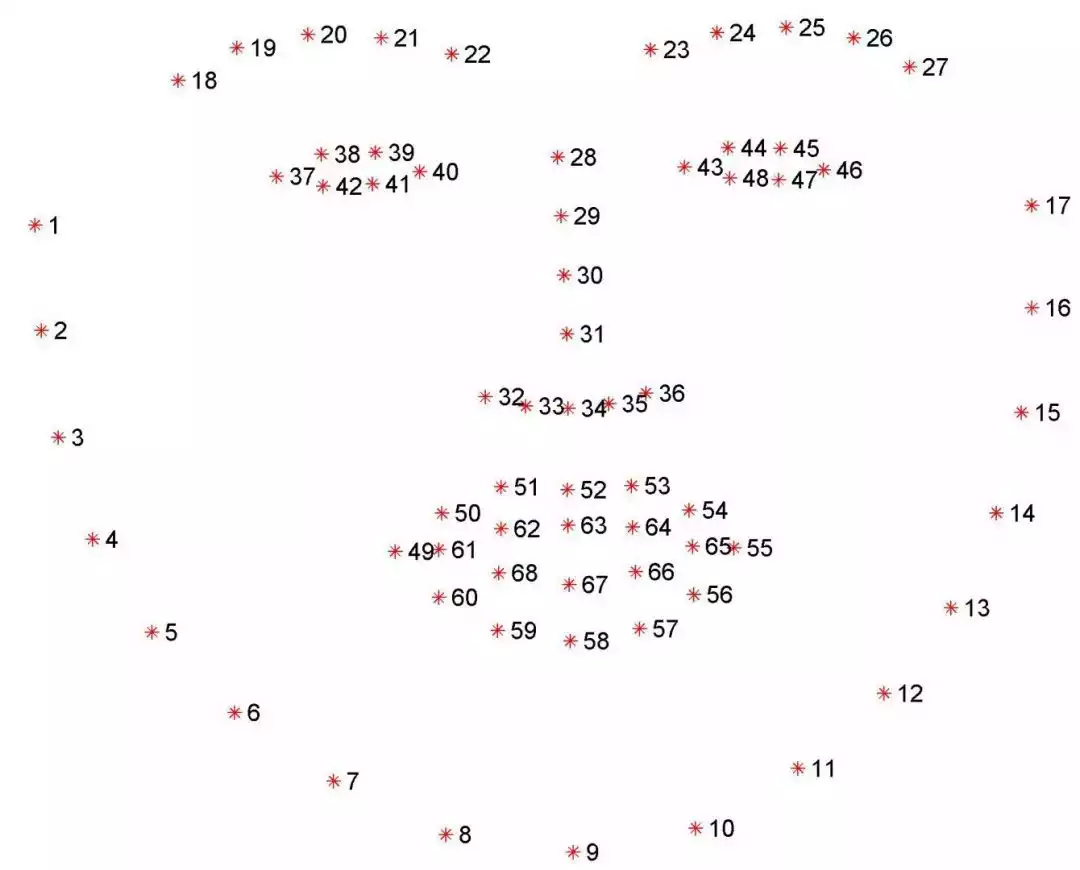
From the image above, you can see that the indexes of the eyes are:
- For the left eye: (37, 38, 39, 40, 41, 42)
- For the right eye: (43, 44, 45, 46, 47, 48)
Let's start by importing the necessary libraries.
import dlib
import cv2
import numpy as np
from numpy.linalg import norm


# initialize the threshold for the blink detection and the number of blinks
threshold = 0.2
eye_closed = False
blinks = 0
We will use the norm function from numpy to compute the euclidean distance between two points.
When we compute the aspect ratio, we will compare it with the threshold value. If the aspect ratio goes below the threshold and then rises above it, we will increment the blink counter.
We then load the pre-trained models from dlib.
# initialize dlib's face detector and face landmark predictor
detector = dlib.get_frontal_face_detector()
predictor = dlib.shape_predictor("shape_predictor_68_face_landmarks.dat")

# iniatialize the video capture object.
vs = cv2.VideoCapture(0)
Now, let's create two functions: the first one will be used to get the midpoints between two sets of points and then compute the euclidean distance.
The second function will be used to compute the eye aspect ratio.
def mid_line_distance(p1 ,p2, p3, p4):
    """compute the euclidean distance between the midpoints of two sets of points"""
    p5 = np.array([int((p1[0] + p2[0])/2), int((p1[1] + p2[1])/2)])
    p6 = np.array([int((p3[0] + p4[0])/2), int((p3[1] + p4[1])/2)])

    return norm(p5 - p6)

def aspect_ratio(landmarks, eye_range):
    # Get the eye coordinates
    eye = np.array(
        [np.array([landmarks.part(i).x, landmarks.part(i).y])
         for i in eye_range]
        )
    # compute the euclidean distances
    B = norm(eye[0] - eye[3])
    A = mid_line_distance(eye[1], eye[2], eye[5], eye[4])
    # Use the euclidean distance to compute the aspect ratio
    ear = A / B
    return ear
Now, we will loop over the frames of the video.
while True:
    # grab the frame from the video capture object,
    # resize it, and convert it to grayscale.
    _, frame = vs.read()
    frame = cv2.resize(frame, (600, 450))
    gray = cv2.cvtColor(frame, cv2.COLOR_BGR2GRAY)

    # detect faces in the grayscale frame
    rects = detector(gray, 0)
The rects variable contains the bounding boxes of the faces (see: How to Resize Images with OpenCV and Python).
So now we will loop over each face in the frame and apply the facial landmark detector to it.
    # loop over the face detections
    for rect in rects:
        landmarks = predictor(gray, rect)

        # Use the coordinates of each eye to compute the eye aspect ratio.
        left_aspect_ratio = aspect_ratio(landmarks, range(42, 48))
        right_aspect_ratio = aspect_ratio(landmarks, range(36, 42))
        ear = (left_aspect_ratio + right_aspect_ratio) / 2.0
After getting the landmarks of the face, we compute the aspect ratio for each eye using our aspect_ratio function.
The final aspect ratio is the average of the aspect ratios of the two eyes.
The next step is to compare the aspect ratio with the threshold value.
        # if the eye aspect ratio is below the blink threshold, set the eye_closed flag to True.
        if ear < threshold:
            eye_closed = True
        # if the eye aspect ratio is above the blink threshold and
        # the eye_closed flag is True, increment the number of blinks.
        elif ear >= threshold and eye_closed:
            blinks += 1
            eye_closed = False
Basically, what we are doing here is that we are checking if the eye aspect ratio goes below the blink threshold and then rises above it. If so, we count this as blinking so we increment the blink counter.
The final step is to draw the landmarks of the eyes, display the number of blinks, and the eye aspect ratio on the frame.
        # draw the landmarks on the frame
        for n in range(36, 48):
            x = landmarks.part(n).x
            y = landmarks.part(n).y
            cv2.circle(frame, (x, y), 4, (255, 0, 0), -1)

        # draw the eye aspect ratio and the number of blinks on the frame
        cv2.putText(frame, "Blinks: {}".format(blinks), (10, 30),
            cv2.FONT_HERSHEY_SIMPLEX, 0.7, (0, 255, 0), 2)
        cv2.putText(frame, "Eye Aspect Ratio: {:.2f}".format(ear), (300, 30),
            cv2.FONT_HERSHEY_SIMPLEX, 0.7, (0, 255, 0), 2)

    cv2.imshow("Frame", frame)
    if cv2.waitKey(1) == ord("q"):
        break

cv2.destroyAllWindows()
vs.stop()
The final result is shown in the video below:

Summary
In this tutorial, you learned how to create a blink counter application using Dlib and facial landmarks.
We started by detecting faces in a video frame using Dlib's face detector. Using the detected faces we then applied Dlib's face landmark predictor to get the facial landmarks.
Next, we used the landmarks to compute the eye aspect ratio and compare it to a threshold value to determine if the person is blinking.
If you want to learn more about computer vision and image processing then check out my course Computer Vision and Image Processing with OpenCV and Python.
You can get the source code for this article by clicking this link.
If you have any questions or want to say something, please leave a comment in the section below.
Related Tutorials
Here are some related tutorials that you may find interesting:
Previous Article
Bubble Sheet Multiple Choice Test with OpenCV and Python
Next Article