Please consider supporting us by disabling your ad blocker. Thank you for your support.
Please consider supporting us by disabling your ad blocker.
Smile Detection with Python, OpenCV, and Haar Cascade

You can train a Haar cascade classifier to detect whatever you want and there are different pre-trained Haar cascades to detect faces, cats, number plates, smiles, and more.
In this tutorial, we are going to implement a smile detector algorithm using OpenCV and a pre-trained Haar cascade.
Smile detention is a subset of facial recognition technology and can be used for different purposes such as for ensuring that people are in good moods when they are being photographed.
Detecting Smiles with Haar Cascade in Images
The Haar cascade file we are going to use in this tutorial is called haarcascade_smile.xml which you can download from the OpenCV's haarcascades directory.
We will also apply Haar cascades to detect faces and draw a bounding box around them; so we will also need the haarcascade_frontalface_default.xml file.
The Haar cascade smile detector actually detects the “mouth” on a face instead of a smile but we are going to do a little trick to detect smiling/not-smiling.
Of course, our detector will not be the most accurate but the goal of this tutorial is to see how to use Haar cascades for object detection.
So let's get started detecting smiles in images using only OpenCV and Haar cascade. Open a new file, name it smile_detector_image.py and let's write some code:
import cv2

width = 800
height = 600
blue = (255, 0, 0)

# load the image, resize it, and convert it to grayscale
image = cv2.imread("images/1.jpg")
image = cv2.resize(image, (width, height))
gray = cv2.cvtColor(image, cv2.COLOR_BGR2GRAY)
We will use the width and height variables to resize our image; the blue variable will be used later on to draw the bounding box and write a text on the image.
Next, we load our image, resize it, and convert it to grayscale.
Now we can load our Haar cascades face and smile detectors:
# load the haar cascades face and smile detectors
face_detector = cv2.CascadeClassifier("haarcascade_frontalface_default.xml")
smile_detector = cv2.CascadeClassifier("haarcascade_smile.xml")

# detect faces in the grayscale image
face_rects = face_detector.detectMultiScale(gray, 1.1, 8)
To detect faces in the input image, we are using the detectMultiScale function passing it 3 parameters:
- The first argument is the image on which we want to detect faces.
- The second argument is the scale factor which specifies how much the image size is reduced at each image scale. Using a value of 1.1 means we reduce the size of the image by 10% at each step.
- The third argument is the number of neighbors each window should have to retain it. Increase this number if you want to get better accuracy but on the other hand, the algorithm will miss some faces.
The function returns a list containing the bounding boxes of the detected faces on the image.
So we can loop over the list of bounding boxes and draw a rectangle around each detected face:
# loop over the face bounding boxes
for (x, y, w, h) in face_rects:
    cv2.rectangle(image, (x, y), (x + w, y + h), blue, 2)
    # extract the face from the grayscale image
    roi = gray[y:y + h, x:x + w]

    # apply the smile detector to the face roi
    smile_rects, rejectLevels, levelWeights = smile_detector.detectMultiScale3(roi, 2.5, 20, outputRejectLevels=True)
So here we loop over the face bounding boxes, draw a rectangle around the face, and extract the region of the face from the image.
Next, we are applying our smile detector to the face ROI. You may have noticed that we are using the detectMultiScale3 function instead of detectMultiScale.
The function works exactly the same way as the previous one, except that it accepts an additional parameter called outputRejectLevels, and returns 3 elements: the bounding boxes for the mouth, rejectLevels, and levelWeights which will allow us to retrieve the certainty of classification.
This way we can set a threshold value and classify a detection with a levelWeights below the threshold value as "not smiling" and a detection with a levelWeights above the threshold value as "smiling".
After several tests, I found that the value 2 was a good threshold for this example.
    # if there was no detection, we consider this a "no smiling" detection
    if len(levelWeights) == 0:
        cv2.putText(image, "Not Smiling", (20, 20),
                cv2.FONT_HERSHEY_SIMPLEX, 0.75, blue, 3)
    else:
        # if `levelWeights` is below 2, we classify this as "Not Smiling"
        if max(levelWeights) < 2:
            cv2.putText(image, "Not Smiling", (20, 20),
                cv2.FONT_HERSHEY_SIMPLEX, 0.75, blue, 3)
        # otherwise, there is a smiling in the face ROI
        else:
            cv2.putText(image, "Smiling", (20, 20),
                cv2.FONT_HERSHEY_SIMPLEX, 0.75, blue, 3)

cv2.imshow("image", image)
cv2.waitKey(0)
Here we check to see if there was a detection. If len(levelWeights) is equal to zero this means that there was no detection and therefore we can say that there is no smiling.
If the level of confidence of our model (max(levelWeights)) is below 2 we report this as "Not Smiling", otherwise, we report the detection as "Smiling".
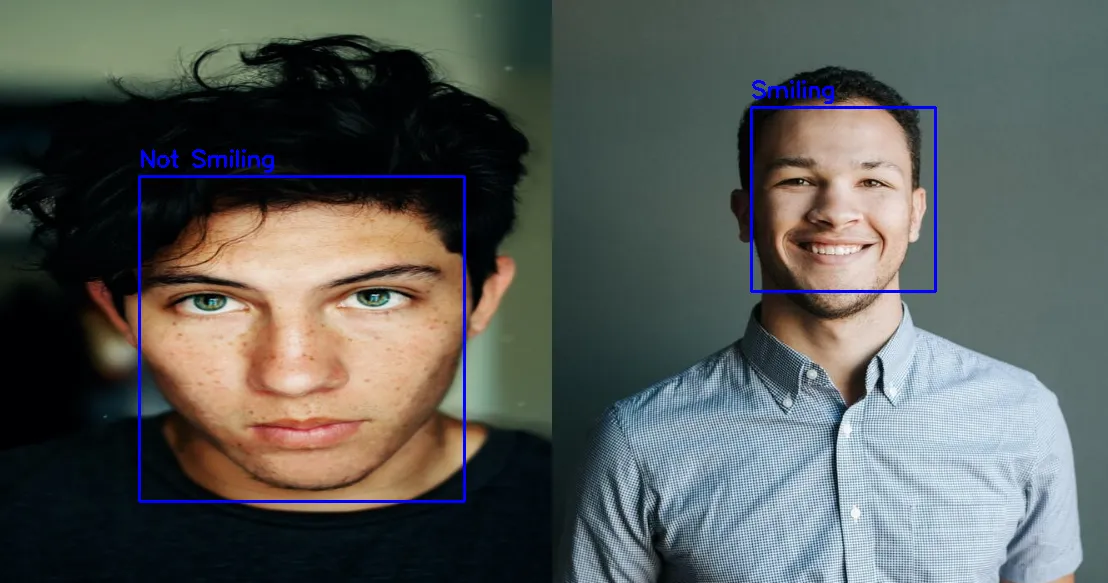
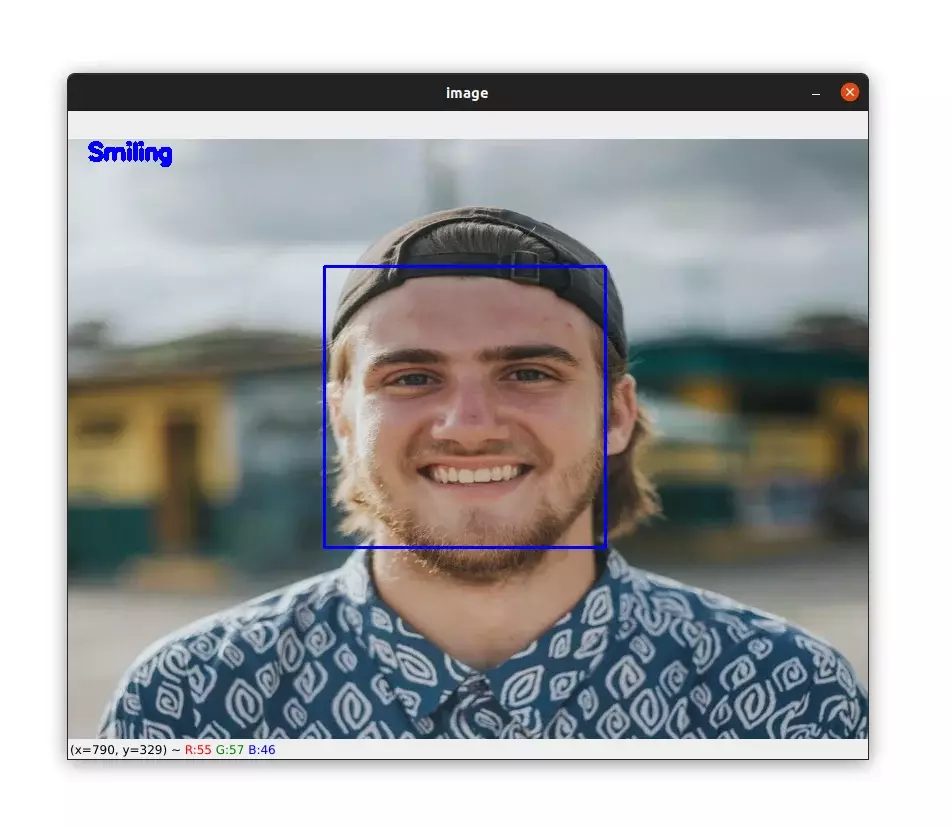
In the image below you can see that our algorithm detected successfully a smile on the image:
And below you can see a "no smile" detection:

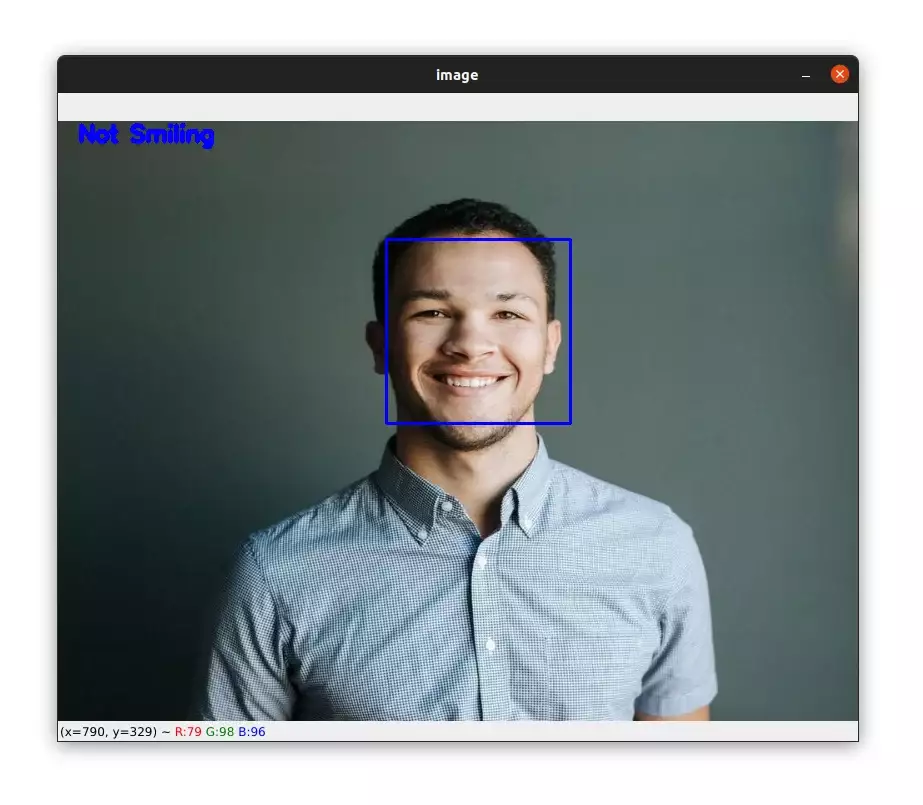
But our algorithm does sometimes report a smile as a no-smile:

Real-time Smile Detection with Haar Cascades
Now that you learned how to apply smile detection to images, let's see how to do it in videos.
Let's start by initializing the video capture object, and loading our Haar cascades detectors:
import cv2

blue = (255, 0, 0)

video_capture = cv2.VideoCapture(0)

# load the haar cascades face and smile detectors
face_detector = cv2.CascadeClassifier("haarcascade_frontalface_default.xml")
smile_detector = cv2.CascadeClassifier("haarcascade_smile.xml")
Now, let's loop over the frames:
# loop over the frames
while True:
    # get the next frame from the video and convert it to grayscale
    _, frame = video_capture.read()
    gray = cv2.cvtColor(frame, cv2.COLOR_BGR2GRAY)

    # apply our face detector to the grayscale frame
    faces = face_detector.detectMultiScale(gray, 1.1, 8)

    # go through the face bounding boxes
    for (x, y, w, h) in faces:
        # draw a rectangle around the face on the frame
        cv2.rectangle(frame, (x, y), (x + w, y + h), blue, 2)
        # get the region of the face
        roi = gray[y:y + h, x:x + w]
Here, the code is the same as before except that we are applying our face detector to the frame instead of the input image.
Next, we can perform smile detection to the face ROI:
        # apply our smile detector to the region of the face
        smile_rects, rejectLevels, levelWeights = smile_detector.detectMultiScale3(
                                                        roi, 2.5, 20, outputRejectLevels=True)

        # weaker detections are classified as "Not Smiling"
        # while stronger detection are classified as "Smiling"
        if len(levelWeights) == 0:
            cv2.putText(frame, "Not Smiling", (20, 20),
		            cv2.FONT_HERSHEY_SIMPLEX, 0.75, blue, 3)
        else:
            if max(levelWeights) < 2:
                cv2.putText(frame, "Not Smiling", (20, 20),
		            cv2.FONT_HERSHEY_SIMPLEX, 0.75, blue, 3)
            else:
                cv2.putText(frame, "Smiling", (20, 20),
		            cv2.FONT_HERSHEY_SIMPLEX, 0.75, blue, 3)

    cv2.imshow('Frame', frame)
    # wait for 1 millisecond and if the q key is pressed, we break the loop
    if cv2.waitKey(1) == ord('q'):
        break

# release the video capture and close all windows
video_capture.release()
cv2.destroyAllWindows()
Again the code above is the same as before except that we are applying smile detection to a frame instead of an image.
We then display our frame on the screen:
Overall, the accuracy in the video above is good but just keep in mind that there are several things that influence our smile detector such as variations in lighting, the distance of the face from the camera, the size of the frames, etc.
So you may have different results with your own videos.
Summary
In this tutorial, you learned how to use OpenCV Haar cascade to detect smiles in images and videos.
Haar cascade is one of the oldest algorithms for object detection developed by Paul Viola and Michael Jones in 2001 in the paper Rapid Object Detection using a Boosted Cascade of Simple Features. The algorithm is very fast and can easily run in real-time.
If you want to learn more about computer vision and image processing then check out my course Computer Vision and Image Processing with OpenCV and Python.
You can get the source code for this article by clicking this link.
If you have any questions or want to say something, please leave a comment in the section below.
Related Tutorials
Here are some related tutorials that you may find interesting:
Previous Article

Overfitting and Underfitting in Deep Learning
Next Article