Please consider supporting us by disabling your ad blocker. Thank you for your support.
Please consider supporting us by disabling your ad blocker.
Face Recognition with Python, Dlib, and Deep Learning

In this tutorial, we will see how to perform face recognition using the Dlib library and deep learning. The OpenCV library will be used for performing some simple image processing tasks such as converting the image to grayscale, resizing it, and so on.
We’ll use a pre-trained network provided by Dlib. This network has been trained on a dataset of over 3 million images. The network is called the ResNet-34.
What is Face Recognition
Face recognition is a process of identifying or verifying the identity of an individual based on their facial features.
It is used to verify the identity of individuals, find missing persons, identify criminals, etc.
Face recognition uses a database of known faces and compares them with the unknown face to find a match and predict the identity of the person.
There are different algorithms used in face recognition, including eigenfaces, local binary patterns, and deep learning. In this tutorial, we will see how to use deep learning to perform face recognition.
Face Recognition Pipeline
Face recognition is generally divided into 4 steps, which are as follows:
-
Face Detection: The first step in the face recognition pipeline is to detect all the faces in the image. This can be done using a face detector such as Haar cascades, Histogram of Oriented Gradients (HOG), or deep learning-based face detectors. In this tutorial, we will use the HOG face detector provided by Dlib.
-
Face Alignment using facial landmarks (optional): The second step in the pipeline is to align or normalize the face using facial landmarks. This step is optional but it can improve the accuracy of the face recognition system. For simplicity, we will skip this step in this tutorial.
-
Face Encoding: In this step, we pass the face image to the model and extract the facial features.
-
Face Recognition: This is the last step in the pipeline where we compare the extracted face features with a database of known face features and try to find a match. This can be done using a variety of different algorithms, including K-Nearest Neighbors (KNN), Support Vector Machine (SVM), Random Forest, etc.

Deep Learning-based Algorithms for Face Recognition and How They Work?
Deep learning algorithms for face recognition are based on convolutional neural networks (CNNs). These types of neural networks are known as siamese networks.
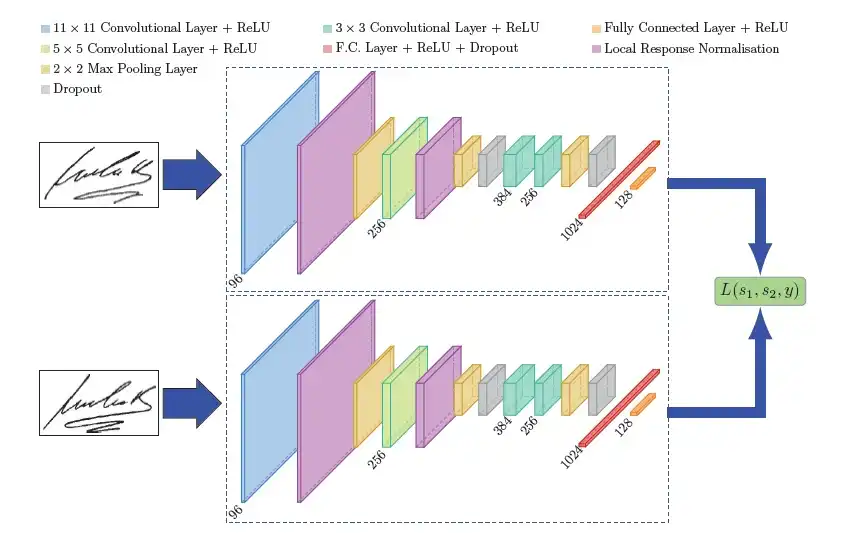 Example of a siamese network architecture
Basically, a siamese network is a type of neural network that contains two or more identical sub-networks. Each sub-network shares the same weights and parameters.
This architecture enables the model to compare input images and find similarities between them, which is essential for face recognition.
Some state-of-the-art siamese network architectures used for face recognition include:
- VGG-Face
- Dlib’s ResNet-based face recognition model
- FaceNet
- OpenFace
- Facebook DeepFace
- DeepID
- ArcFace
- SFace
In this tutorial, we will use Dlib’s ResNet-based face recognition model. This model is based on the ResNet-34 architecture.
So how does the network is trained?
The model is trained by feeding it tree input images:
-
An “anchor” image, which is the image of a given person
-
A “positive” image, which is an image of the same person as the anchor image.
-
A “negative” image, which is an image of a different person.
The network then outputs a 128-d embedding for each image.
The neural network is trained using a loss function that penalizes it if the distance between two embeddings of a similar person ("anchor" and "positive" images) is large or if the distance between two embeddings of two different people ("anchor" and "negative" images) is small.
By doing this, the network will learn to generate embeddings that are closer together for images of the same person and further apart for images of different people.
 An example of the training process of a siamese network (image source)
Once the network is trained, it can then be used to generate embeddings for new images. These embeddings can then be used to train a classifier to recognize faces. The classifier can be any machine learning algorithm, such as K-Nearest Neighbors (KNN), support vector machine (SVM), Random Forest, etc.
In this tutorial, we will use the K-Nearest Neighbors algorithm.
Of course, here I am explaining how the training process work but in our case, we will not train the model from scratch. We will instead use a pre-trained model.
So our work is to take this pre-trained model and use it to generate the features (a.k.a embeddings) for our own dataset. We will then store these features in a database (or a file).
When we get a new image, we detect the face in the image, extract the face region from the image and feed it to the model. The model then generates its 128-d embedding.
Finally, we compute the distance (using KNN) between this new face embedding and all the face embeddings in our database.
The person with the closest embedding is the person in the new image.
Installing the Libraries
In order to perform face recognition, you'll need to install OpenCV, Dlib, and Numpy.
All these libraries can be installed using the pip command. You can install them using the requirements.txt file which is provided in the source code of this tutorial. Make sure to download the source code of this tutorial.
First, create a virtual environment. Then, activate the virtual environment and install the required libraries using the pip command.
$ python3 -m venv venv
$ source venv/bin/activate
$ pip install -r requirements.txt
Our Face Recognition Dataset
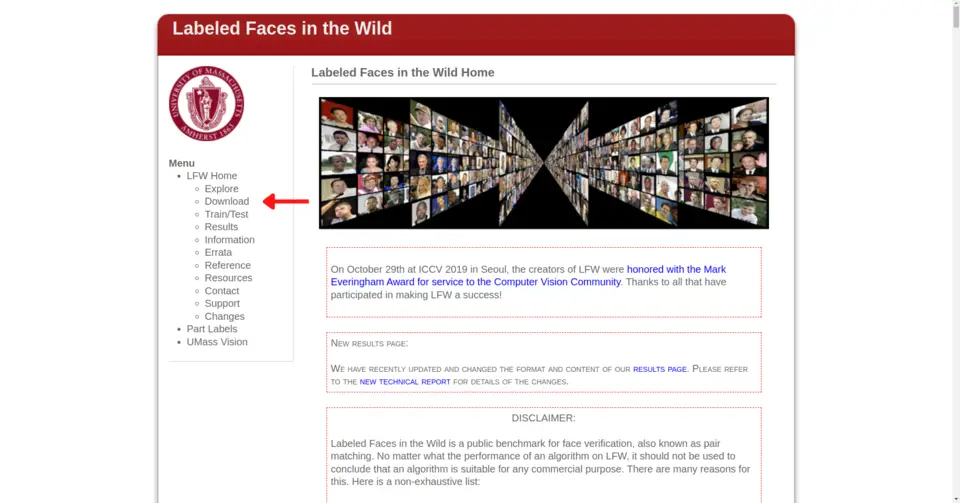
In this tutorial, we will use the Labeled Faces in the Wild (LFW) dataset. This dataset contains over 13,000 images of faces collected from the web.
The dataset is divided into 5749 directories, each containing between 1 and 530 images of a given person. So there are 5749 different person in the dataset.
To download the dataset, navigate to the LFW dataset website and click on the Download button.
Then click on the All images as gzipped tar file link. This will download a file named lfw.tgz.

Once the download is complete, extract the lfw.tgz file. This will create a directory named lfw containing all the images of the dataset.
We will take only 4 different persons from this dataset to perform face recognition. I have already created a folder named dataset in the source code of this tutorial which contains the images of these 4 persons.
The persons I have chosen are: Arnold Schwarzenegger, Jean Chretien, Junichiro Koizumi, and Recep Tayyip Erdogan.
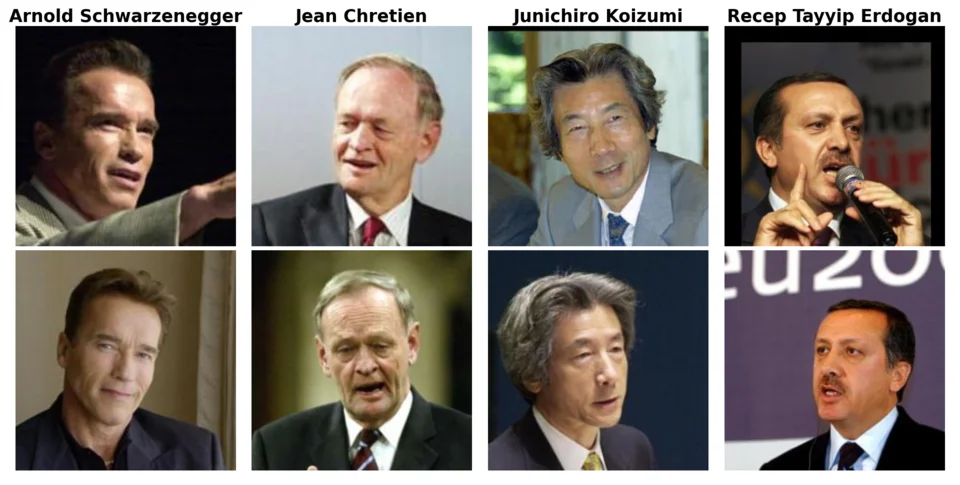 Our face recognition dataset was taken from the LFW dataset
I also removed images containing multiple faces because the algorithm we are going to create assumes there is either one or multiple faces but of the same person in the image.
Project Structure
The project structure of this tutorial is as follows:
tree --filelimit 10 --dirsfirst

├── dataset
│   ├── Arnold_Schwarzenegger  [35 entries]
│   ├── Jean_Chretien  [48 entries]
│   ├── Junichiro_Koizumi  [47 entries]
│   └── Recep_Tayyip_Erdogan  [24 entries]
├── examples  [14 entries]
├── models
│   ├── dlib_face_recognition_resnet_model_v1.dat
│   └── shape_predictor_68_face_landmarks.dat
├── venv
├── encodings.pickle
├── face_encoding.py
├── face_recognition_images.py
├── face_recognition_videos.py
├── requirements.txt
└── utils.py
Here is a brief description of each directory/file:
-
dataset/: Contains the images of the people we want to recognize.
-
examples/: Contains some example images that we will use to test our face recognition system.
-
models/: Contains the pre-trained models that we will use to generate the face embeddings.
-
venv/: Our virtual environment.
-
encodings.pickle: File containing the face embeddings of the people in our dataset. These embeddings will be generated by the face_encoding.py script.
-
face_encoding.py: This file contains the code for generating the face embeddings of the people in our dataset.
-
face_recognition_images.py: This file contains the code for performing face recognition on images.
-
face_recognition_videos.py: This one contains the code for performing face recognition on videos.
-
requirements.txt: Contains the list of libraries that we need to install. You can install them using the command pip install -r requirements.txt.
-
utils.py: To make our code more organized, we will put all the utility functions in this file.
Face Enoding using Dlib and Deep Learning
The first thing we need to do is to load the images of the people we want to recognize. We will then extract the face regions from the images and generate the face embeddings for each face region.
Let's start by importing the required packages and the models. Open up the utils.py file and let's write some code.
import dlib
from glob import glob
import cv2
import numpy as np
import os

# load the face detector, landmark predictor, and face recognition model
face_detector = dlib.get_frontal_face_detector()
shape_predictor = dlib.shape_predictor("models/shape_predictor_68_face_landmarks.dat")
face_encoder = dlib.face_recognition_model_v1("models/dlib_face_recognition_resnet_model_v1.dat")
The face detector (face_detector) is used to detect the face regions in the input image.
The landmark predictor (shape_predictor) is used to localize the facial landmarks in the face region. We will need the facial landmarks to generate the face embeddings.
The face encoder model (face_encoder) is used to generate the face embeddings.
Next, we will get the paths to the images in our dataset. Let's create a helper function for that:
# change this to include other image formats you want to support (e.g. .webp)
VALID_EXTENSIONS = ['.png', '.jpg', '.jpeg']

def get_image_paths(root_dir, class_names):
    """ grab the paths to the images in our dataset"""
    image_paths = []
The get_image_paths() function takes two arguments: root_dir and class_names.
The root_dir is the path to the dataset. The class_names is a list of the names of each person we want to recognize.
Here is what the class_names list looks like:
>>> class_names
['Recep_Tayyip_Erdogan', 'Jean_Chretien', 'Junichiro_Koizumi', 'Arnold_Schwarzenegger']
Now, we will loop over the class names, and for each class name, we will loop over the images in the directory and add the path to the image to the image_paths list.
    # loop over the class names
    for class_name in class_names:
        # grab the paths to the files in the current class directory
        class_dir = os.path.sep.join([root_dir, class_name])
        class_file_paths = glob(os.path.sep.join([class_dir, '*.*']))

        # loop over the file paths in the current class directory
        for file_path in class_file_paths:
            # extract the file extension of the current file
            ext = os.path.splitext(file_path)[1]

            # if the file extension is not in the valid extensions list, ignore the file
            if ext.lower() not in VALID_EXTENSIONS:
                print("Skipping file: {}".format(file_path))
                continue

            # add the path to the current image to the list of image paths
            image_paths.append(file_path)

    return image_paths
The glob() function returns a list of paths to the files in the current class directory. We loop over the file paths and extract the file extension of the current file. If the file extension is not valid (not an image), we will skip it and continue to the next one.
If the file extension is valid (an image), we add the path to the current image to the image_paths list.
Let's test our get_image_paths() function.
>>> from utils import get_image_paths
>>> class_names = ['Recep_Tayyip_Erdogan', 'Jean_Chretien', 'Junichiro_Koizumi', 'Arnold_Schwarzenegger']
>>> image_paths = get_image_paths("dataset", class_names)
>>> image_paths
['dataset/Recep_Tayyip_Erdogan/Recep_Tayyip_Erdogan_0017.jpg', 'dataset/Recep_Tayyip_Erdogan/Recep_Tayyip_Erdogan_0013.jpg', 'dataset/Recep_Tayyip_Erdogan/Recep_Tayyip_Erdogan_0012.jpg', ...]
As you can see, the get_image_paths() function returns a list of paths to the images in our dataset.
Next, we will create a helper function for extracting the face regions from the images. We will use the Dlib face detector for that.
def face_rects(image):
    # convert the image to grayscale
    gray = cv2.cvtColor(image, cv2.COLOR_BGR2GRAY)
    # detect faces in the grayscale image
    rects = face_detector(gray, 1)
    # return the bounding boxes
    return rects
The face_rects() function takes an image as input and applies our face detector to it. It returns the bounding boxes of the face regions in the image.
Now that we have our bounding boxes, we can use them to apply the landmark predictor and get the facial landmarks.
def face_landmarks(image):
    return [shape_predictor(image, face_rect) for face_rect in face_rects(image)]
This function loops over the bounding boxes of each face region. For each face region, it applies the landmark predictor.
It returns a list containing the facial landmarks of each face region.
And now, the last step is to generate the face embeddings for each face region. Again, we will create a helper function for that.
def face_encodings(image):
    # compute the facial embeddings for each face
    # in the input image. the `compute_face_descriptor`
    # function returns a 128-d vector that describes the face in an image
    return [np.array(face_encoder.compute_face_descriptor(image, face_landmark))
            for face_landmark in face_landmarks(image)]
So here the face_encodings() function takes an image as input and loops over the facial landmarks of each face region.
For each face region, it applies the face encoder and generates the face embedding. It returns a list containing the face embedding of each face region.
Let's test our face_encodings() function.
>>> from utils import face_encodings
>>> import cv2
>>> image = cv2.imread("dataset/Recep_Tayyip_Erdogan/Recep_Tayyip_Erdogan_0017.jpg")
>>> face_encodings(image)
[array([-0.06507568,  0.09282234, -0.05310396,  0.02033956, -0.05189228,
        0.0038331 ,  0.02058978, -0.16266678,  0.16215618, -0.07854272,
        0.22294444, -0.02746225, -0.21170133, -0.10646843,  0.12207212,
        0.08830512, -0.1529105 , -0.15543598, -0.13133761, -0.07789465,
       -0.01266594, -0.03342287, -0.07684287, -0.01465143, -0.16457887,
       -0.29837033, -0.07858203, -0.06912123,  0.10793255, -0.06668072,
        0.05952527, -0.01771747, -0.18992454, -0.10981462,  0.09109481,
        0.06847958, -0.06725877, -0.02276845,  0.15260877, -0.05116167,
       -0.13816157, -0.05038669,  0.10000665,  0.25293767,  0.11579101,
        0.09511411,  0.05221565, -0.10308918, ...])]
>>> face_encodings(image)[0].shape
(128,)
As you can see, the face_encodings() function returns a list containing the face embedding of each face region in the image. Each face embedding is a 128-d Numpy array.
Now that we have our helper functions, we can start building our face recognition system.
We will start by generating the face embeddings for each image in our dataset. We will then store the face embeddings in a dictionary. The keys of the dictionary will be the names of each person in our dataset and the values will be a list of face embeddings for each image of the person.
Finally, we will save the dictionary to disk.
Open the face_encoding.py file and add the following code:
import pickle
import cv2
import os

from utils import get_image_paths
from utils import face_encodings


root_dir = "dataset"
class_names = os.listdir(root_dir)

# get the paths to the images
image_paths = get_image_paths(root_dir, class_names)
# initialize a dictionary to store the name of each person and the corresponding encodings
name_encondings_dict = {}
We will use the pickle module to save our dictionary to a file so that we can use it later when we test our face recognition system.
Here we are using the get_image_paths() function to get the paths to the images in our dataset.
We are also initializing a dictionary to store the labels (name of each person) and the corresponding face embeddings.
Now, we will loop over the paths of images and generate the face embeddings for each image.
# initialize the number of images processed
nb_current_image = 1
# now we can loop over the image paths, locate the faces, and encode them
for image_path in image_paths:
    print(f"Image processed {nb_current_image}/{len(image_paths)}")
    # load the image
    image = cv2.imread(image_path)
    # get the face embeddings
    encodings = face_encodings(image)
    # get the name from the image path
    name = image_path.split(os.path.sep)[-2]
    # get the encodings for the current name
    e = name_encondings_dict.get(name, [])
    # update the list of encodings for the current name
    e.extend(encodings)
    # update the list of encodings for the current name
    name_encondings_dict[name] = e
    nb_current_image += 1
So here we are looping over the paths of images. For each path, we are loading the image using OpenCV and generating the face embeddings using the face_encodings() function.
Recall that internally, the face_encodings() function applies the face detector to get the bounding boxes of the face regions in the image and then applies the landmark predictor to get the facial landmarks. Finally, it applies the face encoder using the facial landmarks to generate the face embeddings.
We are also getting the name of the person from the path of the image. The path of the image is of the form dataset/Recep_Tayyip_Erdogan/Recep_Tayyip_Erdogan_0017.jpg. So we can get the name of the person by splitting the path using the directory separator (os.path.sep) and getting the second last element of the list.
Next, we try to get the list of face embeddings for the current person from the dictionary. If the name of the person is not in the dictionary, we initialize an empty list for the face embeddings.
Then we extend the list of embeddings with the face embeddings generated for the current image. Finally, we update the dictionary with the new list of face embeddings for the current person.
After the loop, we will have a dictionary with the name of each person and the corresponding list of face embeddings for each image of the person.
The dictionary will look something like this:
>>> name_encondings_dict
{'Recep_Tayyip_Erdogan': [array([-0.05895536,  0.07766615,  ...]),
                          array([-0.04809677,  0.08508434,  ...]),
                          ...],
'Jean_Chretien': [array([-0.18319653,  -0.18853943, ...]),
                  array([-0.065067637,  0.13090725, ...]),
                  ...],
'Junichiro_Koizumi': [array([-0.18313943, 0.07619441, ...]),
                      array([-0.18313943,  0.0761441, ...]),
                      ...],
'Arnold_Schwarzenegger': [array([-0.117762501,  0.152411991, ...]),
                          array([-0.117625501,  0.152341991, ...]),
                          ...],
}
The last step is to save the dictionary to a file using the pickle module.
# save the name encodings dictionary to disk
with open("encodings.pickle", "wb") as f:
    pickle.dump(name_encondings_dict, f)
Now, we can run the face_encoding.py script to generate the face embeddings for each image in our dataset. Open the terminal, navigate to the project directory, and run the following command:
$ python face_encoding.py
Image processed 1/175
Image processed 2/175
Image processed 3/175
...
Image processed 173/175
Image processed 174/175
Image processed 175/175
After the script finishes running, you should see a file named encodings.pickle in the project directory. This file contains the dictionary with the name of each person and the corresponding list of face embeddings for each image of the person.
Face Recognition in Images
Now that we have our face embeddings, we can start recognizing faces in images.
We will write the following code in the face_recognition_images.py file:
import pickle
import cv2

from utils import face_rects
from utils import face_encodings

# load the encodings + names dictionary
with open("encodings.pickle", "rb") as f:
    name_encodings_dict = pickle.load(f)

# load the input image
image = cv2.imread("examples/1.jpeg")
# get the 128-d face embeddings for each face in the input image
encodings = face_encodings(image)
# this list will contain the names of each face detected in the image
names = []
We first load the dictionary containing the name of each person and the corresponding list of face embeddings.
Next, we load the input image using OpenCV and generate the face embeddings for each face in the image using the face_encodings() function.
The next step is to loop over the face embeddings and compare them with the face embeddings of each person in our dataset. We will need another helper function that computes the distance between the current face embedding and the face embedding of each person in our dataset.
If the distance between the current face embedding and a face embedding in the database is less than a threshold, the face is considered a match so we increment the "number of matches" for the current person by 1.
It's easier to understand this logic by looking at the code. Open the utils.py file and add the following code:
def nb_of_matches(known_encodings, unknown_encoding):
    # compute the Euclidean distance between the current face encoding
    # and all the face encodings in the database
    distances = np.linalg.norm(known_encodings - unknown_encoding, axis=1)
    # keep only the distances that are less than the threshold
    small_distances = distances <= 0.6
    # return the number of matches
    return sum(small_distances)
The nb_of_matches() function takes two arguments: the list of face embeddings of each person in our dataset (known_encodings) and the face embedding of the current face in the input image (unknown_encoding).
It computes the Euclidean distance between the current face encoding and all the face encodings in the database. Then, it keeps only the distances that are less than the threshold (the face is considered a match if the distance is less than the threshold).
Finally, it sums the number of times the distance is less than the threshold to get the number of matches for the current face.
Now, we can loop over the face embeddings of each face in the input image and use the nb_of_matches() function to get the number of matches for each face.
# don't forget to import our helper function
from utils import nb_of_matches

# ...

# loop over the encodings
for encoding in encodings:
    # initialize a dictionary to store the name of the
    # person and the number of times it was matched
    counts = {}
    # loop over the known encodings
    for (name, encodings) in name_encodings_dict.items():
        # compute the number of matches between the current encoding and the encodings
        # of the known faces and store the number of matches in the dictionary
        counts[name] = nb_of_matches(encodings, encoding)
    # check if all the number of matches are equal to 0
    # if there is no match for any name, then we set the name to "Unknown"
    if all(count == 0 for count in counts.values()):
        name = "Unknown"
    # otherwise, we get the name with the highest number of matches
    else:
        name = max(counts, key=counts.get)

    # add the name to the list of names
    names.append(name)
So first we initialize a dictionary to keep track of the number of matches for each person. Then, using our dictionary of known encodings, we use the nb_of_matches() function to get the number of matches for the current face encoding and store it in the counts dictionary.
Finally, we use the counts dictionary to get the name of the person with the highest number of matches. In case there is no match for any person (all the number of matches are equal to 0), we set the name to "Unknown". We then add the name to the list of names.
The last step is to draw a rectangle around each face in the input image and write the name of the person on top of the rectangle.
# loop over the `rectangles` of the faces in the
# input image using the `face_rects` function
for rect, name in zip(face_rects(image), names):
    # get the bounding box for each face using the `rect` variable
    x1, y1, x2, y2 = rect.left(), rect.top(), rect.right(), rect.bottom()
    # draw the bounding box of the face along with the name of the person
    cv2.rectangle(image, (x1, y1), (x2, y2), (0, 255, 0), 2)
    cv2.putText(image, name, (x1, y1 - 10),
            cv2.FONT_HERSHEY_SIMPLEX, 0.75, (0, 255, 0), 2)

# show the output image
cv2.imshow("image", image)
cv2.waitKey(0)
The face_rects() utility function returns a list of rectangles for each face in the input image. These rectangles are provided by the Dlib library.
We loop over the rectangles and get the bounding box for each face. Then, we draw a rectangle around each face and write the name of the person on top of the rectangle.
Finally, we show the output image using OpenCV.
Now, it's time to test our face recognition algorithm. I have added a few images to the examples folder. Make sure to download the source code for this tutorial.
Here is an example of the output of our face recognition algorithm:
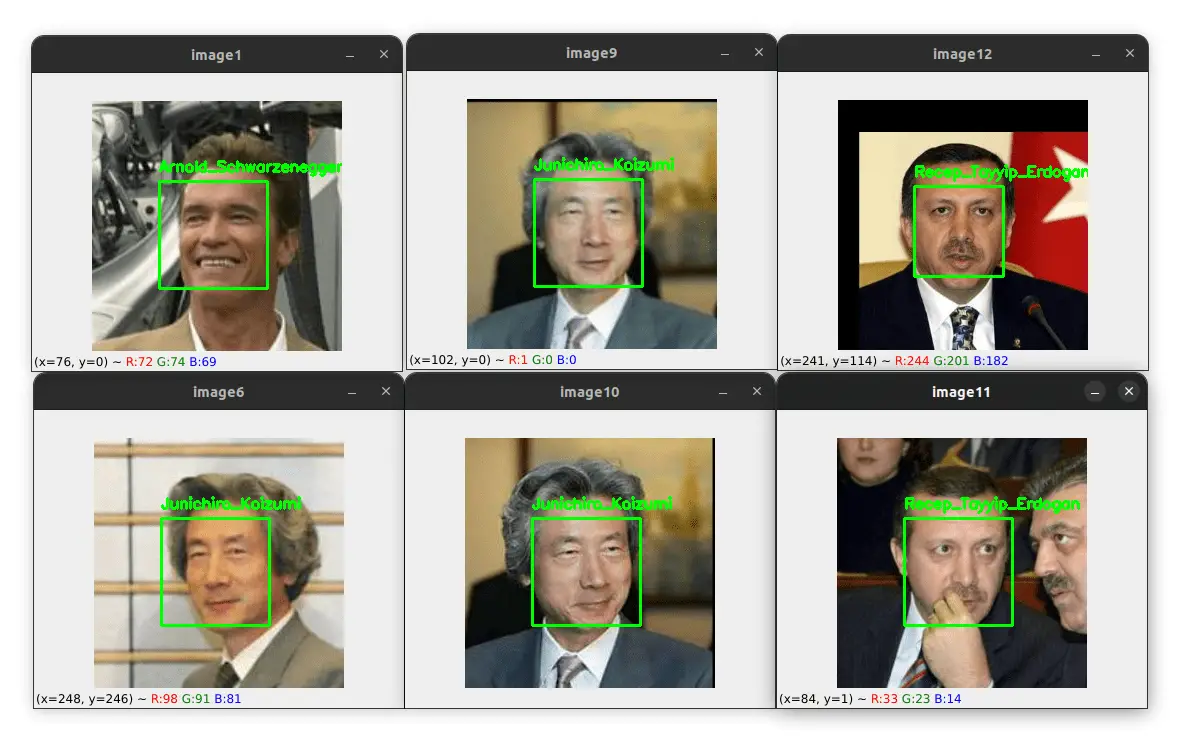
Here I tested on some images that are inside the exemples folder. As you can see, the algorithm correctly identified the faces of each person in the image.
Now, what if there is more than one person in the input image? Let's see an example:
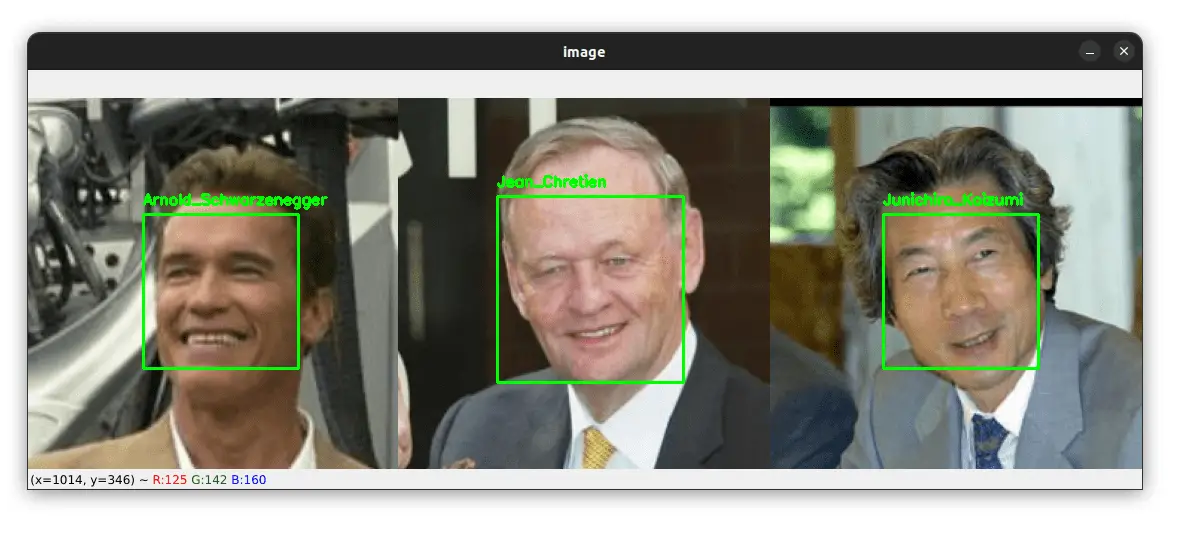
As you can see, the algorithm correctly identified the three faces in the same image.
And what if there is a face of a person that is not in our dataset? Let's see an example:
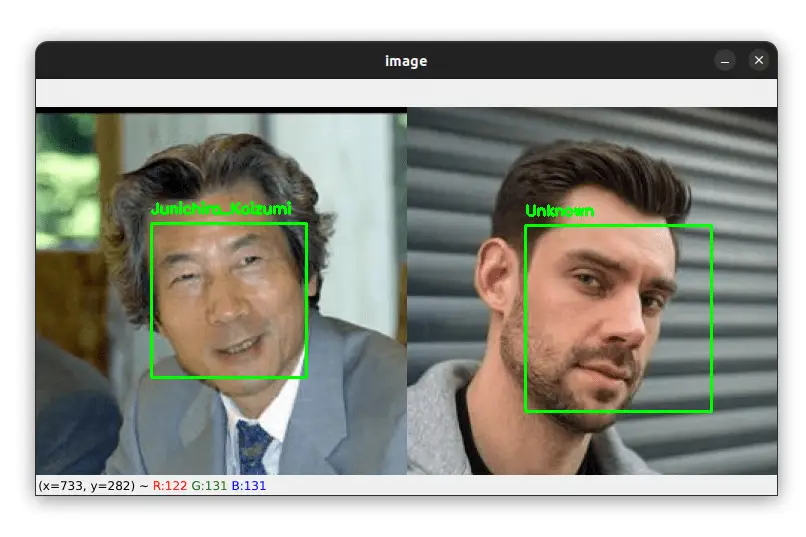
Our dataset does not contain images of the person on the right, but our algorithm is smart enough to label him as an "Unknown" person.
I have included in the source code a Python script that you can use to test the face recognition algorithm on videos.
I am not going to cover face recognition in videos since the code is almost the same as the code for images. The only difference is that we need to loop over the frames of the video.
Summary
In this tutorial, we learned how to perform face recognition using Python, Dlib, and Deep Learning. As you saw, the face recognition algorithm is very accurate even though we used very few images to generate the face embeddings.
The source code for this article is available through this link.
If you have any questions, feel free to leave a comment below.
Related Tutorials
Here are some related tutorials that you may find interesting:
Previous Article
Object Detection with Python, Deep Learning, and OpenCV
Next Article
Image Thresholding with OpenCV and Python
Hi Sapna, thanks for the feedback!

In order to detect the person you want, you first need to collect some images of it (10-50) and then use the source code from the tutorial to generate the face embeddings and store them in a file.

Once you have your face embeddings, you can use the face_recognition_images.py script to detect the person you want. the model should recognize her since you have its face embeddings stored in the file.

Hope this will help :)
Feb. 4, 2023, 2:29 p.m.
Well explained. How can the code be used for the persons wearing a mask.
Feb. 19, 2023, 10:18 a.m.
Nope, this code can only recognize the persons on this tutorial :/
Feb. 19, 2023, 11:47 a.m.
Hey, Its feels too good to read your facial recognition blog. I need some help that if you can send me the code for Attendance System by Facial recognition which can actually mark the attendance of 5-10 students on live camera.
Feb. 20, 2023, 4:46 p.m.
Sorry Rohit, I don't have the code for an Attendance System!
Feb. 20, 2023, 7:18 p.m.
Feb. 4, 2023, 10:08 a.m.