Please consider supporting us by disabling your ad blocker. Thank you for your support.
Please consider supporting us by disabling your ad blocker.
Django blog tutorial part 1: Project Configuration
Hi everyone and welcome! In this tutorial series, we are going to build a blog application with Python and the Django web framework. We will start from the configuration of the project then we will implement the following features: authentication, reset password, change password, comment, create a post, and finally we will deploy the application.
You can open the link below to see the application we are going to create (two features are missing, though: media files are not displayed and reset password don't work because the application is hosted for free).
www.django-blog-rouizi.herokuapp.com
The application has 1000 free dyno hours per month, when this limit is reached the application stop working until next month. This is because I am using Heroku free plan.
Below, I included a list of the articles in this series:
- Django blog tutorial part 1: Project Configuration (This post)
- Django blog tutorial part 2: Model View Template
- Django blog tutorial part 3: Authentication and Profile Page
- Django blog tutorial 4: Posts and Comments
- Django blog tutorial part 5: Deployment on Heroku
- Django blog tutorial part 6: Setting Up an Email Service
- Django blog tutorial part 7: Serving Media Files From Amazon S3
Dependencies
- Python 3.8
- Django 3.1
- PostgreSQL 12.4
- Ubuntu 20.04
To check the version of Python tap the following command in the terminal:
$ python3 -V
Python 3.8.2
Setting Up a Virtual Environment and the Project
Let's start by creating a new directory and then initialize a virtual environment:
$ mkdir myproject && cd $_
myproject$ python3 -m venv venv
myproject$ source venv/bin/activate
Note: From now on when we are in the root directory of the project (myproject$), I will abbreviate it to $.
Now we can install Django with the pip command:
(venv) $ pip install djangoWhen the installation ends we are ready to create a new Django project:
(venv) $ django-admin startproject blog .The use of . just tell Django to create the project in the current directory (myproject).

Configuring a PostgreSQL Database
To use a PostgreSQL database in a Django project, you must install the Psycopg2 library:
(venv) $ pip install psycopg2Now we need to connect to PostgreSQL using the postgres user to create a user and a database:
(venv) $ sudo -u postgres psql
password for user postgres :
psql (12.4 (Ubuntu 12.4-1.pgdg20.04+1))
Type "help" for help.

postgres=# CREATE DATABASE blog;
postgres=# CREATE USER test WITH ENCRYPTED PASSWORD '1234';
postgres=# GRANT ALL PRIVILEGES ON DATABASE blog TO test;
postgres=# \q
The last step is to let Django know that we want to use the database we just created.
# blog/settings.py
# ...

DATABASES = {
  'default': {
      'ENGINE': 'django.db.backends.postgresql',
      'NAME': 'blog',
      'USER': 'test',
      'PASSWORD': '1234',
      'HOST': '',
      'PORT': 5432
  }
}

# ...
You can remove the db.sqlite3 database:
(venv) $ rm db.sqlite3 Then start the server. You should see the output below:
(venv) $ python manage.py runserver
Watching for file changes with StatReloader
Performing system checks...

System check identified no issues (0 silenced).

# ...
If, instead, you have this error:
Watching for file changes with StatReloader
Performing system checks...

System check identified no issues (0 silenced).
Exception in thread django-main-thread:
Traceback (most recent call last):

# ...
django.db.utils.OperationalError: FATAL:  Peer authentication failed for user "test"
Then you need to modify peer authentication to password authentication. Open the file pg_hba.conf (run locate pg_hba.conf to find where the file is):
(venv) $ sudo nano /etc/postgresql/12/main/pg_hba.conf

# change this line:

# "local" is for Unix domain socket connections only
local   all             all                                 peer

# to this:

# "local" is for Unix domain socket connections only
local   all             test                                md5
Don't forget to restart the server:
(venv) $ sudo service postgresql restartUsing a Custom User Model
In the Django documentation, they highly recommend setting up a custom user model when starting a new project, even if the default one is sufficient for us. And since we need to extend the user model later, we are going to follow this recommendation.
First, we need to create an app:
(venv) $ python manage.py startapp usersThen open the file users/models.py and add these lines:
# users/models.py
from django.db import models
from django.contrib.auth.models import AbstractUser

class User(AbstractUser):
    pass
Now we need to add the app in the INSTALLED_APPS settings and point AUTH_USER_MODEL to our custom user model:
# blog/settings.py
INSTALLED_APPS = [
  # ...
  'users',
]

# ...

AUTH_USER_MODEL = 'users.User'
and register the model in users/admin.py:
# users/admin.py
from django.contrib import admin
from django.contrib.auth.admin import UserAdmin
from .models import User

admin.site.register(User, UserAdmin)
Finally, we can run the migrations:
(venv) $ python manage.py makemigrations
Migrations for 'users':
users/migrations/0001_initial.py
  - Create model User

(venv) $ python manage.py migrate
Operations to perform:
  Apply all migrations: admin, auth, contenttypes, sessions, users
Running migrations:
  Applying contenttypes.0001_initial... OK

  # ...
If you want to learn more about custom user models, check out my post Django: Custom User Model Extending AbstractUser.
Hello World
To finish this part we are going to create a simple page that displays «Hello World».
First, let's create a new app:
(venv) $ python manage.py startapp coreand add it to INSTALLED_APPS:
# blog/settings.py
INSTALLED_APPS = [
  # ...
  'users',
  'core',
]
So far our project structure looks like this:
|── myproject/
|    |── blog/
|    |    |── asgi.py
|    |    |── __init__.py
|    |    |── settings.py
|    |    |── urls.py
|    |    |── wsgi.py
|    |── core/
|    |    |── migrations/
|    |    |    |── __init__.py
|    |    |── admin.py
|    |    |── apps.py
|    |    |── __init__.py
|    |    |── models.py
|    |    |── tests.py
|    |    |── views.py
|    |── users/
|    |    |── migrations/
|    |    |    |── __init__.py
|    |    |── admin.py
|    |    |── apps.py
|    |    |── __init__.py
|    |    |── models.py
|    |    |── tests.py
|    |    |── views.py
|    |──venv/
|    |── manage.py
Template Configuration
Good. Now we have to create a new folder named templates in the root directory where manage.py live:
|── myproject/
|    |── blog/
|    |── core/
|    |── templates/     <-- here!
|    |── users/
|    |── venv/
|    |── manage.py
and inside the templates folder, create a file named base.html:
<!DOCTYPE html>
<html lang="en">
<head>
<meta charset="utf-8">
<meta name="viewport" content="width=device-width, initial-scale=1, shrink-to-fit=no">
<!-- Bootstrap CSS -->
<link rel="stylesheet" href="https://stackpath.bootstrapcdn.com/bootstrap/4.5.2/css/bootstrap.min.css"
integrity="sha384-JcKb8q3iqJ61gNV9KGb8thSsNjpSL0n8PARn9HuZOnIxN0hoP+VmmDGMN5t9UJ0Z" crossorigin="anonymous">
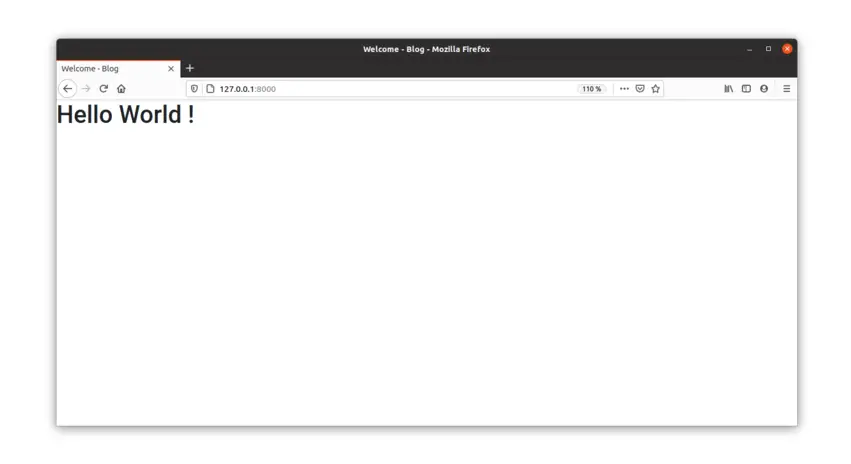
<title>{% block head_title %}Welcome - Blog{% endblock %}</title>
</head>
<body>
<h1>Hello World !</h1>
<!-- jQuery first, then Popper.js, then Bootstrap JS -->
<script src="https://code.jquery.com/jquery-3.5.1.slim.min.js"
integrity="sha384-DfXdz2htPH0lsSSs5nCTpuj/zy4C+OGpamoFVy38MVBnE+IbbVYUew+OrCXaRkfj"
crossorigin="anonymous"></script>
<script src="https://cdn.jsdelivr.net/npm/popper.js@1.16.1/dist/umd/popper.min.js"
integrity="sha384-9/reFTGAW83EW2RDu2S0VKaIzap3H66lZH81PoYlFhbGU+6BZp6G7niu735Sk7lN"
crossorigin="anonymous"></script>
<script src="https://stackpath.bootstrapcdn.com/bootstrap/4.5.2/js/bootstrap.min.js"
integrity="sha384-B4gt1jrGC7Jh4AgTPSdUtOBvfO8shuf57BaghqFfPlYxofvL8/KUEfYiJOMMV+rV"
crossorigin="anonymous"></script>
</body>
</html>
It is recommended adding Bootstrap in a project via CDN (Content Delivery Network) for multiple reasons:
- They are hosting the files on multiple servers, so the loading time is reduced.
- The libraries are automatically updated.
- SEO improved ...
After that we need to tell Django where to find our application's templates.
# blog/settings.py

TEMPLATES = [
  {
      'BACKEND': 'django.template.backends.django.DjangoTemplates',
      'DIRS': [BASE_DIR / 'templates'],  # <-- add this
      'APP_DIRS': True,
      'OPTIONS': {
          # ...
          ],
      },
  },
]
The last step is to have a view that render the HTML file above. We are going to use a class based view.
Open the urls.py file and add the code below:
# blog/urls.py
# ...
from django.views.generic import TemplateView

urlpatterns = [
    path('admin/', admin.site.urls),
    path('', TemplateView.as_view(template_name='base.html'), name='home')
]
If you run the server you should see the result below:
Finally, let's create a superuser and add a requirements.txt file:
(venv) $ python manage.py createsuperuser
Username: test
Email address:
Password:             # 1234
Password (again):     # 1234
# ...
Superuser created successfully.
(venv) $ pip freeze > requirements.txt
Ok, so far so good! We have all the pieces in place to start the core of our project. The blog!
I hope you enjoyed going through this first part of the tutorial as much as I enjoyed writing the content. See you in the next part.
If you are looking for the source code for this part of the tutorial you can find it at this link in GitHub: https://github.com/Rouizi/django-blog/tree/v0.1
Nice content
May 16, 2021, 7:27 p.m.
Thank you @Lucretius
May 16, 2021, 8:47 p.m.
excellent work
Aug. 13, 2021, 1:22 p.m.
Thank you @Mohamed
Aug. 16, 2021, 5:34 p.m.
Please can anyone help me here. I am running the codes here on windows 10. When I ran the code:
"sudo -u postgres psql" , I got the following error message:
'sudo' is not recognized as an internal or external command,
''sudo'' is not recognized as an internal or external command,
operable program or batch file.
Apparently the code I typed in is not compatible with windows. I wonder if anyone can help me get a command prompt line that is compatible with windows.
Thanks.
Jan. 10, 2022, 1:12 a.m.
Yes Tony this command is for Linux users. For windows, I think there is an SQL shell that you can open, or otherwise, you'll need to install pgadmin.
Please refer to this tutorial to learn more: https://www.postgresqltutorial.com/connect-to-postgresql-database/
Jan. 10, 2022, 10:20 a.m.
@Yacine. Thanks for the help. I'll follow the link and see where it leads. Thanks.
Jan. 10, 2022, 3:26 p.m.
@Tony No problem
Jan. 10, 2022, 8:09 p.m.
May 1, 2021, 11:19 a.m.