Please consider supporting us by disabling your ad blocker. Thank you for your support.
Please consider supporting us by disabling your ad blocker.
Django blog tutorial part 5: Deployment on Heroku
This is the fifth part of our tutorial series! We are going to deploy our Django application to the Heroku cloud platform.
Heroku is a platform as a service that is very easy to set up and has a free service level for small projects, which is quite limited though.
We will continue where we left off in the fourth part. If you want to follow along with me, download the source code of the project from this link: https://github.com/Rouizi/django-blog/tree/v0.4
Below, I included a list of the articles in this series:
- Django blog tutorial part 1: Project Configuration
- Django blog tutorial part 2: Model View Template
- Django blog tutorial part 3: Authentication and Profile Page
- Django blog tutorial 4: Posts and Comments
- Django blog tutorial part 5: Deployment on Heroku (This post)
- Django blog tutorial part 6: Setting Up an Email Service
- Django blog tutorial part 7: Serving Media Files From Amazon S3
Login to Heroku
To be able to deploy on Heroku, you will need an account on their platform. So if you don't have one, create one.
Heroku provides a Command Line Interface (CLI) to interact with their servers directly from your console. Go ahead and install it.
Once the CLI is installed, run the heroku login command to log in to your account:
heroku login

heroku: Press any key to open up the browser to login or q to exit:
Opening browser to https://cli-auth.heroku.com/auth/cli/browser/cda1e4f1-5db6-4552-bc1a-7689421dc318?requestor=SFMyNTY.g3QAAAACZAAEZGF0YW0AAAAMMTc2LjEzNC42LjYzZAAGc2lnbmVkbgYAsLzl1HQB.8Hjpqi07BUtJ4c6uu2gxWRHJK27BMjQ8KOHgJs0WD60
Logging in... done
Logged in as cinorouizi@gmail.com
Project Settings
First, let's clone the code from GitHub:
git clone https://github.com/Rouizi/django-blog.git
cd django-blog/
git checkout v0.4
rm -rf .git    # remove my .git folder
python3 -m venv venv
source venv/bin/activate
pip install -r requirements.txt
The git checkout command switches the branch to v0.4 of the project history, which corresponds to this part of the tutorial.
Now, let's deactivate the debug mode:
# blog/settings.py
import os
# ...

if os.environ.get('ENV') == 'PRODUCTION':
    DEBUG = False
else:
    DEBUG = True
It is also recommended having a different secret key in development and in production:
# ...
SECRET_KEY = os.environ.get('SECRET_KEY', '+ga99@m8781l5hl0d@k&3%b2do$sw!xjpt2)_0eple#(vdxx@(')
# ...
Here, we are trying to get the environment variable SECRET_KEY and if it is not set we use a default secret key.
When we create an application with the heroku command, Heroku associates it with a domain name of the form nameofyourapp.herokuapp.com.
Later, I will create an app named django-blog-rouizi, so I need to add its URL in the ALLOWED_HOSTS variable:
# blog/settings.py
# ...
ALLOWED_HOSTS = ["django-blog-rouizi.herokuapp.com"]
# ...
Static Files
In development, we used the Django server to serve static files. However, Django does not support serving static files in production, so we are going to use the WhiteNoise project for that.
First let's add the following to settings.py:
# blog/settings.py
# ...
if os.environ.get('ENV') == 'PRODUCTION':
    STATIC_ROOT = BASE_DIR / 'staticfiles'
Now install WhiteNoise:
pip install whitenoiseEdit the settings.py file again to integrate WhiteNoise:
# blog/settings.py
# ...
MIDDLEWARE = [
    'django.middleware.security.SecurityMiddleware',
    'whitenoise.middleware.WhiteNoiseMiddleware',
    # ...
]
# ...
if os.environ.get('ENV') == 'PRODUCTION':
    # ...
    # compression and caching support
    STATICFILES_STORAGE = 'whitenoise.storage.CompressedManifestStaticFilesStorage'
Database Configuration
First, we need the dj-database-url package:
pip install dj-database-urlThen edit the settings.py file like this:
# blog/settings.py
import dj_database_url
# ...

if os.environ.get('ENV') == 'PRODUCTION':
    # ...
    DATABASES['default'] = dj_database_url.config(conn_max_age=600, ssl_require=True)
Finally, let's use environment variables in the DATABASES dictionary:
# blog/settings.py
# ...

DATABASES = {
    'default': {
        'ENGINE': 'django.db.backends.postgresql',
        'NAME': os.environ.get('NAME'),
        'USER': os.environ.get('USER'),
        'PASSWORD': os.environ.get('PASSWORD'),
        'HOST': '',
        'PORT': 5432
    }
}
Procfile and Requirements Files
To set up the production environment, Heroku expects the dependencies to be in the requirements.txt file. Heroku also reads the Procfile file to know how to run the application.
Note!
The Procfile file must be in the root directory of the application (at the same level as manage.py) and starts with a capital letter.
Create the Procfile in the root directory:
touch ProcfileAnd add this line to it:
web: gunicorn blog.wsgiNow we need to install the Gunicorn web server:
pip install gunicorn
Update the requirements.txt file:
pip freeze > requirements.txtCreating a New Heroku Application
We need first to initialize a Git repository and commit our application code to it (initializing a Git repository must be in the app’s root directory):
git init
git add .
git commit -m "preparing to deployment"
To create a new app, we use the command heroku create nameofyourapp:
heroku create django-blog-rouizi

Creating ⬢ django-blog-rouizi... done
https://django-blog-rouizi.herokuapp.com/ | https://git.heroku.com/django-blog-rouizi.git
The name of the app must be unique, so you have to choose another name for your deployment.
Now we need to set the environment variables. We can do this via the Heroku CLI:
heroku config:set ENV="PRODUCTION"
heroku config:set SECRET_KEY="QstedJXq8cx0c>j^uu6mofx0c7tCadXVEWV-$G(^+V#UtwwfHmX{JylM:5"
heroku config:set NAME="blog"
heroku config:set USER="test"
heroku config:set PASSWORD="1234"
To generate a new secret key, you can use the Python shell:
python manage.py shell

>>> import random, string
>>> "".join([random.choice(string.printable) for _ in range(50)])
"QstedJXq8cx0c>j^uu6mofx0c7tCadXVEWV-$G(^+V#UtwwfHmX{JylM:5"
Deploying the Application
To push the application, we simply use the git push command:
git push heroku master

Enumerating objects: 72, done.
Counting objects: 100% (72/72), done.
Delta compression using up to 4 threads
Compressing objects: 100% (66/66), done.
Writing objects: 100% (72/72), 155.31 KiB | 10.35 MiB/s, done.
Total 72 (delta 12), reused 0 (delta 0), pack-reused 0
remote: Compressing source files... done.
remote: Building source:
remote:
remote: -----> Python app detected
remote: -----> Installing python-3.6.12
remote: -----> Installing pip 20.1.1, setuptools 47.1.1 and wheel 0.34.2
remote: -----> Installing SQLite3
remote: -----> Installing requirements with pip
# ...
remote: -----> $ python manage.py collectstatic --noinput
remote:        133 static files copied to '/tmp/build_ec88b10a/staticfiles', 421 post-processed.
remote:
remote: -----> Discovering process types
remote:        Procfile declares types -> web
remote:
remote: -----> Compressing...
remote:        Done: 55.8M
remote: -----> Launching...
remote:        Released v15
remote:        https://django-blog-rouizi.herokuapp.com/ deployed to Heroku
remote:
remote: Verifying deploy... done.
To https://git.heroku.com/django-blog-rouizi.git
 * [new branch]      master -> master
The last thing to do is to run the migrations:
heroku run python manage.py migrate

Running python manage.py migrate on ⬢ django-blog-rouizi... up, run.8207 (Free)
Operations to perform:
  Apply all migrations: admin, auth, contenttypes, core, sessions, users
# ...
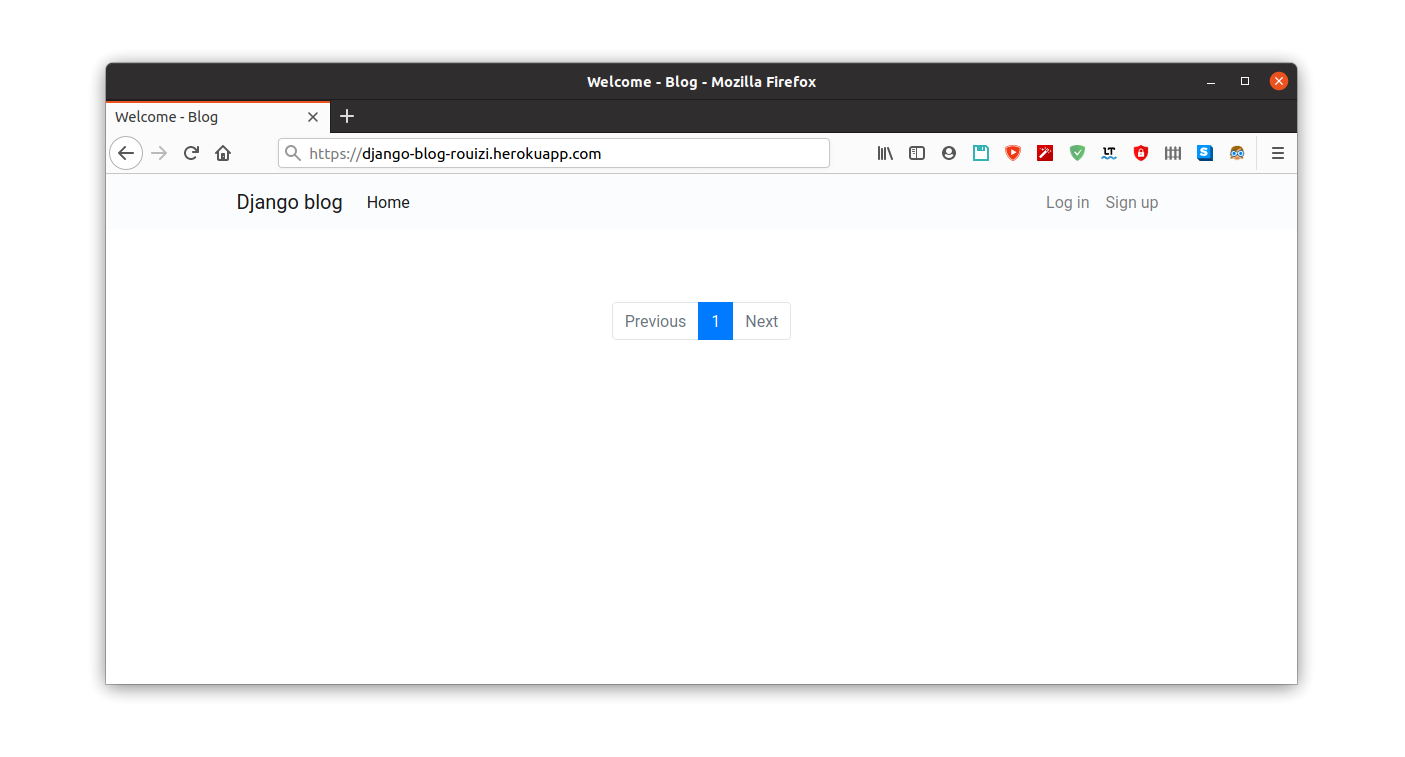
You can visit the URL django-blog-rouizi.herokuapp.com to access the application (I added some posts via the admin site.):
Even though the application is working, we still have two problems to fix: the first one is that we have to set up an email service so that users can reset their password, the second is that user-uploaded files are not displayed. This is because Heroku uses dynos to run the application and dynos go to sleep after 30 minutes. This makes Heroku unsuitable for permanent data storage. For that, we are going to use Amazon Simple Storage Service (S3) for storing and serving media files.
Let's stop here for now, we'll do this configuration in the next part.
You can find the source code of the project, including this part, on GitHub at this link: https://github.com/Rouizi/django-blog/tree/v0.5
Previous Article
Django blog tutorial part 4: Posts and Comments
Next Article

Django blog tutorial part 6: Setting Up an Email Service
Hi Yakup, Thanks for reaching out.
Since you have this error I think that your project's manage.py file is probably not present at the root of your project's git repository.

Also, as I mentioned in the tutorial, make sure that The Procfile file is in the root directory of the application (at the same level as manage.py) and starts with a capital letter.

Please read this question on StackOverflow: https://stackoverflow.com/questions/57418727/django-heroku-python-cant-open-file-manage-py-errno-2-no-such-file-or-d

I hope this will help to solve your issue.
Feb. 23, 2022, 11:06 p.m.
Feb. 23, 2022, 9:58 p.m.