Please consider supporting us by disabling your ad blocker. Thank you for your support.
Please consider supporting us by disabling your ad blocker.
Django blog tutorial part 7: Serving Media Files From Amazon S3
Welcome everyone to the part 7 of the Django blog tutorial series. It's been a long time since the last part in this series, so I am going to explain a bit what we did in this tutorial series and what we are going to do today.
In this tutorial series we have built a Django blog application, and in part 5, we've finally deployed our application on Heroku.
We still had two small issues to resolve:
- The first one was to set up an email service for reset passwords, which we have already done in part 6.
- The second thing we had to do was to serve our media files with Amazon S3 bucket.
So in this tutorial, we are going to set up Amazon S3 to handle our media files.
Grab a copy of the project from GitHub and let's get started.
Below, I included a list of the articles in this series:
- Django blog tutorial part 1: Project Configuration
- Django blog tutorial part 2: Model View Template
- Django blog tutorial part 3: Authentication and Profile Page
- Django blog tutorial 4: Posts and Comments
- Django blog tutorial part 5: Deployment on Heroku
- Django blog tutorial part 6: Setting Up an Email Service
- Django blog tutorial part 7: Serving Media Files From Amazon S3 (This post)
AWS Identity and Access Management (IAM)
We are going to store and serve our Django's media files via an Amazon S3 bucket.
For security, it is recommended to create an IAM user (Identity and Access Management) that has only access to our S3 bucket.
Sign in to the AWS console and click on Services on the top left.
Under Security, Identity, & Compliance click on IAM or you can simply tap IAM in the search bar.

Click on the Users tab and then Add user:

Define a username and choose the programmatic access option and click on the Next: Permissions button:

Now we need to create a new group with the AmazonS3FullAccess permissions and add our user to it.
Click on the Create group button:

Choose a name for the group and select the AmazonS3FullAccess policy from the list and click on the Create group button:

Click on the Next: Tags button. In step 3 you can add a Tag if you want, and in step 4 you can review the information.
If everything is correct, click on the Create user button, you should see this page:

Download the user's credentials and let's move on to the S3 bucket part.
Amazon Simple Storage Service (S3)
Basically, a bucket is like a directory that will contain all our files.
To create one, click on the Services menu, and under Storage click on S3. In the next page, click on the Create bucket button to create a bucket:

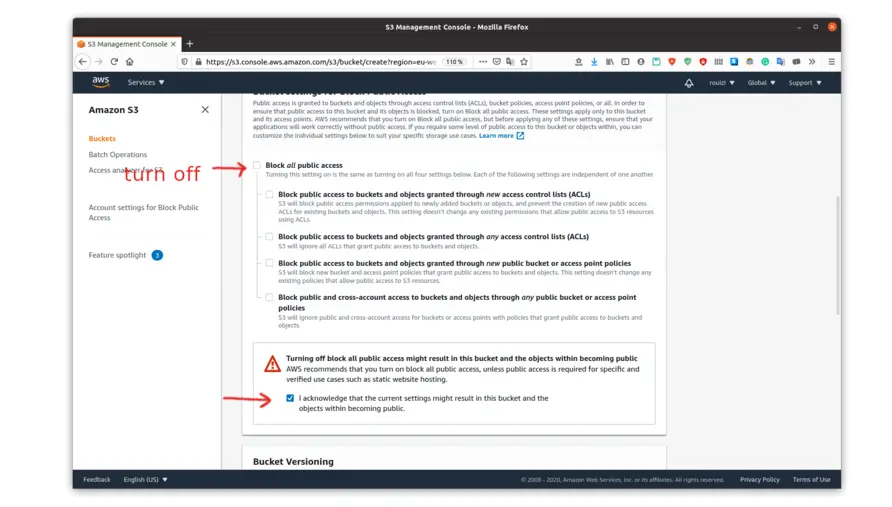
Give a name for the bucket and select a region. Then, on the "Bucket settings for Block Public Access" section turn off "Block all public access":
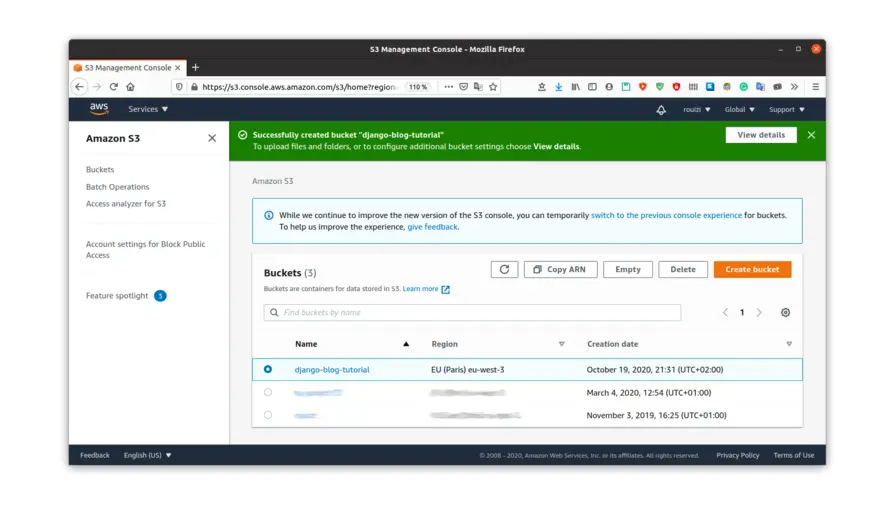
Scroll down and click on the Create bucket button. You should see your bucket in the list:
Next, click on the bucket name. On the next page, navigate to the Permissions tab:

Then scroll down to the bucket policy section and add the following code:
{
    "Version": "2012-10-17",
    "Statement": [
        {
            "Effect": "Allow",
            "Principal": "*",
            "Action": [
                "s3:PutObject",
                "s3:PutObjectAcl",
                "s3:GetObject",
                "s3:GetObjectAcl",
                "s3:DeleteObject"
            ],
            "Resource": "arn:aws:s3:::django-blog-tutorial/*"
        }
    ]
}
Make sure to replace django-blog-tutorial with your bucket name.
Now return to the Objects tab and click the on "Create folder" button and add a folder named media. This folder will contain all the uploaded images.

We also need to create a profile_image folder inside the media folder, which will contain the users profile images:

Now let's return to our Django application.
Installation
Now, we need to install 2 libraries: django-storages and boto3
pip install boto3
pip install django-storages
and add storages to INSTALLED_APPS in settings.py
INSTALLED_APPS = [
    'django.contrib.admin',
    'django.contrib.auth',
    'django.contrib.contenttypes',
    'django.contrib.sessions',
    'django.contrib.messages',
    'django.contrib.staticfiles',
    'users',
    'core',
    'storages',
]
We also need to update the requirements.txt file:
pip freeze > requirements.txt Media Files
We need to add the following configuration in settings.py module to handle media files:
# blog/settings.py

# s3 settings
AWS_ACCESS_KEY_ID = os.environ.get("AWS_ACCESS_KEY_ID", "")
AWS_SECRET_ACCESS_KEY = os.environ.get("AWS_SECRET_ACCESS_KEY", "")
AWS_STORAGE_BUCKET_NAME = os.environ.get("S3_BUCKET_NAME", "")
AWS_S3_CUSTOM_DOMAIN = os.environ.get("AWS_S3_CUSTOM_DOMAIN", "")
AWS_S3_OBJECT_PARAMETERS = {'CacheControl': 'max-age=86400'}

MEDIA_ROOT = BASE_DIR / 'media' # remove this
MEDIA_URL = '/media/'           # remove this

if os.environ.get('ENV') == 'PRODUCTION':
    # ...
    # s3 public media settings
    PUBLIC_MEDIA_LOCATION = 'media'
    MEDIA_URL = f'https://{AWS_S3_CUSTOM_DOMAIN}/{PUBLIC_MEDIA_LOCATION}/'
    DEFAULT_FILE_STORAGE = 'blog.storage_backends.MediaStorage'
else:
    # ...
    MEDIA_ROOT = BASE_DIR / 'media'
    MEDIA_URL = '/media/'
You can see that the DEFAULT_FILE_STORAGE variable is pointing to the storage_backends file, which does not yet exist.
So, First, create the file storage_backends.py inside the blog folder, then add the following code in storage_backends.py:
# blog/storage_backends.py
from storages.backends.s3boto3 import S3Boto3Storage
from django.conf import settings


class MediaStorage(S3Boto3Storage):
    location = 'media'
    default_acl = 'public-read'
    file_overwrite = False
This class simply override the default S3Boto3Storage class to have a custom storage backend.
Now we need to add the environment variables to Heroku:
heroku config:set AWS_ACCESS_KEY_ID="your-aws-access-key-id"
heroku config:set AWS_SECRET_ACCESS_KEY="your-aws-secret-access-key"
heroku config:set S3_BUCKET_NAME="django-blog-tutorial"
heroku config:set AWS_S3_CUSTOM_DOMAIN="django-blog-tutorial.s3.amazonaws.com"
You can find the AWS_ACCESS_KEY_ID and AWS_SECRET_ACCESS_KEY in the file you downloaded above when you created the IAM user.
And that's it! We are ready to commit the changes and push to production:
git add blog/settings.py blog/storage_backends.py requirements.txt
git commit -m 'setting up aws'
git push heroku master
Don't forget to log in to Heroku, using heroku login, if you are not logged in.
Also, if you are not following this tutorial series from the beginning, you will need to create an app on Heroku with the command: heroku create your-app-name
Now navigate to your application, you should be able to upload media files:

Summary
In this tutorial, we saw how to create an IAM user, a group, and how to set up our Django application to upload and serve media files from an Amazon S3 bucket.
This was the last part of this tutorial series. I hope you enjoyed it and let me know in the comment section what you think.
Also, feel free to suggest topics for future articles if you ever have any.
Previous Article
Django Pagination With Class Based View
Next Article

April 25, 2022, 3:56 p.m.