Please consider supporting us by disabling your ad blocker. Thank you for your support.
Please consider supporting us by disabling your ad blocker.
Django blog tutorial part 2: Model View Template
This is the second part of the Django blog tutorial series. In this part, we are going to explore the MVT architecture.
We will build the home page that lists all the blog posts and a second page that display all the details about a single post.
We will continue where we left off in the previous part. If you want to follow along with me, clone the source code of the project from this link: https://github.com/Rouizi/django-blog/tree/v0.1
Below, I included a list of the articles in this series:
- Django blog tutorial part 1: Project Configuration
- Django blog tutorial part 2: Model View Template (This post)
- Django blog tutorial part 3: Authentication and Profile Page
- Django blog tutorial 4: Posts and Comments
- Django blog tutorial part 5: Deployment on Heroku
- Django blog tutorial part 6: Setting Up an Email Service
- Django blog tutorial part 7: Serving Media Files From Amazon S3
Creating The First Models
Django uses the ORM to wrap all rows loaded from the database into a series of models. Models are Python objects and each attribute in these models corresponds to a column in a database.
We will start with the Post and the Tag models. Write the following code in the empty file core/models.py:
# core/models.py
from django.db import models
from django.conf import settings

class Tag(models.Model):
  name = models.CharField(max_length=40)

  def __str__(self):
      return self.name

class Post(models.Model):
    title = models.CharField(max_length=200, db_index=True)
    slug = models.SlugField(max_length=200, db_index=True)
    author = models.ForeignKey(settings.AUTH_USER_MODEL, on_delete= models.CASCADE)
    content = models.TextField()
    image = models.ImageField(upload_to='', blank=True, null=True)
    tags = models.ManyToManyField(Tag, blank=True)
    created_on = models.DateTimeField(auto_now_add=True)
    updated_on = models.DateTimeField(auto_now= True)

    class Meta:
        ordering = ['-created_on']

    def __str__(self):
        return self.title
Since we are going to do a lot of lookups on the fields title and slug, I added the parameter db_index=True to speed up searches on these columns.
The on_delete=models.CASCADE parameter means that if the author of the post is deleted, we also want her post to be deleted.
The parameter blank=True tells Django that this field is not required. This includes the admin and our custom forms. And null=True allow NULL values for that field in the database.
The auto_now_add and auto_now parameters, available only for date/datetime fields, are managed by Django: the first one sets the field to now when a Post object is created and the second one set the field to now every time a Post object is updated.
In the Meta class, the option ordering sets the default order when selecting data with this model. Here, the posts will by default be sorted by creation date (from newest to oldest).
Before we run the migration, we need to install an additional library required for the ImageField field called Pillow:
(venv) $ pip install Pillow
Collecting Pillow
  Using cached Pillow-7.2.0-cp38-cp38-manylinux1_x86_64.whl (2.2 MB)
Installing collected packages: Pillow
Successfully installed Pillow-7.2.0
(venv) $ pip freeze > requirements.txt
Now we can run the migrations:
(venv) $ python manage.py makemigrations
Migrations for 'core':
  core/migrations/0001_initial.py
    - Create model Tag
    - Create model Post
(venv) $ python manage.py migrate
Operations to perform:
  Apply all migrations: admin, auth, contenttypes, core, sessions, users
Running migrations:
  Applying core.0001_initial... OK
Since we are managing user-uploaded files, we need to tell Django where to store these files, and where to serve them from. Add the code below in blog/settings.py:
# blog/settings.py
# ...
MEDIA_ROOT = BASE_DIR / 'media'
MEDIA_URL = '/media/'
HomeView and PostView
In the previous chapter, we used a simple CBV (TemplateView) to display our home page. We are going to replace it with another CBV to list all the posts. Here is what we are going to do:
# blog/urls.py
# ...
from django.conf.urls import include              # <-- add this
from django.views.generic import TemplateView     # <-- remove this

urlpatterns = [
    path('admin/', admin.site.urls),
    path('', TemplateView.as_view(template_name='base.html'), name='home')    # <-- remove this
    path('', include(('core.urls', 'core'), namespace='core')),               # <-- add this
]
Now open the file core/views.py and add the following:
# core/views.py
from django.shortcuts import render
from django.views.generic import ListView, DetailView
from django.shortcuts import get_object_or_404

from .models import Post

class HomeView(ListView):
    template_name = 'core/home.html'
    queryset = Post.objects.all()
    paginate_by = 2

class PostView(DetailView):
    model = Post
    template_name = 'core/post.html'

    def get_context_data(self, **kwargs):
        context = super().get_context_data(**kwargs)
        # since our slug field is not unique, we need the primary key to get a unique post
        pk = self.kwargs['pk']
        slug = self.kwargs['slug']

        post = get_object_or_404(Post, pk=pk, slug=slug)
        context['post'] = post
        return context
These new views need an entry in the urlpatterns, create the file urls.py in the core app and add the following:
# core/urls.py
from django.urls import path
from .views import HomeView, PostView

urlpatterns = [
    path('', HomeView.as_view(), name='home'),
    path('post/<pk>/<slug:slug>', PostView.as_view(), name='post'),
]
Django Admin
Before we create the HTML pages, let's add some dummy data via the Django admin site. First, we need to register our models to the admin. Open the file core/admin.py and add the following code:
# core/admin.py
from django.contrib import admin
from .models import Post, Tag

class PostAdmin(admin.ModelAdmin):
    list_display = ('title', 'created_on', 'updated_on')
    list_filter = ('tags', 'created_on', 'updated_on')
    search_fields = ('title',)
    prepopulated_fields = {'slug': ('title',)} # this create the slug field from the title field
    autocomplete_fields = ('tags',)

admin.site.register(Post, PostAdmin)

# TagAdmin must define "search_fields", because it's referenced by PostAdmin.autocomplete_fields.
class TagAdmin(admin.ModelAdmin):
    search_fields = ('name',)

admin.site.register(Tag, TagAdmin)
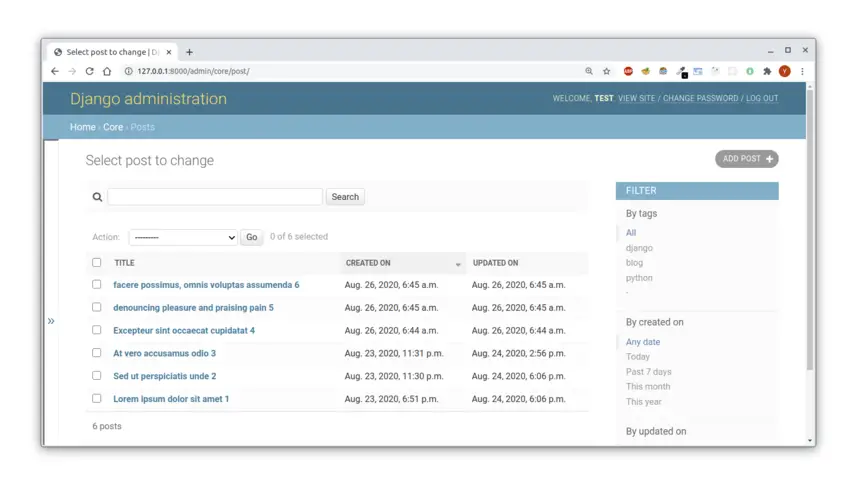
The option autocomplete_fields is useful when a field refers to another table with many entities, in our case the tags field refers to the Tag table. This makes it simple to select multiple choices.
You can see the result for this simple customization in the image below:
Templates
The last thing we need is a template. First, let's start with the base.html file to add a navigation bar:
<!-- templates/base.html -->
<!-- ... removed for brevity -->
<body>
  <nav class="navbar navbar-expand-sm navbar-light bg-light">
  <div class="container">
    <a href="{% url 'core:home' %}" class="navbar-brand">Django blog</a>
    <button type="button" class="navbar-toggler" data-toggle="collapse" data-target="#navbarCollapse">
      <span class="navbar-toggler-icon"></span>
    </button>
    <div class="collapse navbar-collapse justify-content-between" id="navbarCollapse">
      <div class="navbar-nav">
        <a href="{% url 'core:home' %}" class="nav-item nav-link">Home</a>
      </div>
    </div>
  </div>
</nav>
{% block content %}
{% endblock content %}
<!-- ... removed for brevity -->
I am using the Bootstrap navbar, nothing special!
Now create the folder core inside the templates directory and the file home.html inside the core folder:
├── myproject/
    ├── blog
    ├── core
    ├── manage.py
    ├── requirements.txt
    ├── templates
    │   └── base.html
    │   ├── core/          # the core folder
    │   ├── home.html  # the home file
    ├── users
    └── venv
And add this content inside the home.html file:
<!-- templates/core/home.html -->
{% extends 'base.html' %}

{% block content %}
<div class="container mt-5">

  <div class="row">
    {% for post in object_list %}
    <div class="card col-lg-6 offset-lg-3 mb-3">
      {% if post.image %}
      <img class="card-img-top mt-3" src="{{ post.image.url }}" alt="{{ post.title }}">
      {% endif %}
      <div class="card-body">
        <a href="{% url 'core:post' post.id post.slug %}">
          <h2 class="card-title my-3">{{ post.title }} </h2>
        </a>
        <div class="text-muted mb-3">
          <div>
            <span>created: {{ post.created_on|date:"N j Y" }} |</span>
            <span>updated: {{ post.updated_on|timesince }} ago |</span>
            <span>author: {{ post.author }}</span>
          </div>
          <div>
            {% for tag in post.tags.all %}
            <span class="badge badge-dark">{{ tag }}</span>
            {% endfor %}
          </div>
        </div>
        <p class="card-text">{{ post.content|truncatewords:20 }}</p>
        <a class='btn btn-primary' href="{% url 'core:post' post.id post.slug %}">Read more ...</a>
      </div>
    </div>
    {% endfor %}
  </div>

  <!-- Pagination -->
  <div class="row">
    <nav class="col-lg-6 offset-lg-3 mt-4 d-flex justify-content-center">
      <ul class="pagination">

        {% if page_obj.has_previous %}
        <li class="page-item">
          <a class="page-link" href="?page={{ page_obj.previous_page_number }}">Previous</a>
        </li>
        {% else %}
        <li class="page-item disabled">
          <a class="page-link" href="#"">Previous</a>
        </li>
        {% endif %}

        {% for i in page_obj.paginator.page_range %}
        <li class=" page-item {% if page_obj.number == i %}active{% endif %}">
            <a class="page-link" href="?page={{ i }}">{{ i }}</a>
        </li>
        {% endfor %}

        {% if page_obj.has_next %}
        <li class="page-item">
          <a class="page-link" href="?page={{ page_obj.next_page_number }}">Next</a>
        </li>
        {% else %}
        <li class="page-item disabled">
          <a class="page-link" href="#">Next</a>
        </li>
        {% endif %}

      </ul>
    </nav>
  </div>
  <!-- /Pagination -->

</div>
{% endblock %}
Remember that we used ListView to render this page, this is why our posts are contained in the object_list variable.
Another thing to notice is post.tags.all, this is equivalent to post.tags.all() in view. This selects all tags that that post belongs to.
The page_obj variable contains some useful information, like the number of pages.
Let's see how the template above looks when rendered:
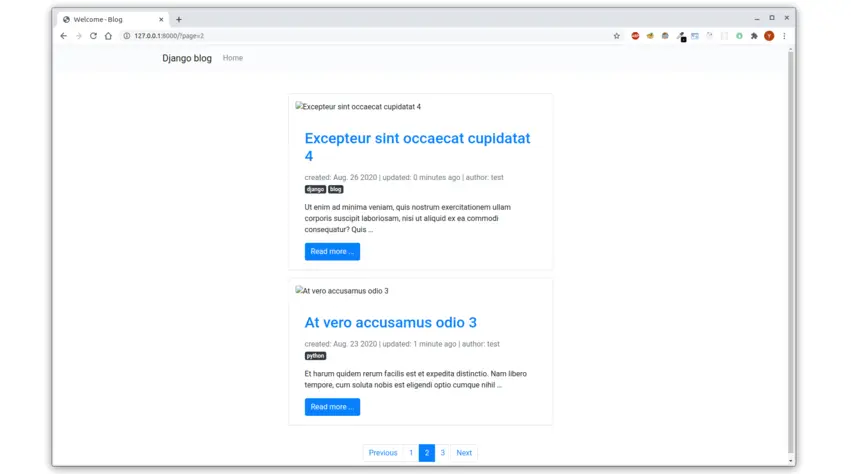
It seems that user-uploaded images are not displayed. To fix this, open the file blog/urls.py and add the following:
# blog/urls.py
# ...
from django.conf import settings
from django.conf.urls.static import static

# ...
urlpatterns += static(settings.MEDIA_URL, document_root=settings.MEDIA_ROOT)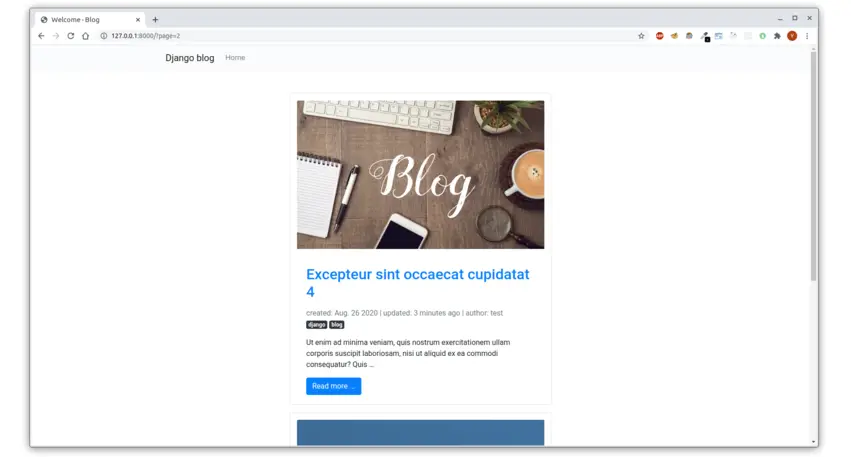
That's enough for the home page. Let's jump now to the post page.
Create a file post.html at the same level where the home.html file live:
<!-- templates/core/post.html -->
{% extends 'base.html' %}

{% block head_title %}{{ post.title }}{% endblock %}

{% block content %}
<div class="container-fluid my-5">
  <div class="row">
    <div class="col-lg-6 offset-lg-3">

      <div class="card">
        <h2 class="card-title text-center my-3">{{ post.title }}</h2>
        <div class="text-muted text-center mb-3">
          <div>
            created: {{ post.created_on|date:"N j Y" }},
            last updated: {{ post.updated_on|timesince }},
            by <a class="badge badge-secondary" href="#">{{ post.author }}</a>
          </div>
          <div>
            {% for tag in post.tags.all %}
            <span class="badge badge-dark">{{ tag }}</span>
            {% endfor %}
          </div>
        </div>
        {% if post.image %}
        <img class="card-img-top" src="{{ post.image.url }}" alt="{{ post.title }}">
        {% endif %}
        <div class="card-text mt-5 p-4">
          {{ post.content }}
        </div>
      </div>

    </div>
  </div>
</div>
{% endblock content %}
The code is pretty similar to the one on the home page. You can see the result in the image below:
 This ends our second chapter for this tutorial series. I hope you enjoyed the content.
You can find the source code of the project, including this chapter, on GitHub at this link: https://github.com/Rouizi/django-blog/tree/v0.2
If you have any questions or want to say something please leave a comment in the section below.
Previous Article
Django blog tutorial part 1: Project Configuration
Next Article